By: Team W9-02 (Health Hub) Since: Jan 2019 Licence: MIT
- 1. Introduction
- 2. Notation
- 3. Quick Start
- 4. Change Log
- 5. Features
- 5.1. Viewing Help :
help - 5.2. Showing all requests/health workers :
list - 5.3. Adding requests/health workers:
add - 5.4. Editing requests/health workers :
edit - 5.5. Filtering health workers/requests:
filter - 5.6. Deleting requests/health workers :
delete - 5.7. Assigning requests to a health worker :
assign - 5.8. Clearing Requests :
clr - 5.9. Closing Requests :
complete - 5.10. Undoing Commands :
undo - 5.11. Redoing undone commands :
redo - 5.12. Listing previous commands :
history - 5.13. Viewing a request :
select - 5.14. Setting Reminder Alerts:
setreminder - 5.15. Getting health condition statistics:
statistics - 5.16. Exiting the program :
exit - 5.17. Saving the data
- 5.1. Viewing Help :
- 6. FAQ
- 7. Command Summary
1. Introduction
Health Hub connects home care patients to qualified health care professionals seamlessly.
Health Hub is a desktop application which allows health administrative staff to add, manage and close requests from
patients. These patients are people who do not require 24-hour round' the clock medical attention but perhaps some
other health care services such as the changing of tubing.
Health Hub provides a Graphical User Interface for administrative staff of health organizations and hospitals to manage requests
from all potential home stay patients, and is also optimized for those who prefer to work with a Command Line Interface (CLI).
Want to jump right into using Health Hub? Head over to Section 3, “Quick Start” to install and configure the application, and you’re good to go!
2. Notation
-
Words that are highlighted with a grey background in monospaced font represent a
parameterorcommandthat is present or are to be used in the application. -
All numbers mentioned with commands begins with the number 1, representing the first item in the list.
-
Words that are highlighted in white represent a keyboard button that can be pressed to invoke a described function.
|
Documentation displayed under the this section may be additional useful information regarding HealthHub. |
|
Information under this section denotes shortcuts and alternative commands to the format of certain functions in HealthHub. |
|
Information under this section highlights potential risks that may happen in using a specific feature. |
3. Quick Start
New to Health Hub? Follow our quick and easy steps below to get started on Health Hub in no time!
Before you start, ensure you have Java version 9 or later installed in your computer.
|
If you do not have Java 9 installed, you may download the latest version of the Java Runtime Environment at this link: https://www.oracle.com/technetwork/java/javase/downloads/index.html |
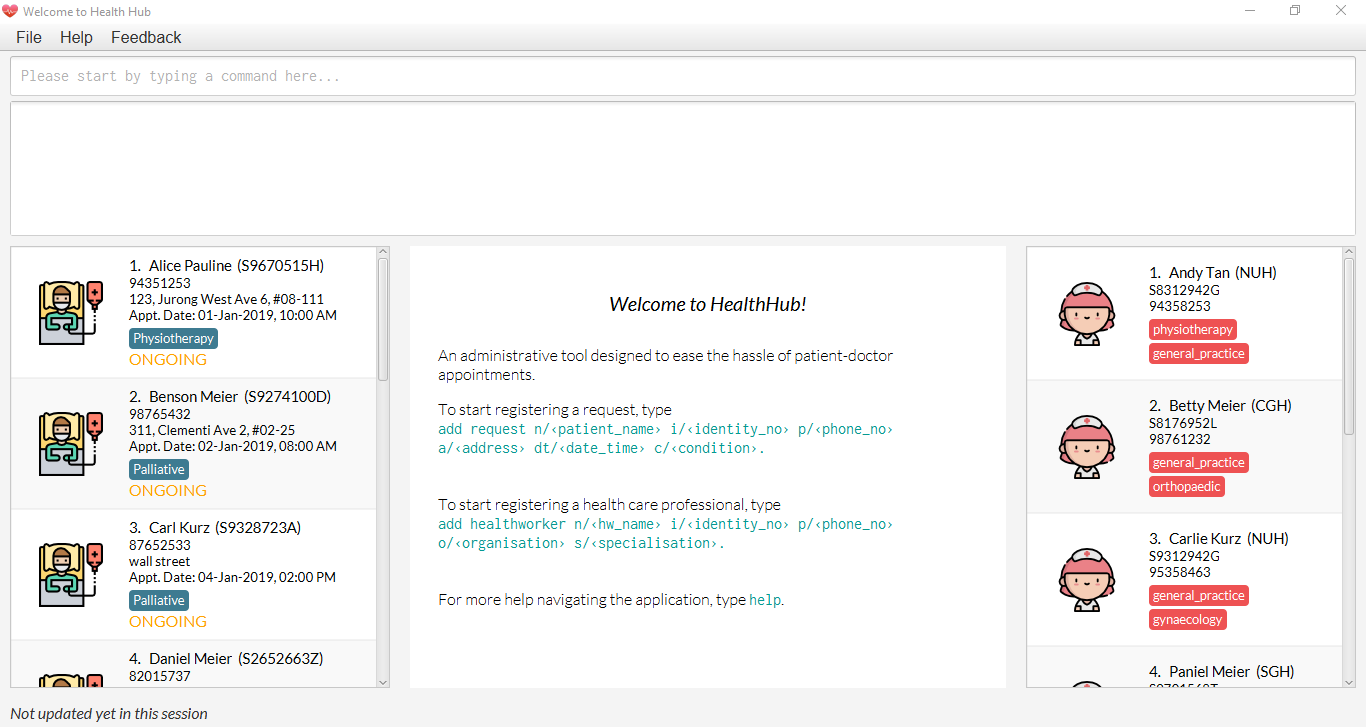
Upon installing the application, click on the healthhub.jar file to open up
Health Hub. You should be greeted by the following interface:
-
Type the command in the command box and press Enter to execute it.
e.g. typinghelpand pressing Enter will open the help window. -
Some example commands you can try:
-
list: lists all requests -
add3 i/3 n/John Doe p/98765432 a/John street, block 123, #01-01: adds a patient namedJohn Doeto the application. -
delete4 n/4: deletes the 4th request shown by the list command -
exit: exits the application, saving any changes made to the parameters in the application.
-
-
Refer to Section 5, “Features” for a detailed explanation of each command.
4. Change Log
Returning user but not sure what has changed since you left?
Listed below are the enhancements made to HealthHub, their version releases and the respective improvement made:
4.1. v1.1 Release Notes
In this patch, the functionality to register new health workers into the
application has been implemented. Users may now also add new requests from
patients into Health Hub for future assignment using the assign command.
-
add healthworkercommand: Adds a health worker to the application, for future assignment to open requests in HealtHub. For details on the -
add requestcommand: Registers a new open request into the application. The open request can then be assigned by the user using theassigncommand.
For more explicit information on the add command, visit Section 5, “Features”,
under Adding a Health Worker/Request.
-
assigncommand: Assigns an open request to an available health worker that is already registered in the system
4.2. v1.2 Release Notes
Version 1.2 provides more utility to the application through the
implementation of the edit and delete commands that allow the user to
modify and remove requests and health workers from the application.
-
edit healthworker/h/1: Modifies the details of an existing health staff registered in Health Hub. -
edit request/r/2: Modifies the details of existing request records in the application.
For more explicit information on the edit command, visit Section 5, “Features”,
under Editing a Health Worker/Request.
4.3. v1.3 Release Notes
With the release of version 1.3, we have set out to improve the already
simple and easy to use Health Hub with command shortcuts, as well as filter
command to easily search for staff with the skillset you are looking for.
Shortcuts:
-
add healthworker/h/1: Adds a health worker to the application. -
add request/r/2: Registers a new request for the hospital management to attend to.
Filtering requests and health workers:
-
filter healthworker/h/1: Filters a healthworker by the individual’s name, phone, organisation or specialisation. -
filter request/r/2: Filters a request by the patient’s name, address, or the date and time of the request and the status of the request
Other enhancements made to Health Hub include:
-
setremindercommand: Allows the user to set and register reminders in the application. -
undo/redocommand: Undo a previous action or redo a previously undone action.
For more explicit information on the filter,setreminder and undo/redo
command, visit Section 5, “Features”, under Filtering Health Workers/Requests.
4.4. v1.4 Release Notes
With the release of version 1.4, we decided to improve our current features by making them more dynamic and automated to reduce the manual work of changing the data.
-
The health worker field inside requests now shows the NRIC of the health worker instead of the name in previous versions.
-
Editing the NRIC of a health worker will dynamically change the health staff field of all requests assigned to the health worker.
-
Users can assign multiple requests to a health worker only if the requests are at least 2 hours apart.
4.5. v2.0 Release Notes
After the release of v1.4, the team have planned for future enhancements to Health Hub to improve its existing functionalities, by also considering different aspects such as the ethical part of handling sensitive patient information within and outside of the app.
For data management, it will be upgraded to an even higher level of encryption by professional standards to ensure that sensitive information is handled cautiously to prevent data leaks.
For account management, hospital administrative staff will have to start logging in to their accounts (accounts which are given to them when they first joined the department) in order to use the app. These accounts are created and managed by a higher authority personnel, to add a second layer of security.
So far, with the releases of v1.2 to v1.4, the focus is on registering the requests into the system and assigning them. In v2.0, there will be additional details added to health workers such as their availability to visit the home care patients, that will add value to when the user is assigning an open request.
Last but not least, it is important that we gather our users' feedback from time to time to understand their frustrations and needs with the app. As such, there will be a "Feedback" option in v2.0 for users to submit their feedback to the developers of Health Hub.
5. Features
The following description of the features and commands are prototypes and specific details and implementation may vary over the course of the project.
General Command Format:
-
Words in
<conditions>are the parameters to be supplied by the user e.g. inadd n/<name>,<name>is a parameter which can be used asadd n/John Doe. -
Items in square brackets are optional e.g
n/<name> [c/<condition>]can be used asn/John Doe c/Claustrophobiaor asn/John Doe. -
Items with
… after them can be used multiple times including zero times e.g.s/<specialisation>…can be used ast/friend,t/friend t/familyetc. -
Parameters can be in any order e.g. if the command specifies
n/<name> p/<phone_number>,p/<phonenumber> n/<name>is also acceptable.
Our application does not support command chaining. Inputting multiple commands onto the same line will result in only the first command to be executed.
For example, calling list r undo will only list the requests and not execute the undo command.
|
5.1. Viewing Help : help
Upon first starting the application as a new user, or perhaps a returning
user, you may open up the help menu using the help command.
Upon entering the help command, the help menu renders separately from the
Health Hub main application. Therefore, you do not have to worry about losing
any existing work on Health Hub when you are viewing the help menu!
Format: help
The help menu displays a list of available commands for Health Hub, their
parameters and their functions. Should you ever forget the commands for
Health Hub, feel free to enter the help command to revisit this guide.
5.2. Showing all requests/health workers : list
The list command is a simple and basic command that on entering, displays
all health workers/requests in the Health Hub GUI.
Format: list <type>
5.2.1. Showing all health workers
Format: list healthworker
Shortcut(s):
- list h
- list 1
Upon entering the command to list health workers, all currently registered health workers in the Health Hub system will be displayed on the list on the right side of the GUI.
5.2.2. Showing all requests
Format: list request
Shortcut(s):
- list r
- list 2
After entering the command to list requests, you should see the list on the left side of the GUI being populated with all requests that are added to HealthHub.
|
This command may be useful for users to identify existing personnel, patients or requests in the system before assigning and closing existing requests for specific health services. |
Example:
-
list healthworkerlists all health workers stored in the system, their personal particulars, and their skills in the healthcare field. -
list requestlists all requests stored in the system, as well as the details of the request such as the patient to tend to, the date and time of the request and the type of service requested.
5.3. Adding requests/health workers: add
Before you can jump right into the core feature of our application and streamline the process of adding requests from patients and to assign requests to experts in the medical field, it is essential to first ensure that the respective health staff and patients are registered in the system with all the key information.
Add a request, health worker or patient to the application based on the
<type> parameter accepted, using the add command, to register new health
staff, patients and requests.
Format: add <type> <additional_parameters>…
5.3.1. Adding a health worker
Format:
-
add healthworker n/<worker_name> i/<NRIC> n/<phone_number> o/<organisation> s/<specialisation>…
Shortcuts:
-
add h n/<worker_name> i/<NRIC> n/<phone_number> o/<organisation> s/<specialisation>… -
add 1 n/<worker_name> i/<NRIC> n/<phone_number> o/<organisation> s/<specialisation>…
Command that registers a new Health Worker person to the current roster.
Health Workers comprises of personnel who are authorized to work in sectors in the
healthcare industry in accordance to their specialisation.
Health Workers authorized for medical practice specific to their
specialisation include doctors, nurses and community health workers that
are officially certified by certain medical practices.
Each of the following fields entered by the user following each prefix are compulsory, and must adhere to the following format:
-
<worker_name>: Name must only contain alphanumeric characters and spaces , and cannot be empty. E.g Dog Terr -
<NRIC>: NRIC must start with S, T, G or F capitalized, followed by 7 numeric characters and a capitalized alphabetical character. E.g S1234567A -
<phone_number>: Phone number must only contain 8 numeric characters, and start with a 6, 8 or 9. -
<organisation>: Organisation that the health worker belongs to. Organisation name must have at least 2 characters, and only contain alphanumeric characters. -
<specialisation>: Specialisation in the medical field that the health worker possesses. The list of valid specialisations are as follows:-
GENERAL_PRACTICE
-
CARDIOLOGY
-
ENDOCRINOLOGY
-
NEUROLOGY
-
ORTHOPAEDIC
-
PAEDIATRIC
-
GYNAECOLOGY
-
UROLOGY
-
PATHOLOGY
-
HAEMATOLOGY
-
PHYSIOTHERAPY
-
OCCUPATIONAL_THERAPY
-
ANAESTHESIOLOGY
-
|
The NRIC field provided uniquely identifies the health worker. When entering the commands to add or edit a health worker, if the NRIC field matches an already existing health worker with the same NRIC field, an error message denoting a duplicate worker will be displayed. |
5.3.2. Adding a request
Format:
-
add request n/<patient_name> a/<address> i/<patient_nric> p/<phone> dt/<date_time> c/<condition>…
Shortcuts:
-
add r n/<patient_name> a/<address> i/<patient_nric> p/<phone> dt/<date_time> c/<condition>… -
add 2 n/<patient_name> a/<address> i/<patient_nric> p/<phone> dt/<date_time> c/<condition>… -
Registers a new open request from
patientof<patient_name>into the application. -
Each request also states the
<condition>that the patient is experiencing. Administrative staff can then inspect the conditions that are stated by thepatientand assign the appropriate health worker to handle these requests in theassigncommand. -
Format for the time is
HH:mm:ss, where HH represents the hours in a 24hr clock. -
Format for the date is
dd-MM-yyyy. -
Multiple conditions can be accepted. However, each condition has to be prepended with
c/tag. -
Two requests are considered duplicates if they have the same patient NRIC, date, address and conditions. Adding duplicate requests are not allowed.
| The arguments and their respective tags can also be reordered. |
Examples:
-
add request n/Pay Shun i/S9123456G a/NUS UTown p/91234567 c/Heart Attack dt/30-01-2019 10:00:00 -
add request n/Jin Livingston i/S9123456G a/NUS UTown p/91234567 c/Heart Attack dt/30-01-2019 10:00:00 c/Physiotherapy
|
If multiple prefixes are provided with valid values for parameters that can only take in a single value, only the value of the last prefix will be accepted. + E.g n/John n/Johnson the name field will be set to Johnson and not John. Similarly for the |
5.4. Editing requests/health workers : edit
Sometimes, information on a request of health staff may be keyed in wrongly into the application, or you may need to update existing outdated information.
To do this, you can replace the current information
with the new one using the edit command to modify existing personnel
records or request descriptions in Health Hub.
The edit may come in handy when there is a need update to a request’s
status, patient’s condition or a health worker’s skills, based on the
<type> parameter accepted.
The prefixes and valid values for the edit command for both health worker
and request modes follow the same format as in the add command.
5.4.1. Editing a health worker
Format:
-
edit healthworker <index> <additional_parameters>…
Shortcuts:
-
edit h <index> <additional_parameters>… -
edit 1 <index> <additional_parameters>…
Edits the details of an existing health worker registered in Health Hub, at
the <index> specified in the health worker list upon entering the edit healthworker/h/1 command with valid inputs.
|
|
You can remove all the person’s specialisation by typing |
-
edit healthworker 1 p/91234567 n/John Doe
Edits the phone number and name of the 1st health worker shown in the health worker list to be91234567andJohn Doerespectively.
5.4.2. Editing a request
Format:
-
edit request <index> <additional_parameters>…
E.gedit request 1 n/NAME p/PHONE a/ADDRESS i/NRIC c/CONDITION dt/DATE_TIME st/STATUS
Shortcuts:
-
edit r <index> <additional_parameters>… -
edit 2 <index> <additional_parameters>…
Edits the details of a request registered in Health Hub, at
the <index> specified in the request list upon entering the edit
request command with valid inputs.
Upon entering the edit command with all the necessary and valid parameters,
the corresponding request/health worker at the specified <index>. The index refers to the
index number shown in the displayed person list.
Existing values of the request will be updated to the valid input values based on the prefix specified.
Any changes made to existing fields in requests are immediately reflected in the list shown on the HealthHub GUI.
Notes:
-
The index must be a positive integer 1, 2, 3, … and not greater than the number of requests/health workers/patients in the current list.
-
Apart from
specialisationsin health workers andconditionin patients, each field can only have a single value and multiple edit values for other fields will only cause the last one to be accepted. -
Note that the healthworker cannot be edited using this command. To unassign an existing healthworker,
editthe status toPENDING. To change the healthworker assigned, use theassigncommand instead. -
When a request status is changed to pending, any assigned healthworker will be disassigned.
-
When changing the request status, there are only 3 valid statuses: PENDING, COMPLETED and ONGOING. Only these statuses will be accepted, and is not case-sensitive.
-
Not all the tags need to be specified.
-
The tags can be reordered. e.g
edit r 1 n/NAME p/91234567is the same asedit r 1 p/91234567 n/NAME -
Two requests are considered duplicates if they have the same patient NRIC, date, address and conditions. Duplicate requests are not allowed.
| When editing the date of a request, ensure that the date entered is correct. HealthHub accepts any valid calendar dates in the format dd-mm-yyyy HH:mm:ss (where HH represents the time in 24hr format). |
Examples:
-
edit request 2 n/Betsy Crower -
edit r 2 n/Betsy Crower -
edit 2 2 n/Betsy Crower
All the 3 commands above edits the patient name of the 2nd request in the request list to beBetsy Crower. -
edit r 1 n/NAME p/PHONE a/ADDRESS i/NRIC c/CONDITION dt/DATE_TIME st/STATUS
5.5. Filtering health workers/requests: filter
When identifying health workers to assign to an open request, or to look for a particular patient details in certain requests, it may be useful to only display items in a list that match a particular constraint.
Using the filter command, you can set the GUI to display health workers and
requests whose fields match the keywords`that are specified in the `filter
command, allowing you to find the doctors who are experts in cardiology much quicker.
Format: filter <type> <keyword> [<more_keywords>]…
5.5.1. Filter health workers:
Format:
-
filter healthworker <keyword> [<more_keywords>]
Shortcuts:
-
filter h <keyword> [<more_keywords>] -
filter 1 <keyword> [<more_keywords>]
Upon entering the command with valid inputs, HealthHub searches the entire list
of health
workers in Health Hub, and only displays the health workers whose fields
contains the parameters specified in the
filter command as a substring.
|
Examples:
-
filter h s/GENERAL_PRACTICE s/GYNAECOLOGY
Returns all health workers whose field of expertise include general practice and gynaecology.
|
For specialisation fields, parameter values need not follow the exact format as
the valid specialisation values provided under the |
For example, to display only health workers who specialise in physiotherapy,
the filter h s/physio command can entered, using the shortcut h for
health worker mode and the substring physio instead for brevity, as shown
in the image below, in the Before section:
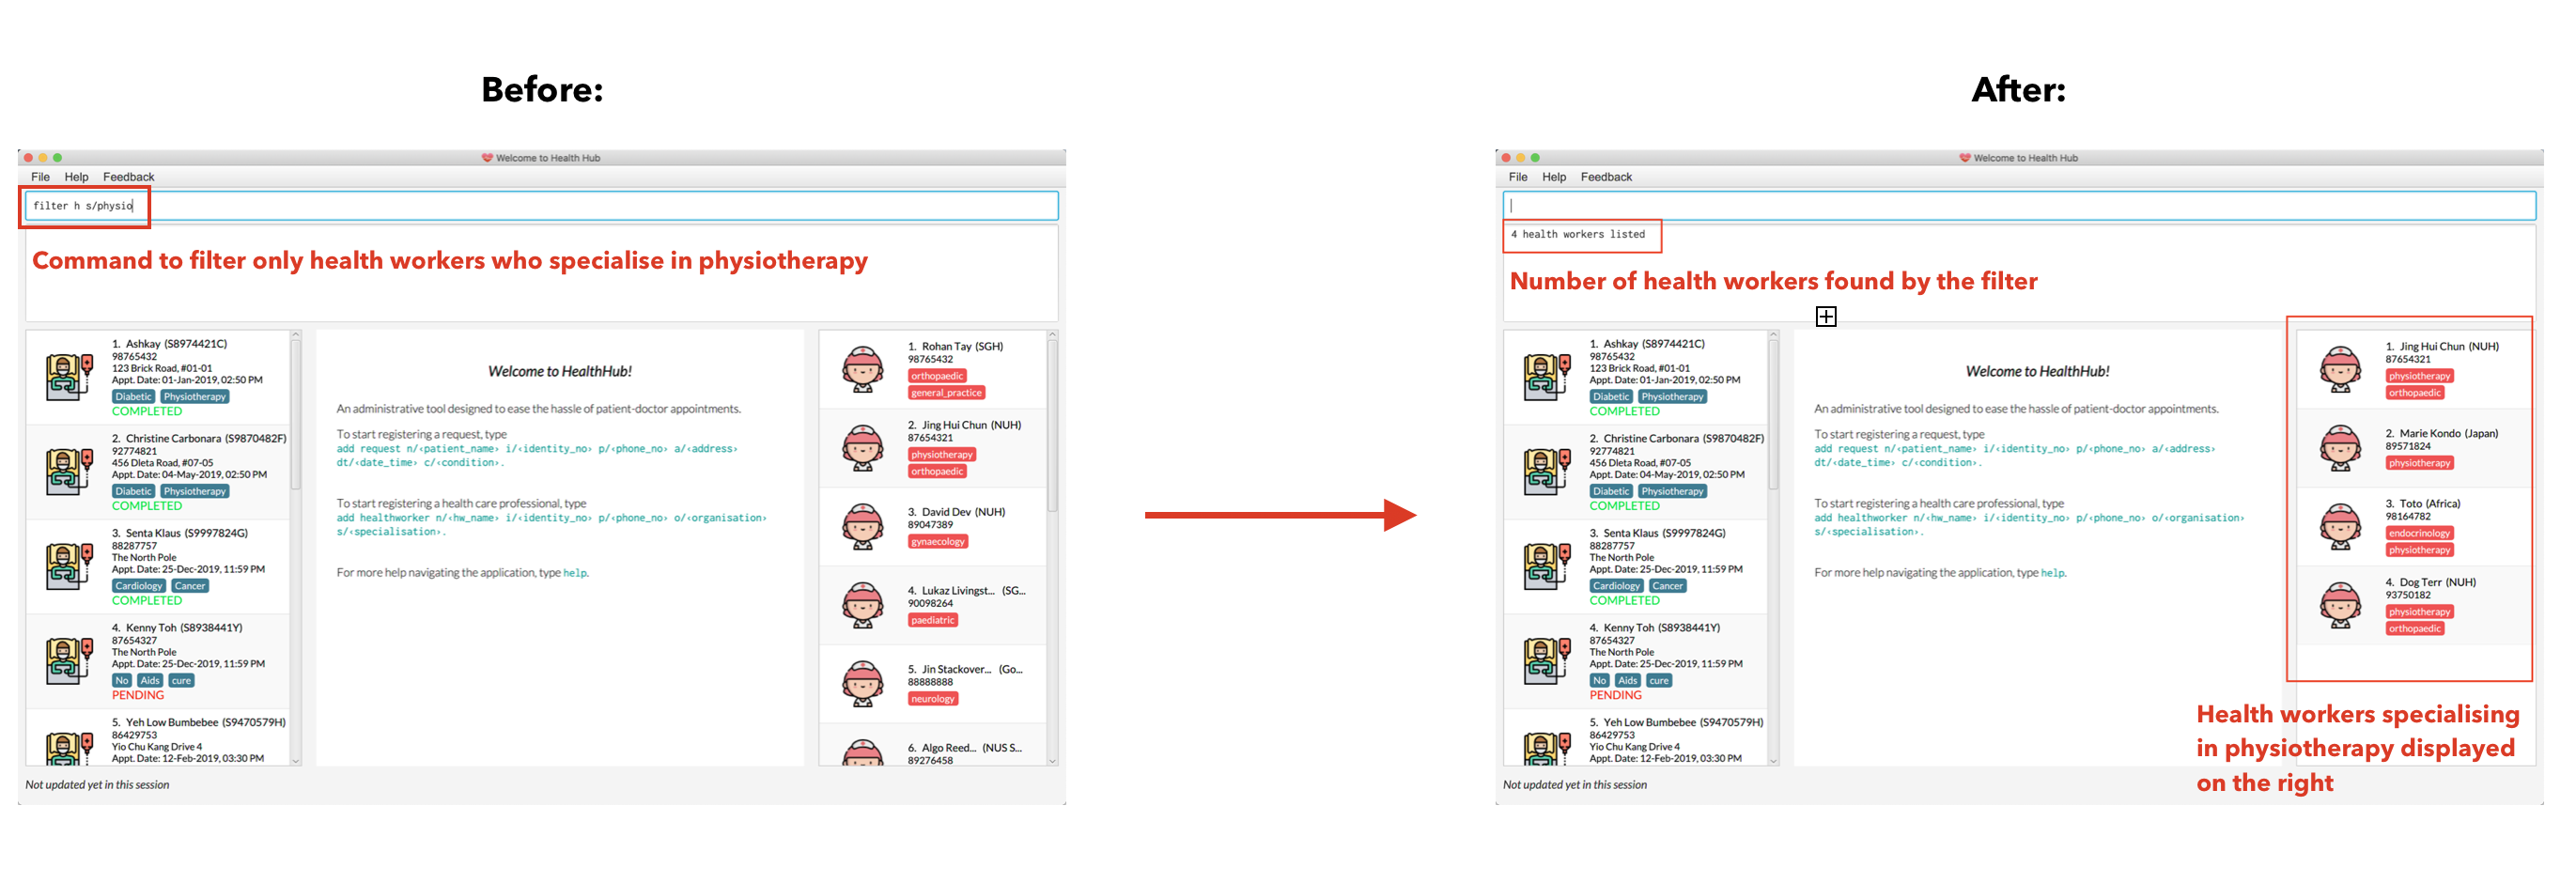
When the command is keyed into the application, HealthHub will display the
state shown by the After section on the right side on the image above. The
command terminal displays a message denoting how many health workers are
found that has PHYSIOTHERAPY as a specialisation, and the health worker
list on the right side of the GUI displays only health workers who has
expertise in physiotherapy.
5.5.2. Filter requests:
Format: filter request <keyword> [<more_keywords>]
Shortcut(s):
1. filter r <keyword> [<more_keywords>]
2. filter 2 <keyword> [<more_keywords>]
where [<more_keywords] refer to the fields you would like to search for.
After entering the command with valid inputs, you will the entire list of requests whose fields match
the parameters specified in the command. To filter requests, you can specify any of the following filtering criteria:
dt/DATE, n/NAME, p/PHONE, st/STATUS, i/NRIC, c/CONDITION. Note that you can also chain multiple criteria together to get a more specific
filter result.
For example, let’s say you want to filter all the requests made by the patient with NRIC S9123456G that have been completed. You
can simply enter the command: filter request i/S9123456A st/COMPLETED, and the request list panel to the left of the screen would update to
show you all the requests you are looking for.
Before:
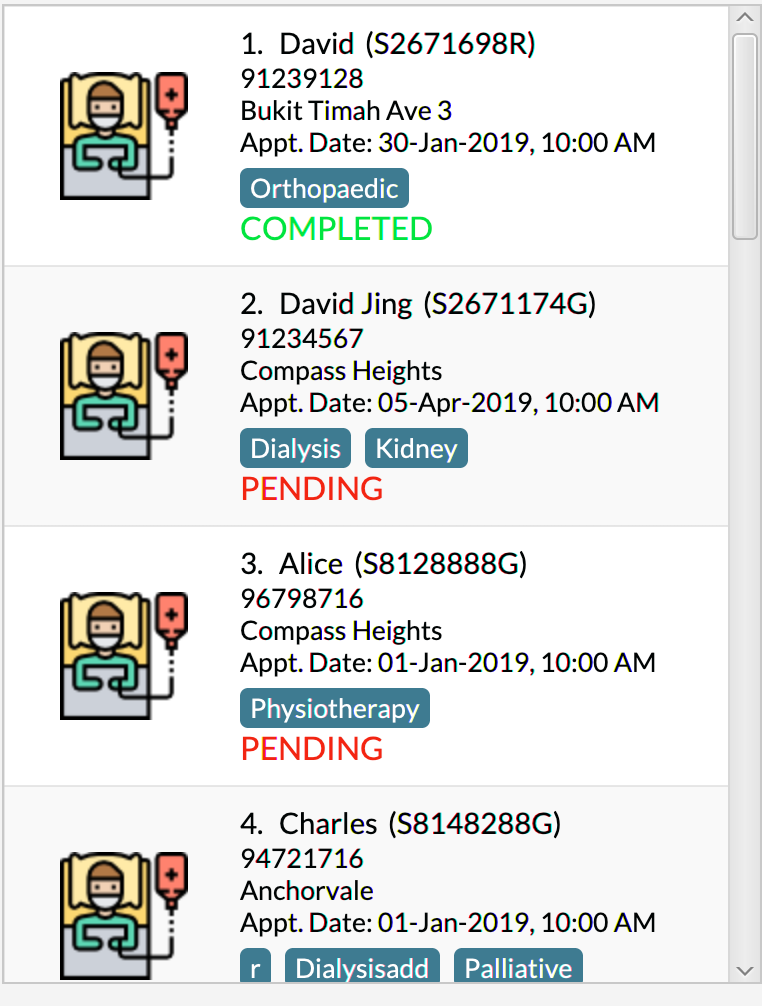
Figure 5.5.2.1 shows the request list prior to executing the filter request command
After:
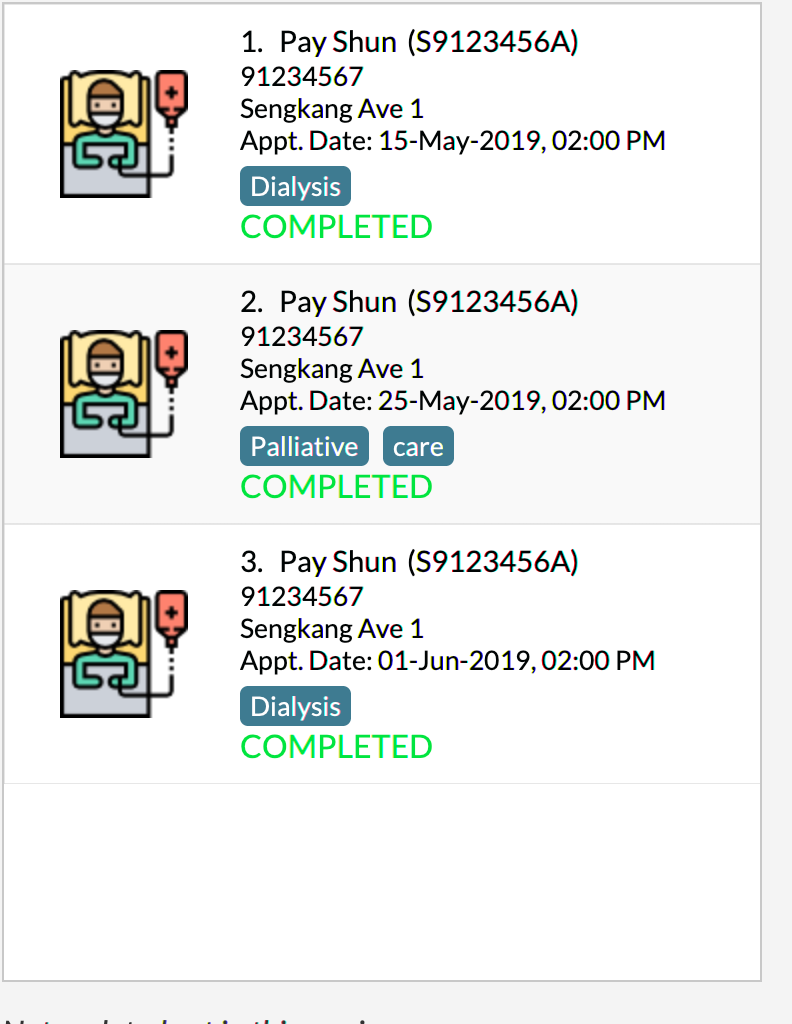
Figure 5.5.2.2 shows the request list after executing filter request i/S9123456A st/COMPLETED
The request list panel on the left would filter to show just the requests queried by the user.
| If there are no such requests that match the user’s query, an empty list would be show on the left panel. |
Notes:
-
The search is case insensitive for all fields apart from specialisation(e.g
hanswill matchHans), and the order of the keywords does not matter(e.gHans Bowill matchBo Hans). -
Search using partial words will return all results with fields containing that subword. (e.g
filter request n/Tanmay return people with the surnames Tan or Tang)
|
Multiple conditions for filtering requests can be added simultaneously for more expressive search. Example:
|
|
To revert the view back to the original request list, enter the |
Examples:
-
filter request n/alice
Returns all patients whose name contains "alice". -
filter r p/9177
Returns all requests with contacts numbers that have "9177" in it’s field. -
filter 2 dt/30-01-2019 10:00:00
Returns all requests scheduled on 30th Jan 2019, at 10 am sharp.
5.6. Deleting requests/health workers : delete
Should there be any invalid or expired request, health worker or patient in
the application, you may also remove them to prevent cluttering of
unnecessary data by using the delete command to remove them from the
application based on the`<type>` parameter accepted, according to the
index of the respective type
shown using the list command, or the index displayed on the GUI.
Format: delete <type> <index>
5.6.1. Delete a health worker:
Format:
-
delete healthworker <index>
Shortcuts:
-
delete h <index> -
delete 1 <index>
Deletes the health worker at the <index> position in shown in the health
worker list.
5.6.2. Delete a request:
Format:
-
delete request <index>
Shortcuts:
-
delete r <index> -
delete 2 <index>
Deletes the request at the <index> position in shown in the list of requests.
Notes:
-
Deletes the corresponding request/health worker/patient at the specified
<index>. -
The index refers to the index number shown in the displayed request/health worker/patient list using the
listcommand, or displayed through the GUI. -
The index must be a positive integer 1, 2, 3, … and not greater than the number of requests/health workers/patients in the current list.
Examples:
-
delete healthworker 2
Deletes the 2nd health worker registered in the list of healthworkers in Health Hub. -
delete request 1
Deletes the 1st request as shown in the list of requests on the GUI of the application
|
Accidentally deleted the wrong health worker or request? Don’t worry, the
deletion can be undone using the To undo the most recent |
5.7. Assigning requests to a health worker : assign
After registering a new request using the add request command, you may
proceed to assign an existing health worker in the system to handle the request,
allocating medical resources to it and closing the request using the simple
assign command
Format: assign hw/<health_worker_index> r/<request_index>…
Where the <request_index> and <health_worker_index> are as shown in the
respective health worker and requests lists in the Health Hub GUI.
Notes:
-
The
request_indexandhealth_worker_indexfields must be a positive integer 1, 2, 3, … and not greater than the number of requests/health workers in the current list. -
The prefix
r/has to be prepended to all requests indices that you would like to assign. -
Health worker that is assigned must be available at the current time stated by the request.
Examples:
-
assign r/1 hw/2
Assigns the health worker at the second index to the first request in the request list. -
assign r/1 r/2 hw/2
Assigns the requests at the first and second request on the request list to the 2nd health worker in the healthworker list.
|
5.8. Clearing Requests : clr
After closing all existing requests, you also have the option of clearing all
requests from the request list, regardless of the state of the request, upon
entering the clr command.
Format: clr
|
Clearing requests would delete all records of completed and pending requests. If you would like to delete just one particular request, consider using the
|
5.9. Closing Requests : complete
After an assigned task has been completed by the assigned health staff, who
has administered the necessary medical treatment, you can mark the request as
closed, using the complete command.
Format: complete <request_index>
Upon entering the complete command, you should notice the status of the
request at position <request_index> changed to COMPLETED, marking the
request closed.
Notes:
-
The
request_indexmust be a positive integer 1, 2, 3, … and not greater than the number of requests in the current list. -
The
completecommand can only be used on ongoing requests. To complete a pending request, use theeditcommand to change the status of the request.
Examples:
-
complete 1
Marks the first request in the list as completed.
5.10. Undoing Commands : undo
If you wish to undo a mistake that you had made while entering commands,
you can restore the lists to the state before the command was called using the undo command.
Format: undo
|
5.11. Redoing undone commands : redo
If you wish to redo a command that you have previously undone, you can use the redo command.
Format: redo
5.12. Listing previous commands : history
In the case where you have been using the application for a while now, and
wish to track and see the past commands that you have entered into the
application, or where you have taken over the application from another
person, you can do so using the history command.
Using the history command, you can view the previous commands entered in
the application in chronological order, allowing you to identify the order in
which commands are keyed in previously.
Format: history
|
Pressing the ↑ and ↓ arrows will display the previous and next input respectively in the command box. |
5.13. Viewing a request : select
With the flexibility in managing and adding, editing and deleting requests, existing functionality for the user to view the details of requests in Health Hub has also been implemented to improve the user experience.
Format: select <request_index>
Shortcut: sr <request_index>
Entering the select command allows the application to select the request at the
specified <request_index>, and displays the full details of the selected
request on the GUI.
|
Users also have the option of clicking on a request in the request list on the GUI, which automatically selects the clicked request as the displayed request. |
5.14. Setting Reminder Alerts: setreminder
Sometimes when you have too many tasks at hand, it can be quite cumbersome to remember what tasks you need to complete for the day. You might want to phone up a patient to remind him of an appointment before the health worker visits his home, because you recall that this patient was not at home the last time the health worker visited. The phone call from you can prepare him to be at his home when the health worker arrives, so he can provide the necessary health care services. It can also remind you when it is lunch time, so you can avoid the peak period!
Format: setreminder t/<hh:mm:ss> m/<customised_message>
Using the setreminder command, you can set a reminder alert to notify you at a certain time of the day, with your
own message that you can customise to remind yourself.
|
The alert only shows for when Health Hub is running in the background process. |
In the example below, a reminder has been set to notify the user at 6.30PM with the customised message to "to call patient Tan Ah Hock for his appointment later at night".
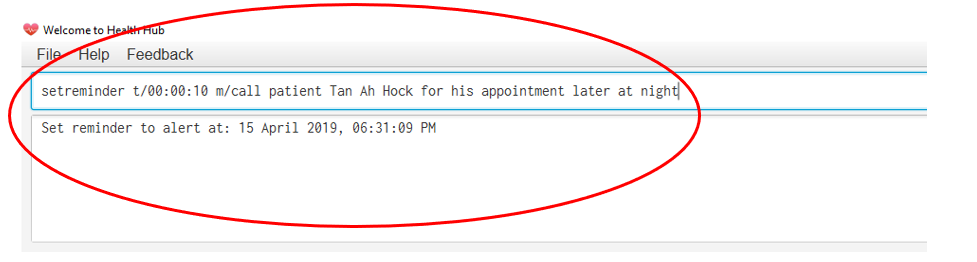
Figure 5.14.1 shows the format of the setreminder command in the text field.
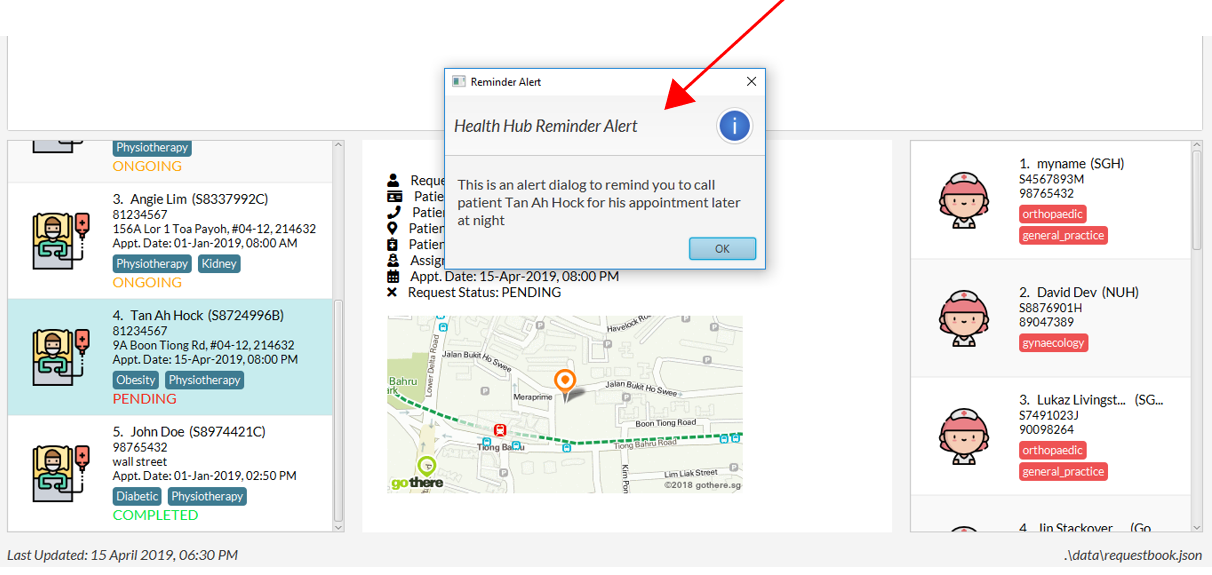
Figure 5.14.2 shows the result of the reminder alert in the GUI after it is time for the app to notify the user.
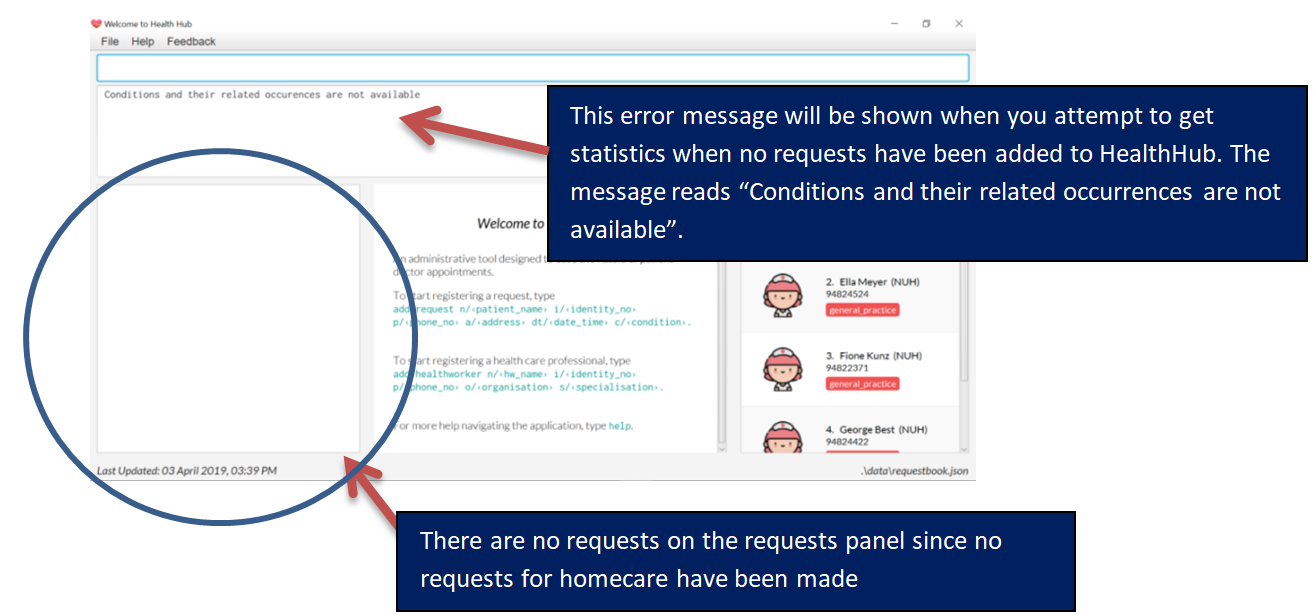
5.15. Getting health condition statistics: statistics
We understand that it is imperative for you to know which health conditions have been seeing an increasing trend, as
well as take note of those which have been experiencing a decline. The statistics command allows you to view all
health conditions that have been registered on HealthHub, and also their respective numbers of occurrences.
Format: statistics → this command displays a list of all health conditions that you have typed into HealthHub, and
shows each health condition’s related number of occurrences.
|
|
Example of usage:
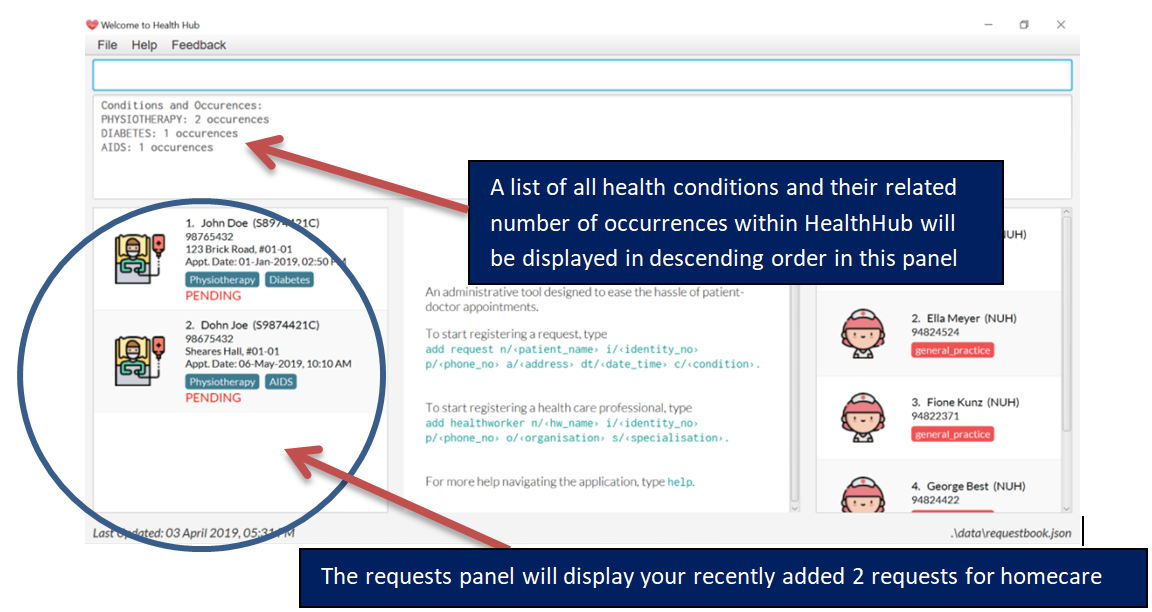
Let’s say that no commands have been issued yet and HealthHub is on a clean slate with no prior records of requests. Suppose as an administrative staff, you input the following commands as your first 2 requests for home care into HealthHub:
add request n/John Doe i/S8974421C p/98765432 a/123 Brick Road, #01-01 dt/01-01-2019 14:50:00 c/Diabetes
c/Physiotherapy
add request n/Dohn Joe i/S9874421C p/98675432 a/Sheares Hall, #01-01 dt/06-05-2019 10:10:00 c/AIDS c/Physiotherapy
You can then subsequently type in the following command:
statistics
Voila! A list of health conditions (namely, the ones which were typed in the 2 abovementioned requests Physiotherapy, Diabetes, AIDS) will be generated and will be displayed in descending order of occurrences. The following screen is what you can expect to see after typing in the 3 commands.
5.15.1. Updating of statistics
Every time you decide to add a request, edit a request, delete a request or even undo and redo a request, it is
important that the statistics display automatically keeps updating itself so that real-time accurate data is always
showed whenever you type in statistics
Example of usage:
Let’s assume you still have the requests of John Doe and Dohn Joe (requests that you had placed into HealthHub from the previous section) in the request panel. You just received news that John Doe’s mobility has miraculously improved and you no longer need to tag him with the ‘Physiotherapy’ health condition in his health request record. You, thus, decided to edit John Doe’s health conditions from Diabetes and Physiotherapy to just Diabetes by issuing the following command:
edit r 1 c/Diabetes
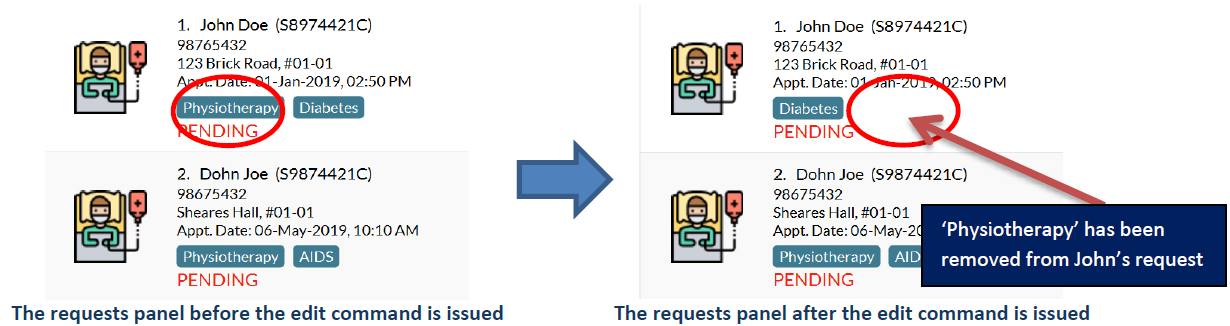
You can then subsequently type in the following command to gather accurate statistical data, which reflects the deletion of one of the ‘Physiotherapy’ health conditions:
statistics

After issuing the aforementioned commands, you now receive news that John Doe had not really recovered entirely yet,
and he still requires Physiotherapy treatment. Fret not! You can always issue the undo command to revert your changes to
John’s earlier set of health conditions (Physiotherapy and Diabetes) and then the statistics command to view the new
data.
In essence, the statistics command is fully integrated with all request-related commands (add, edit, delete,
undo, redo, clr) in its pursuit of always providing accurate, real-time statistical information.
5.15.2. Application of statistics in the workplace
Upon collating such data, you can feedback and make suggestions to the hospital to increase or decrease training in certain departments. Furthermore, you can even use this data as a basis for the health sector to ramp up efforts in its Work Skills Qualification certification for certain healthcare skills to be taught to new aspiring healthcare professionals.
5.16. Exiting the program : exit
Once you are done using the application, you can exit the application by
entering the exit command, hereby saving any information at the current
point in time before shutting down.
Format: exit
5.17. Saving the data
All application data are saved in the hard disk automatically after exiting
the application, removing the need to save manually.
Changes to the data in the application are also saved that any command that modifies application parameters, making sure that minimal data is lost should any unforeseen circumstances happen.
Attempting to read a corrupted data file will show an empty book. If the application is unable to find any data files, it will create books based on its sample data.
6. FAQ
Q: How do I transfer my data to another Computer?
A: Install the app in another computer, and transfer the data files healthworkerbook.json and requestbook.json
to the \data folder of the app directory.
7. Command Summary
| Base Command | Additional Parameters | Description | Remarks |
|---|---|---|---|
|
not applicable |
opens the user guide in a new window |
none |
|
not applicable |
lists all the health workers or requests |
none |
|
|
registers a health worker into the system |
none |
|
|
registers a request into the system |
none |
|
any of the tags above (i.e. edit |
edits the details of a request or a health worker |
none |
|
any of the tags above belonging to health worker (i.e. filter by |
filters through the list of health workers by a criteria |
none |
|
any of the tags above belonging to request (i.e. filter by new filterable tag after request is added - |
filters through the list of requests by a criteria |
none |
|
|
deletes a request |
none |
|
|
assigns a health worker to an open request |
should a health worker be assigned to requests on the same date and time, it should be at least 2 hours apart. |
|
|
closes an ongoing request after it has been completed by the assigned staff |
only used for requests that have the ONGOING status |
|
not applicable |
clears all COMPLETED requests from the list |
none |
|
not applicable |
lists the previous commands entered in chronological order |
none |
|
|
selects a request and display its details on the UI |
none |
|
|
sets a reminder alert to notify the user at a certain time of the day |
the alert will show only if Health Hub is still running |
|
not applicable |
shows the occurences of the different requests by conditions |
none |
|
not applicable |
undos the previous action |
none |
|
not applicable |
redos the previous undone command |
none |