By: Team W9-02 (HealthHub) Since: Jan 2019 Licence: MIT
1. Setting up
1.1. Prerequisites
-
JDK
9-
The Java Development Kit, or JDK for short, provides the necessary existing libraries and implementations that we have used in our implementation of HealthHub. The current version of HealthHub needs at least JDK version 9 to support the full functionality it has to offer.
JDK 10on Windows will fail to run tests in headless mode due to a JavaFX bug. Windows developers are highly recommended to use JDK9.
-
-
IntelliJ IDE
-
IntelliJ is an Integrated Development Environment(IDE) that provides the necessary tools and available plugins needed to compile, build and run the project.
IntelliJ by default has Gradle and JavaFx plugins installed.
Do not disable them. If you have disabled them, go toFile>Settings>Pluginsto re-enable them.
-
|
Don’t have Intellij or JDK installed? Click on the following links to download them below:
|
1.2. Setting up the project in your computer
-
Fork this repo, and clone the fork to your computer
-
Open IntelliJ (if you are not in the welcome screen, click
File>Close Projectto close the existing project dialog first) -
Set up the correct JDK version for Gradle
-
Click
Configure>Project Defaults>Project Structure -
Click
New…and find the directory of the JDK
-
-
Click
Import Project -
Locate the
build.gradlefile and select it. ClickOK -
Click
Open as Project -
Click
OKto accept the default settings -
Open a console and run the command
gradlew processResources. For Mac/Linux environments, run the command./gradlew processResourcesinstead. It should finish with theBUILD SUCCESSFULmessage.
This will generate all resources required by the application and tests. -
Open
MainWindow.javaand check for any code errors-
Due to an ongoing issue with some of the newer versions of IntelliJ, code errors may be detected even if the project can be built and run successfully
-
To resolve this, place your cursor over any of the code section highlighted in red. Press ALT+ENTER, and select
Add '--add-modules=…' to module compiler optionsfor each error
-
-
Repeat this for the test folder as well (e.g. check
HelpWindowTest.javafor code errors, and if so, resolve it the same way)
1.3. Verifying the setup
-
Run the
seedu.address.MainAppand try a few commands -
Run the tests to ensure they all pass.
1.4. Configurations to do before writing code
1.4.1. Configuring the coding style
This project follows oss-generic coding standards. IntelliJ’s default style is mostly compliant with ours but it uses a different import order from ours. To rectify,
-
Go to
File>Settings…(Windows/Linux), orIntelliJ IDEA>Preferences…(macOS) -
Select
Editor>Code Style>Java -
Click on the
Importstab to set the order-
For
Class count to use import with '*'andNames count to use static import with '*': Set to999to prevent IntelliJ from contracting the import statements -
For
Import Layout: The order isimport static all other imports,import java.*,import javax.*,import org.*,import com.*,import all other imports. Add a<blank line>between eachimport
-
Optionally, you can follow the UsingCheckstyle.adoc document to configure Intellij to check style-compliance as you write code.
1.4.2. Getting started
When you have set up your environment successfully for building and running HealthHub, you are ready to get started on coding to contribute to the project. But before that, you may consider familiarising yourself with HealthHub through the following:
-
Familiarising yourself with the model, logic and storage design of HealthHub under the section Section 2, “Design”.
-
Get a good feel of how existing features are implemented under the Section 3, “Implementation” section.
-
Follow the way that the testing suite for features are built in Section 6, “Testing”
-
Painlessly automate build integration by following the steps under Section 7, “Dev Ops”
2. Design
2.1. Architecture
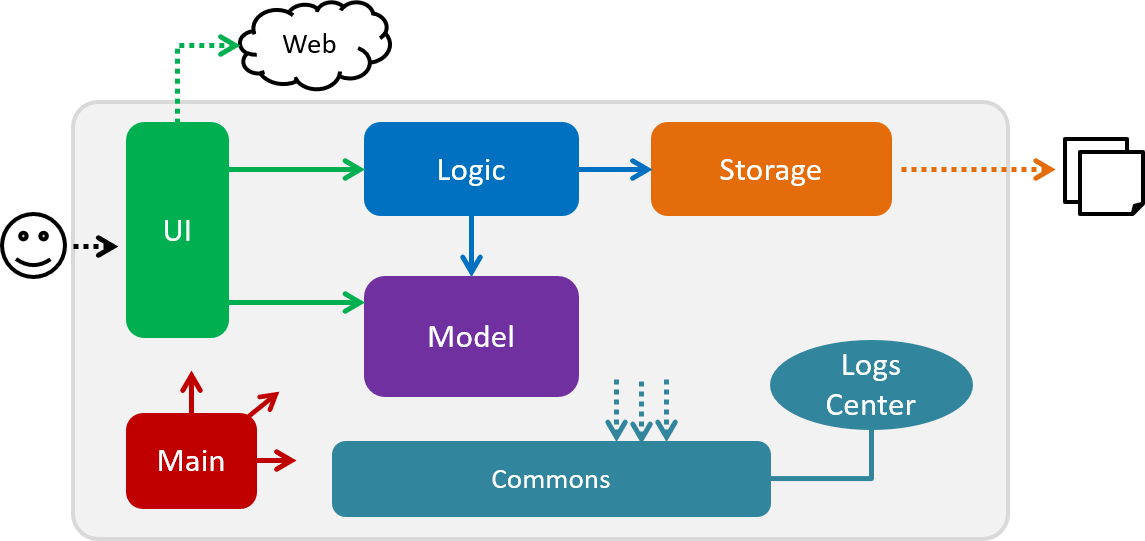
The Architecture Diagram given above explains the high-level design of the App. Given below is a quick overview of each component.
The .pptx files used to create diagrams in this document can be found in the diagrams folder. To update a diagram, modify the diagram in the pptx file, select the objects of the diagram, and choose Save as picture.
|
Main has only one class called MainApp. It is responsible for,
-
At app launch: Initializes the components in the correct sequence, and connects them up with each other.
-
At shut down: Shuts down the components and invokes cleanup method where necessary.
Commons represents a collection of classes used by multiple other components.
The following class plays an important role at the architecture level:
-
LogsCenter: Used by many classes to write log messages to the App’s log file.
The rest of the App consists of four components.
Each of the four components
-
Defines its API in an
interfacewith the same name as the Component. -
Exposes its functionality using a
{Component Name}Managerclass.
How the architecture components interact with each other
The Sequence Diagram below shows how the components interact with each other for the scenario where the user issues the command delete 1.
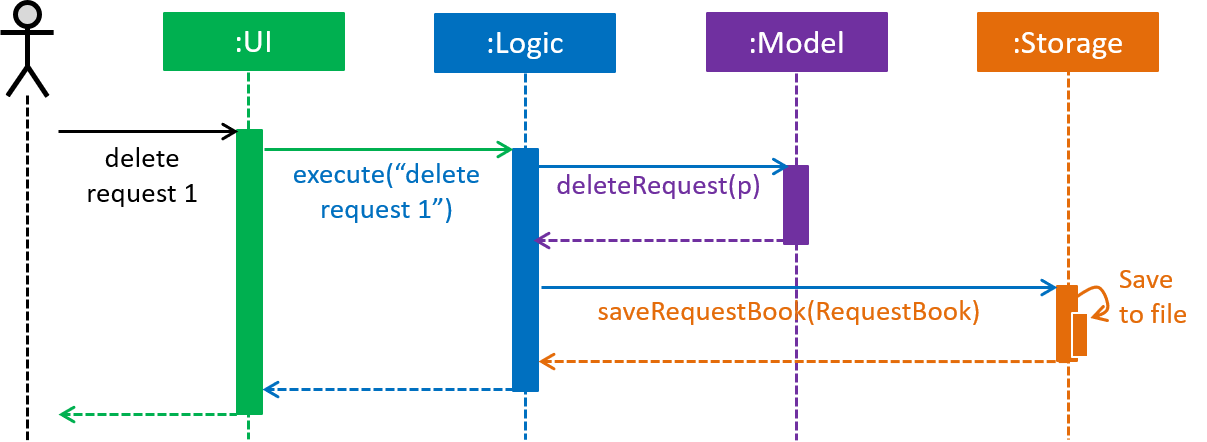
delete request 1 commandThe sections below give more details of each component.
2.2. UI component

API : UI Package
The UI consists of a MainWindow that is made up of parts e.g.CommandBox, ResultDisplay, RequestListPanel, InfoPanel, HealthWorkerListPanel, StatusBarFooter, etc.
All of these, including the MainWindow, inherit from the UiPart class, which is an abstract class containing methods for handling the loading of FXML files.
The UI component uses the JavaFX UI framework. The layout of these UI parts are defined in matching .fxml files that are in the src/main/resources/view folder. For example, the layout of the MainWindow is specified in MainWindow.fxml
The UI component,
-
Executes user commands using the
Logiccomponent. -
Listens for changes to the
Modeldata so that the UI can be updated with the modified data dynamically.
2.3. Logic component
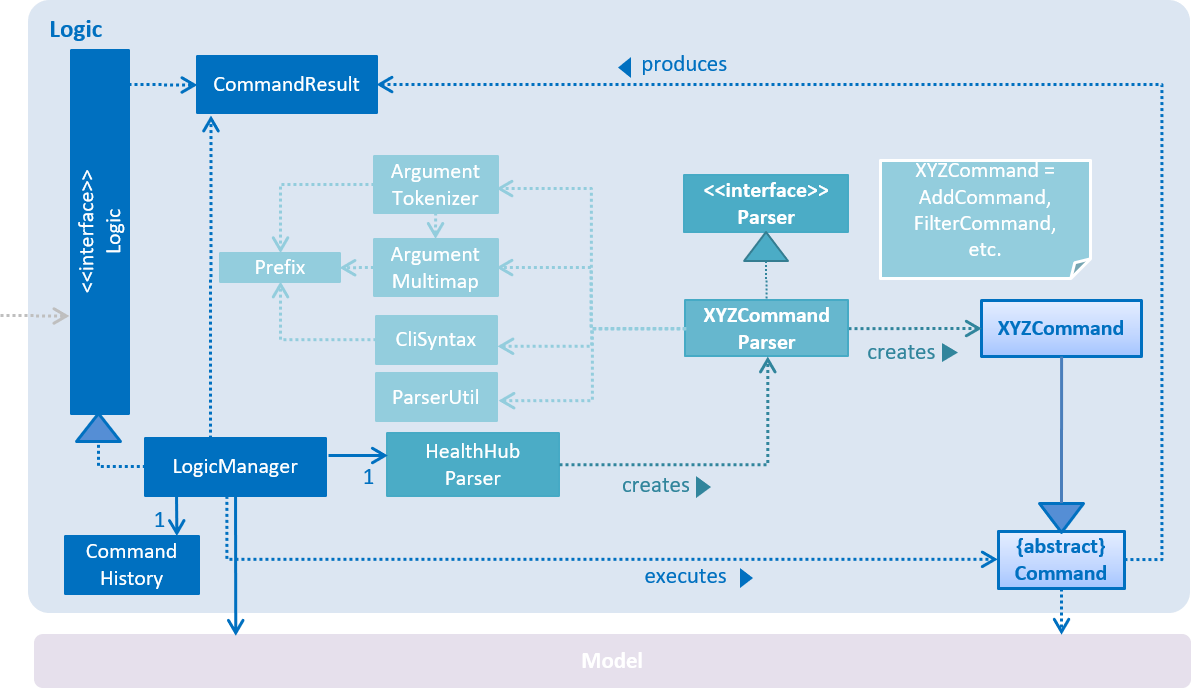
API :
Logic.java
-
Logicuses theHealthHubParserclass to parse the user command. -
This results in a
Commandobject which is executed by theLogicManager. -
The command execution can affect the
Model(e.g. adding a request) or sometimes only affecting the display (eg. listing all requests). -
The result of the command execution is encapsulated as a
CommandResultobject which is passed back to theUi. -
In addition, the
CommandResultobject can also instruct theUito perform certain actions, such as printing out the result message in the command line.
2.4. Model component
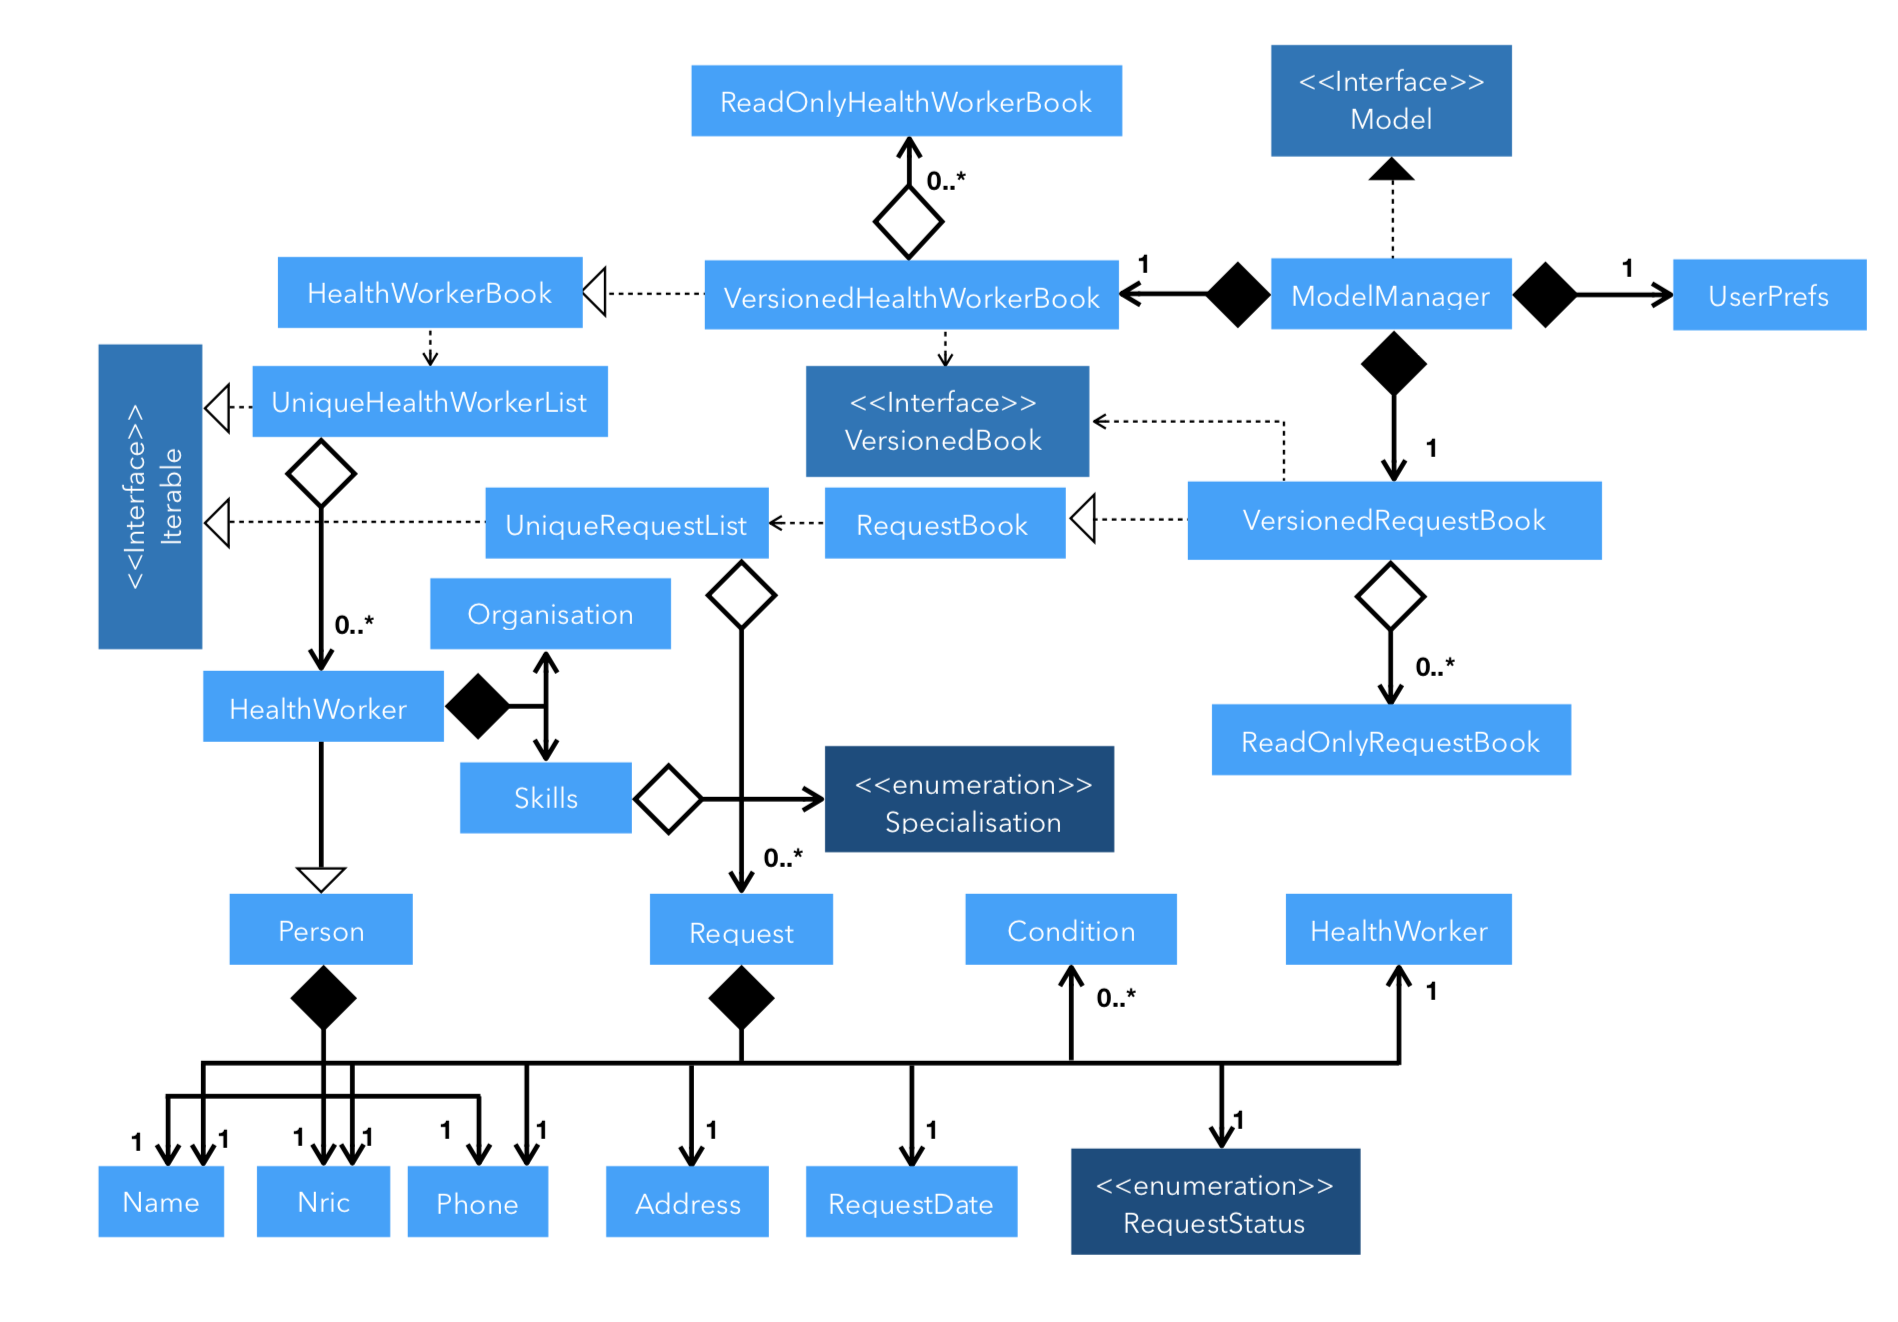
API : Model.java
The Model,
-
stores the
RequestBook data. -
stores the
HealthWorkerBook data. -
Both
HealthWorkerBookandRequestBookstores multiple previous states in the form ofReadOnlyHealthWorkerBookandReadOnlyRequestBook. -
A
UserPrefsobject denoting the user settings for the application.
As a more OOP model, we store a list of Request objects in Request Book, which stores the details of every request, including the patient’s details, request date and status.
In addition, each Request also stores a Set of Conditions of the patient.Similarly for HealthWorker, the list of HealthWorker is stored in a
HealthWorkerBook, and each Specialisation that the HealthWorker has is
stored in a Set that is contained in the Skills class.
|
2.5. Storage component

API : Storage.java
The Storage component,
-
can save
UserPrefobjects in json format and read it back. -
can save the Request, HealthWorker Book data in json format and read it back.
The storage class converts the object data of Request and HealthWorker by converting the objects
into a json object of strings which will be stored in the .json file. When reading the file, the json library passes the respective strings into
their java object constructors to recreate the objects.
|
2.6. Common classes
Classes used by multiple components are in the seedu.addressbook.commons package.
3. Implementation
This section describes some noteworthy details on how certain features are implemented.
The add, edit and delete command have been tweaked to include addition of and Request and HealthWorker.
CommandMode Enum class was introduced in v1.1 to allow for add, edit
and delete different types of objects respective to the different
CommandMode Enums. The various CommandMode enums are:
CommandMode.HEALTHWORKER
CommandMode.REQUEST
CommandMode.OTHERS
CommandMode.INVALID
Each CommandMode enum is matched by it’s own corresponding set of keywords,
which are string equivalents of the enum counterparts that the user can
input to specify the type of object he/she wishes to add. For example:
-
The command string
add healthworker n/Dog Terrthat is entered by the user contains the keywordhealthworkerafter theaddcommand word, which is mapped to it’sCommandModeequivalent inAddCommandParser.
The CommandMode enum also has a Set<HealthWorker field which contains
mappings from a set of keywords to it’s respective CommandMode values for
translation of user input into it’s corresponding CommandMode equivalents.
Then implementation for CommandMode is as follows:
public enum CommandMode {

    HEALTH_WORKER,
    REQUEST,
    OTHERS,
    INVALID;

    public static final String MODE_HEALTHWORKER = "1";
    public static final String MODE_REQUEST = "2";
    public static final String MODE_OTHERS = "4";
    public static final String MODE_INVALID = "5";

    private static final Set<String> healthWorkerModes = new HashSet<>(Arrays.asList("healthworker", "h", "1"));
    private static final Set<String> requestModes = new HashSet<>(Arrays.asList("request", "r", "2"));

    /**
     * Method that checks for the corresponding CommandMode given a string input.
     * Returns INVALID if input string does not match any of the given modes.
     */
    public static CommandMode checkMode(String input) {
        if (healthWorkerModes.contains(input)) {
            return CommandMode.HEALTH_WORKER;
        } else if (requestModes.contains(input)) {
            return CommandMode.REQUEST;
        }

        return CommandMode.INVALID;
    }
}
These CommandModes provide flexbility and functionality to switch between
parsing of different HealthWorker and Request objects.
-
Each of the
add,editanddeletecommand is eventually parsed through theAddCommandParser,EditCommandParserandDeleteCommandParserclasses respectively, which returns anAddCommand,EditCommandandDeleteCommandobject respectively.
3.1. Add feature
The add command allows for users to register new HealthWorker and
Request objects into HealthHub.
The format for the add command is as follows:
add <keyword> <parameters>…
When the user inputs an add command, the add command is eventually passed
into an AddCommandParser object that handles the argument fields after the
add keyword in the command.
The AddCommandParser first checks the first keyword in the string for a valid
CommandMode string equivalent. if the keyword does not contains a valid
string representation of any CommandMode enum, then a ParseException is
thrown by the AddCommandParser. This initial sequence of steps is also
repeated in the following EditCommandParser and DeleteCommandParser objects.
After checking for valid keyword, the AddCommandParser object checks for
the following compulsory information, along with regular expressions checking
for validity of each field:
3.1.1. Adding a HealthWorker
Format: add healthworker/h/1 <parameters>…
-
namefield prepended by then/prefix. Valid inputs ofnamefield will be represented and stored as aNameclass object.-
namefield can only contain alphanumeric characters, and cannot be an empty string.
-
-
phonefield prepended by thep/prefix. Valid inputs ofphonefield will be represented and stored as aphoneclass object.-
phonecontains only 8 numeric digits, of which the first must start with a 6,8 or 9.
-
-
nricfield prepended by thei/prefix. Valid inputs ofnricfield will be represented and stored as aNricclass object.-
nricfield must contains a 9 character string, starting with either a S or T, followed by 7 numeric digits and a alphabet letter. All letters used must be capitalized
-
-
organizationfield prepended by theo/prefix. Valid inputs oforganizationfield will be represented and stored as aOrganizationclass object.-
The
organizationfield must contain only alpha numeric characters, and contain at least 2 characters.
-
-
specialisationfield prepended by thes/prefix. All validspecialisationfields will be parsed into it’s respectiveSpecialisationenum equivalent, collected and stored as aSet<Specialisation>in theSkillsclass object.-
The values in the
specialisationfield will be only be accepted if they correspond to specific mappings to an existingSpecialisationenum that are registered in HealthHub. For information on the valid Specialisation mappings, visit <appendix for Specialisation num>
-
AddCommandParser first checks for the presence of the prefixes for each of
the compulsory fields mentioned above. If any of them are missing, or if any
invalid fields as per the conditions mentioned above, then the
command is invalid and a ParseException is thrown.
If the keyword denoted maps to CommandMode.HEALTHWORKER, then
AddCommandParser constructs a HealthWorker object representing the health worker that is
just added with the respective Name, Phone, Nric, Organization and
Skills objects parsed from the user input, and returns an AddCommand
contain the constructed person to be added.
|
If multiple fields of the same prefix are added, the last value of the last
field will be the one accepted for all fields except the |
Upon a successful add command, the new HealthWorker or Request
constructed from the user entered fields will be added to the end of the UniqueHealthWorkerList.
Valid Specialisations
The Specialisation field is an Enum type in Java, and supports only the
enum fields that are specified in the Specialisation class itself.
The various available specialisation enum values of the Specialisation
class is as follows in the implementation of Specialisation:
public enum Specialisation {

    GENERAL_PRACTICE,
    CARDIOLOGY,
    ENDOCRINOLOGY,
    NEUROLOGY,
    ORTHOPAEDIC,
    PAEDIATRIC,
    GYNAECOLOGY,
    UROLOGY,
    PATHOLOGY,
    HAEMATOLOGY,
    PHYSIOTHERAPY,
    OCCUPATIONAL_THERAPY,
    ANAESTHESIOLOGY;

    ...
}
3.2. Add Request feature
3.2.1. Current Implementation
The add request command allows the LogicManager to create a new request and add it to the list of requests. Adding a new request requires the
patient’s name, patient’s phone number, patient’s address, patient’s NRIC number and the patient’s conditions. The format of the add request command is
add request n/NAME p/PHONE i/NRIC a/ADDRESS dt/DATETIME c/CONDITION.
The following sequence shows the sequence when the add command is execute by the LogicManager:
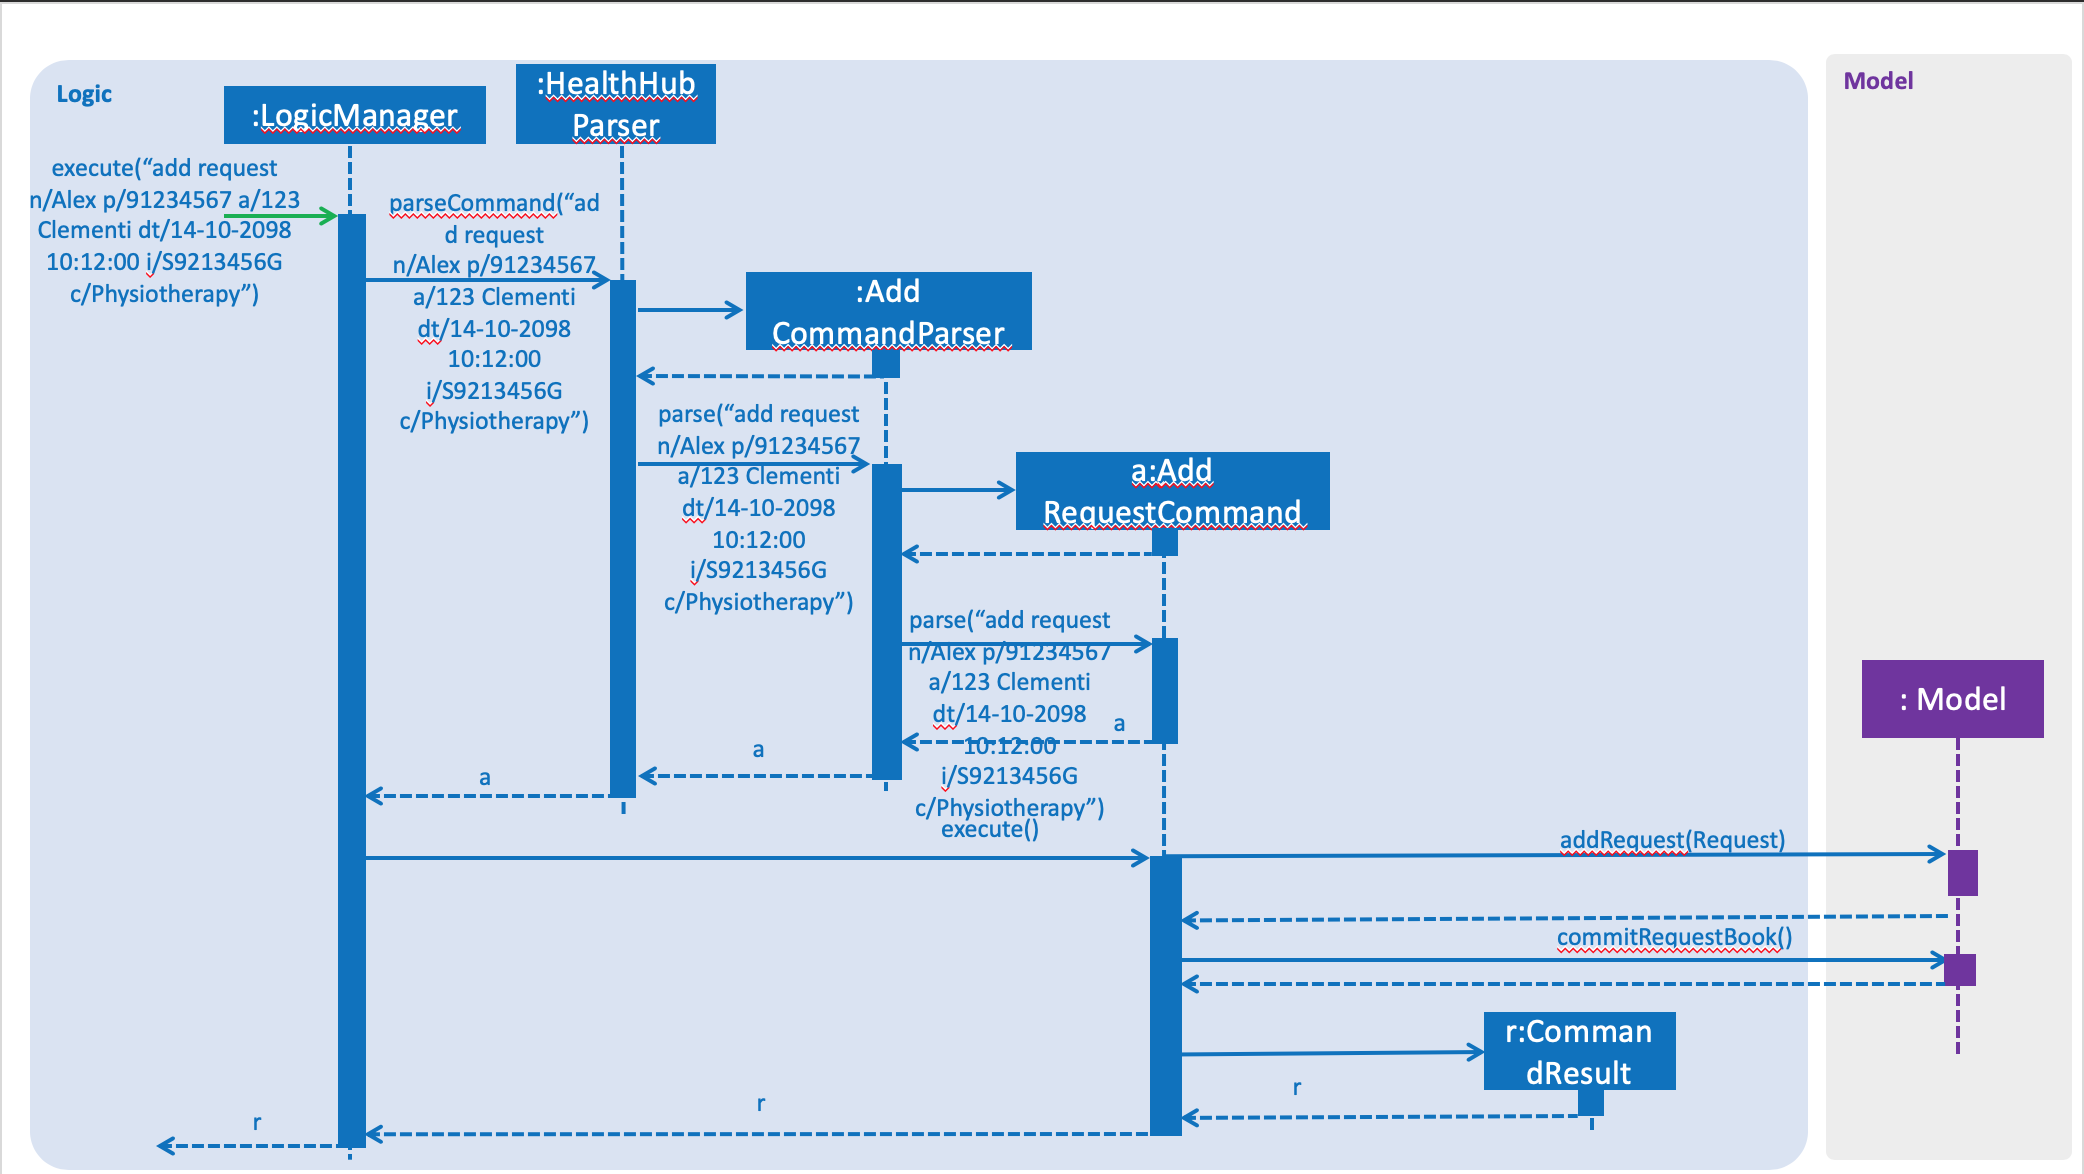
Figure 3.2.1.1 Sequence Diagram for add request command
From the diagram above:
-
LogicManager’s execute is called when the administrator keys in `add requestand it calls uponparseCommandofHealthHubParserto parse the command -
HealthHubParserwill initializeAddCommandParserand invoke the methodparseto further parserequestcommand -
parsewill be invoked and passed the parameters of the add command. -
If all the arguments of the
addcommands are valid,AddRequestCommandwill be returned to theLogicManager -
LogicMangerwill then calls the methodexecutemethod ofAddRequestCommand -
AddRequestCommandwill calladdRequestpassingRequestas an argument toModeland after callscommitRequestBookmethod fromModel -
A
CommandResultwill be returned at the end.
3.2.2. Design Consideration
Aspect: Data Structure for the list of Requests
-
Alternative 1 (Current Approach): Using a
UniqueRequestList-
Pros: The comparison is not as rigid. You can create requests with similar names/phones as long as it passes a less stringent criteria.
-
Cons: You need additional overhead. You need to create an extra class and function to check.
-
-
Alternative 2: Using a
Set-
Pros: Do not need an extra function. You can use use
equalsfor comparison -
Cons: It is a strict check and as a result you will not be allowed to create requests with same phone/same name etc.
-
Aspect: Data Structure of Request
-
Alternative 1 (Current Approach): All parameters in
Requestare abstracted out to have a class of its own (with the exception of the HealthWorker).-
Pros: It adheres to the Single Responsibility Principles (SRP) and the Separation of Concerns (SoC) as each parameter checks whether it is valid
-
Cons: Many different classes are created which increases the complexity of the code
-
-
Alternative 2: Store all parameters of
RequestasString-
Pros: Easy to implement.
-
Cons: Violates SRP as one single class will need to check if the arguments are valid.
-
The RequestStatus class within the Request object utilises the Java Enum to ensure type safety in user inputs.
|
The implementation of the RequestStatus class is as follows:
    private enum Status {
        PENDING,
        ONGOING,
        COMPLETED
    }

     public RequestStatus(String status) {
         this.requestState = Status.valueOf(status);
     }

     public RequestStatus() {
         this(Status.PENDING.name());
     }
Through this, any user String that is passed in as an argument for the RequestStatus field is automatically type checked,
ensuring that there are no invalid request statuses entered.
3.3. Edit feature
The edit command allows users to modify details of existing HealthWorker
or Request objects should the information need to be updated.
The format for the edit command is as follows:
edit <keyword> <index> <parameter> [<parameter>]…
Similar to the add command, the edit command arguments are first checked
passed into the EditCommandParser class instance, where it evaluates for a
valid first keyword and argument prefixes and values. Additionally, the
<index> field is also checked against the existing list of HealthWorker
or Request to ensure that the provided <index> is a valid <index> in
the list.
The argument field after the first keyword denoting the specified
CommandMode must not be empty, and must contain at least one valid prefix
and a valid value for the respective field to be edited. The prefixes and
validity follows the same conditions as stated in the add command.
|
Similar to the If any |
3.3.1. Editing HealthWorker
Upon parsing the argument string into EditCommandParser, it first checks
that the <index> field provided is non-negative, and not greater than the
size of the UniqueHealthWorkerList.
After checking for a valid CommandMode.HEALTHWORKER keyword after the
edit command word, EditCommandParser then tokenizes the argument string
after the keyword into a ArgumentMultiMap object that stores the prefix to
values mapping for each field specified. If no prefixes, or invalid prefixes
are specified, or if invalid values for any prefix is input, then
EditCommandParser throws a ParseException, and displays an error message
to the terminal.
If all values specified are valid and at least one field to specify is
provided, the EditCommandParser parses the ArgumentMultiMap containing
the values to be updated and it’s respective prefixes into an
EditHealthWorkerDescriptor object. EditCommandParser then passes the
EditHealthWorkerDescriptor and the HealthWorker object fetched from the
HealthWorkerBook using the specified valid <index> into a
EditHealthWorkerCommand object and returned.
In the EditHealthWorkerCommand, each HealthWorker related field prefix is
checked for it’s value in EditHealthWorkerDescriptor, and if a value
exists, it replaces the current value of the corresponding field in the
HealthWorker object. Else, the field in HealthWorker is unchanged.
Upon a successful edit command, the HealthWorker or Request object that
has had it’s fields edited will immediately reflect the changes in details on
the GUI.
3.4. Delete feature
Using the delete command, the user can remove HealthWorker and Request
objects from the system.
The format for the delete command is as follows:
delete <keyword> <index>
The delete command takes in only two arguments after the delete command
word: the <keyword> corresponding to the respective CommandMode enum, as
well as the <index> of the HealthWorker or Request object to be
deleted, as indicated in the UniqueHealthWorkerList or UniqueRequestList
displayed in the GUI.
The <index> entered by the user is one-based, while it is converted to it’s
zero-based format in HealthHub during the deletion process. This ensures
that non-technical people who use HealthHub do not need to adjust to
zero-based indexing, and can continue using one-based indexing which they
are more familiar with.
If the user enters an invalid <index> field, such as a negative index or an
index that is greater than the size of the UniqueHealthWorkerList or
UniqueRequestList, then a ParseException will be thrown, and an error
message will be displayed to the user.
Upon successful delete of a valid HealthWorker or Request, the removed
entity will be immediately reflected on the GUI, and be removed from view.
3.5. Assign Request feature
The assign request feature allows an administrator to assign a request to a particular healthworker.
3.5.1. Current Implementation
The following sequence diagram shows the sequence flow from the LogicManager to the ModelManager when a user enters a assign request command:
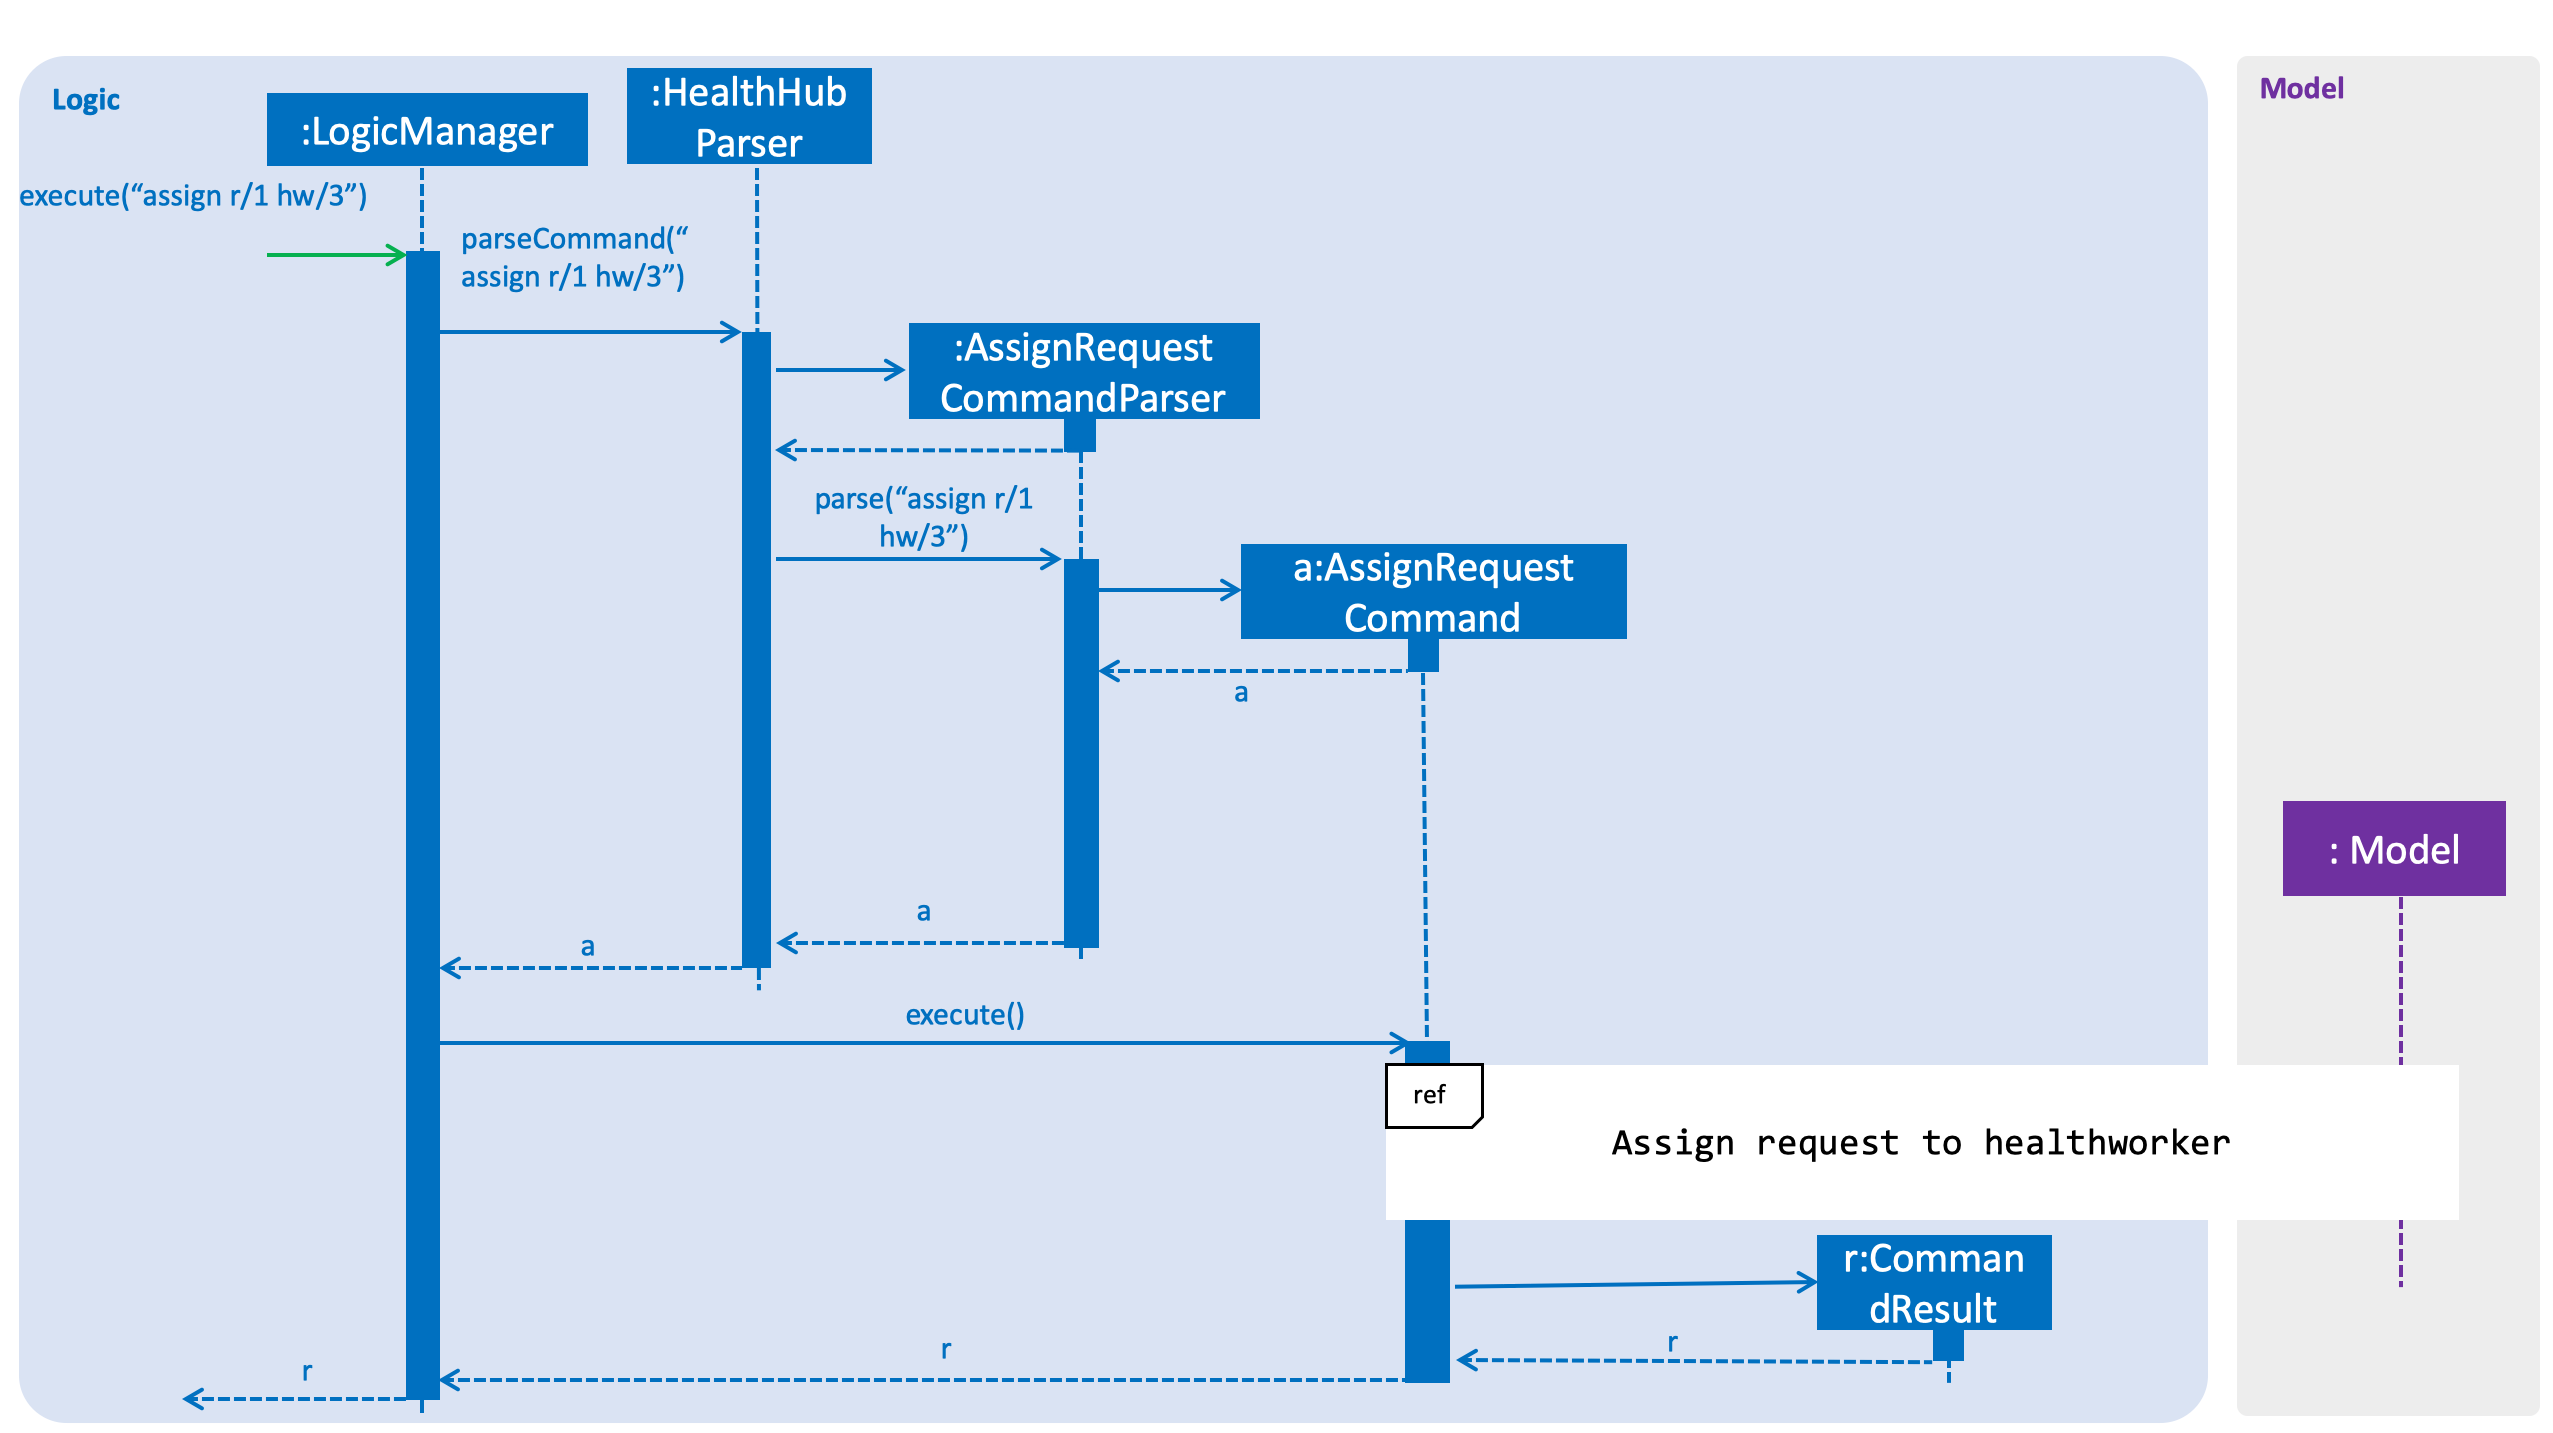
Figure 3.3.1.1 Sequence diagram to illustrate Logic component interactions for assign request command.
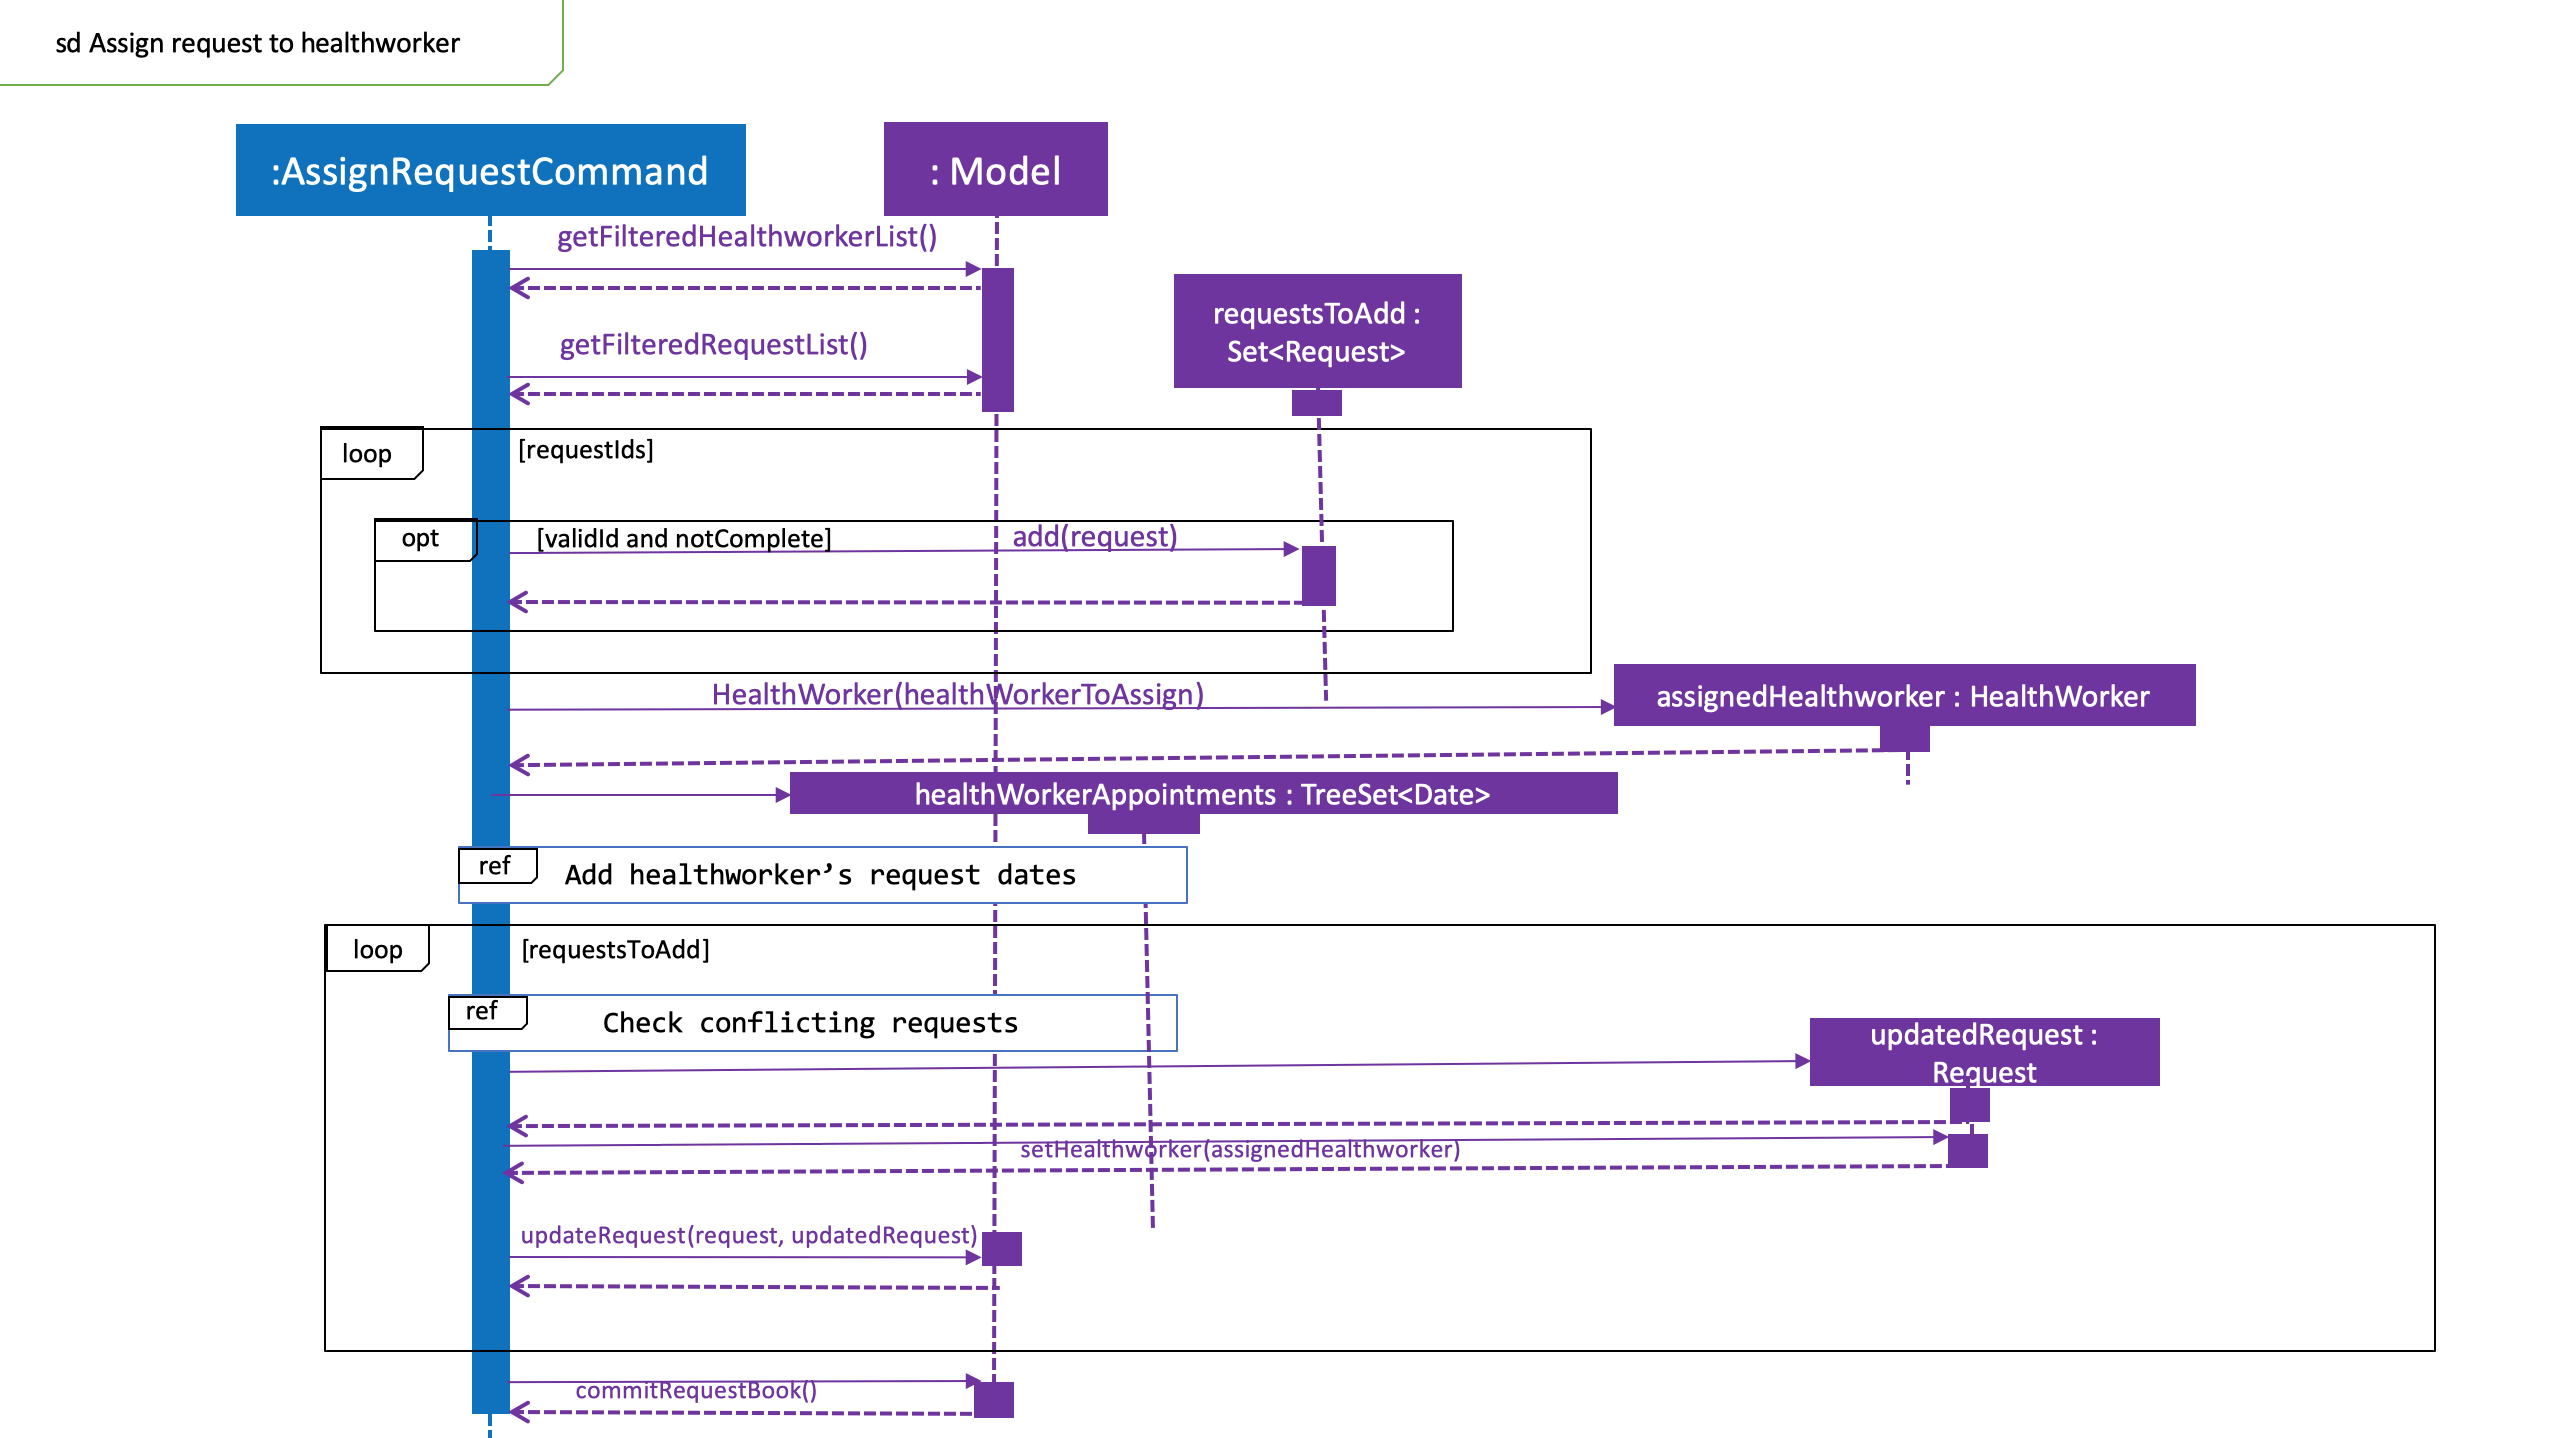
Figure 3.3.1.2 Sequence diagram to illustrate Logic and Model component interactions for AssignRequestCommand.
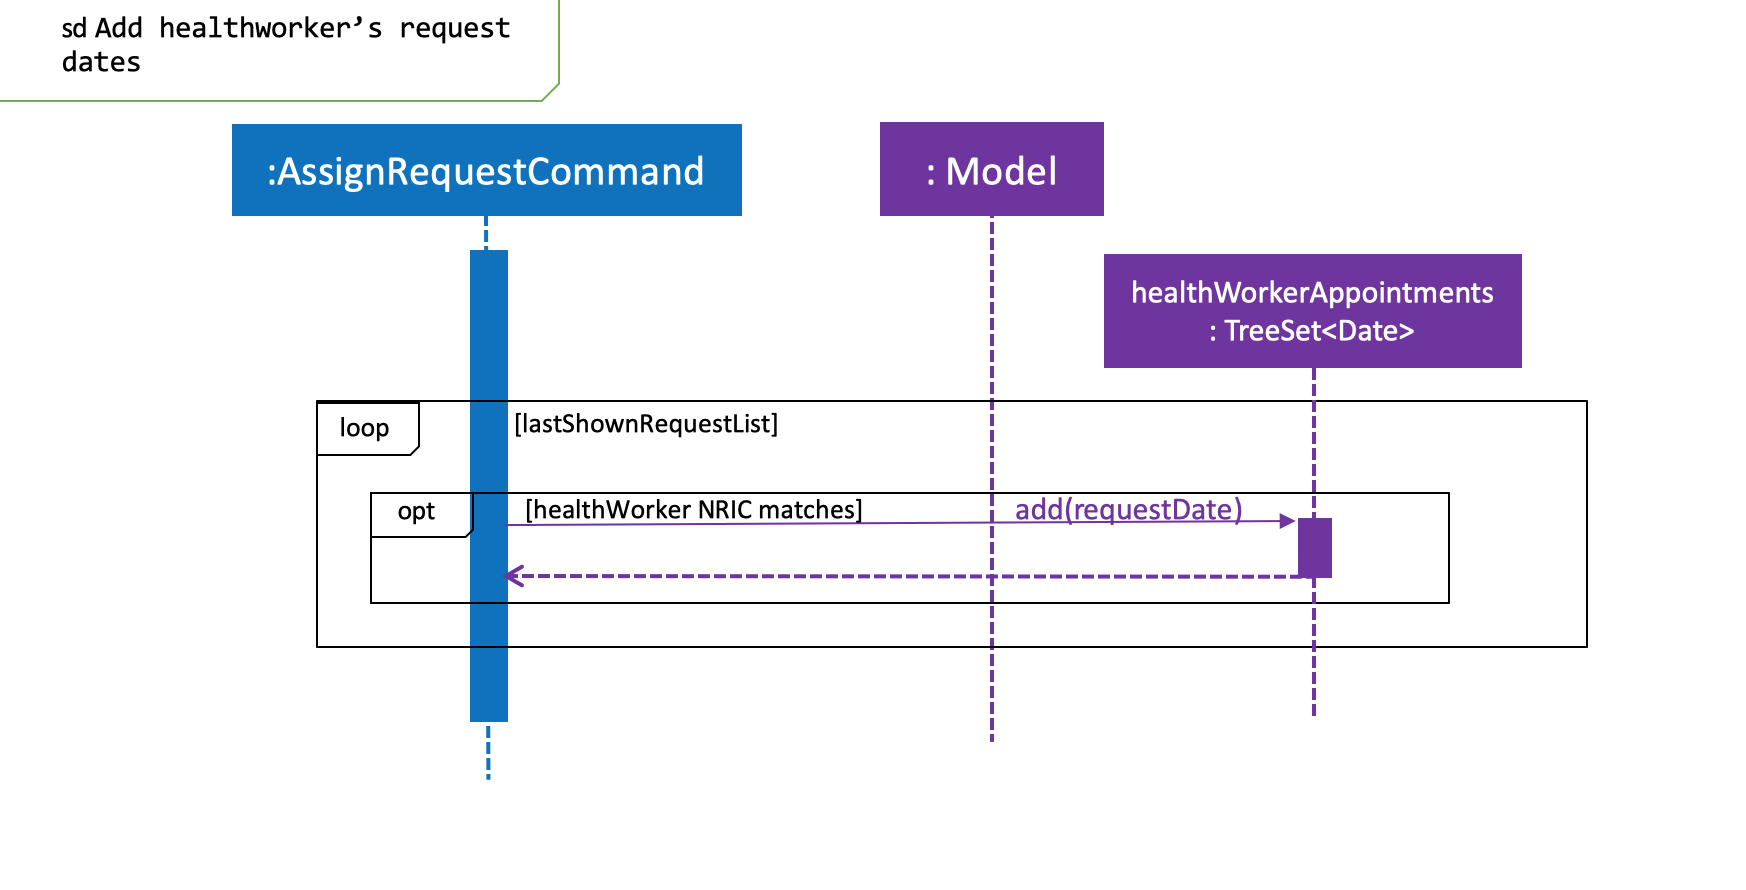
Figure 3.3.1.3 Sequence diagram illustrates addition of the relevant Date objects into the TreeSet<Date> of the healthWorker.
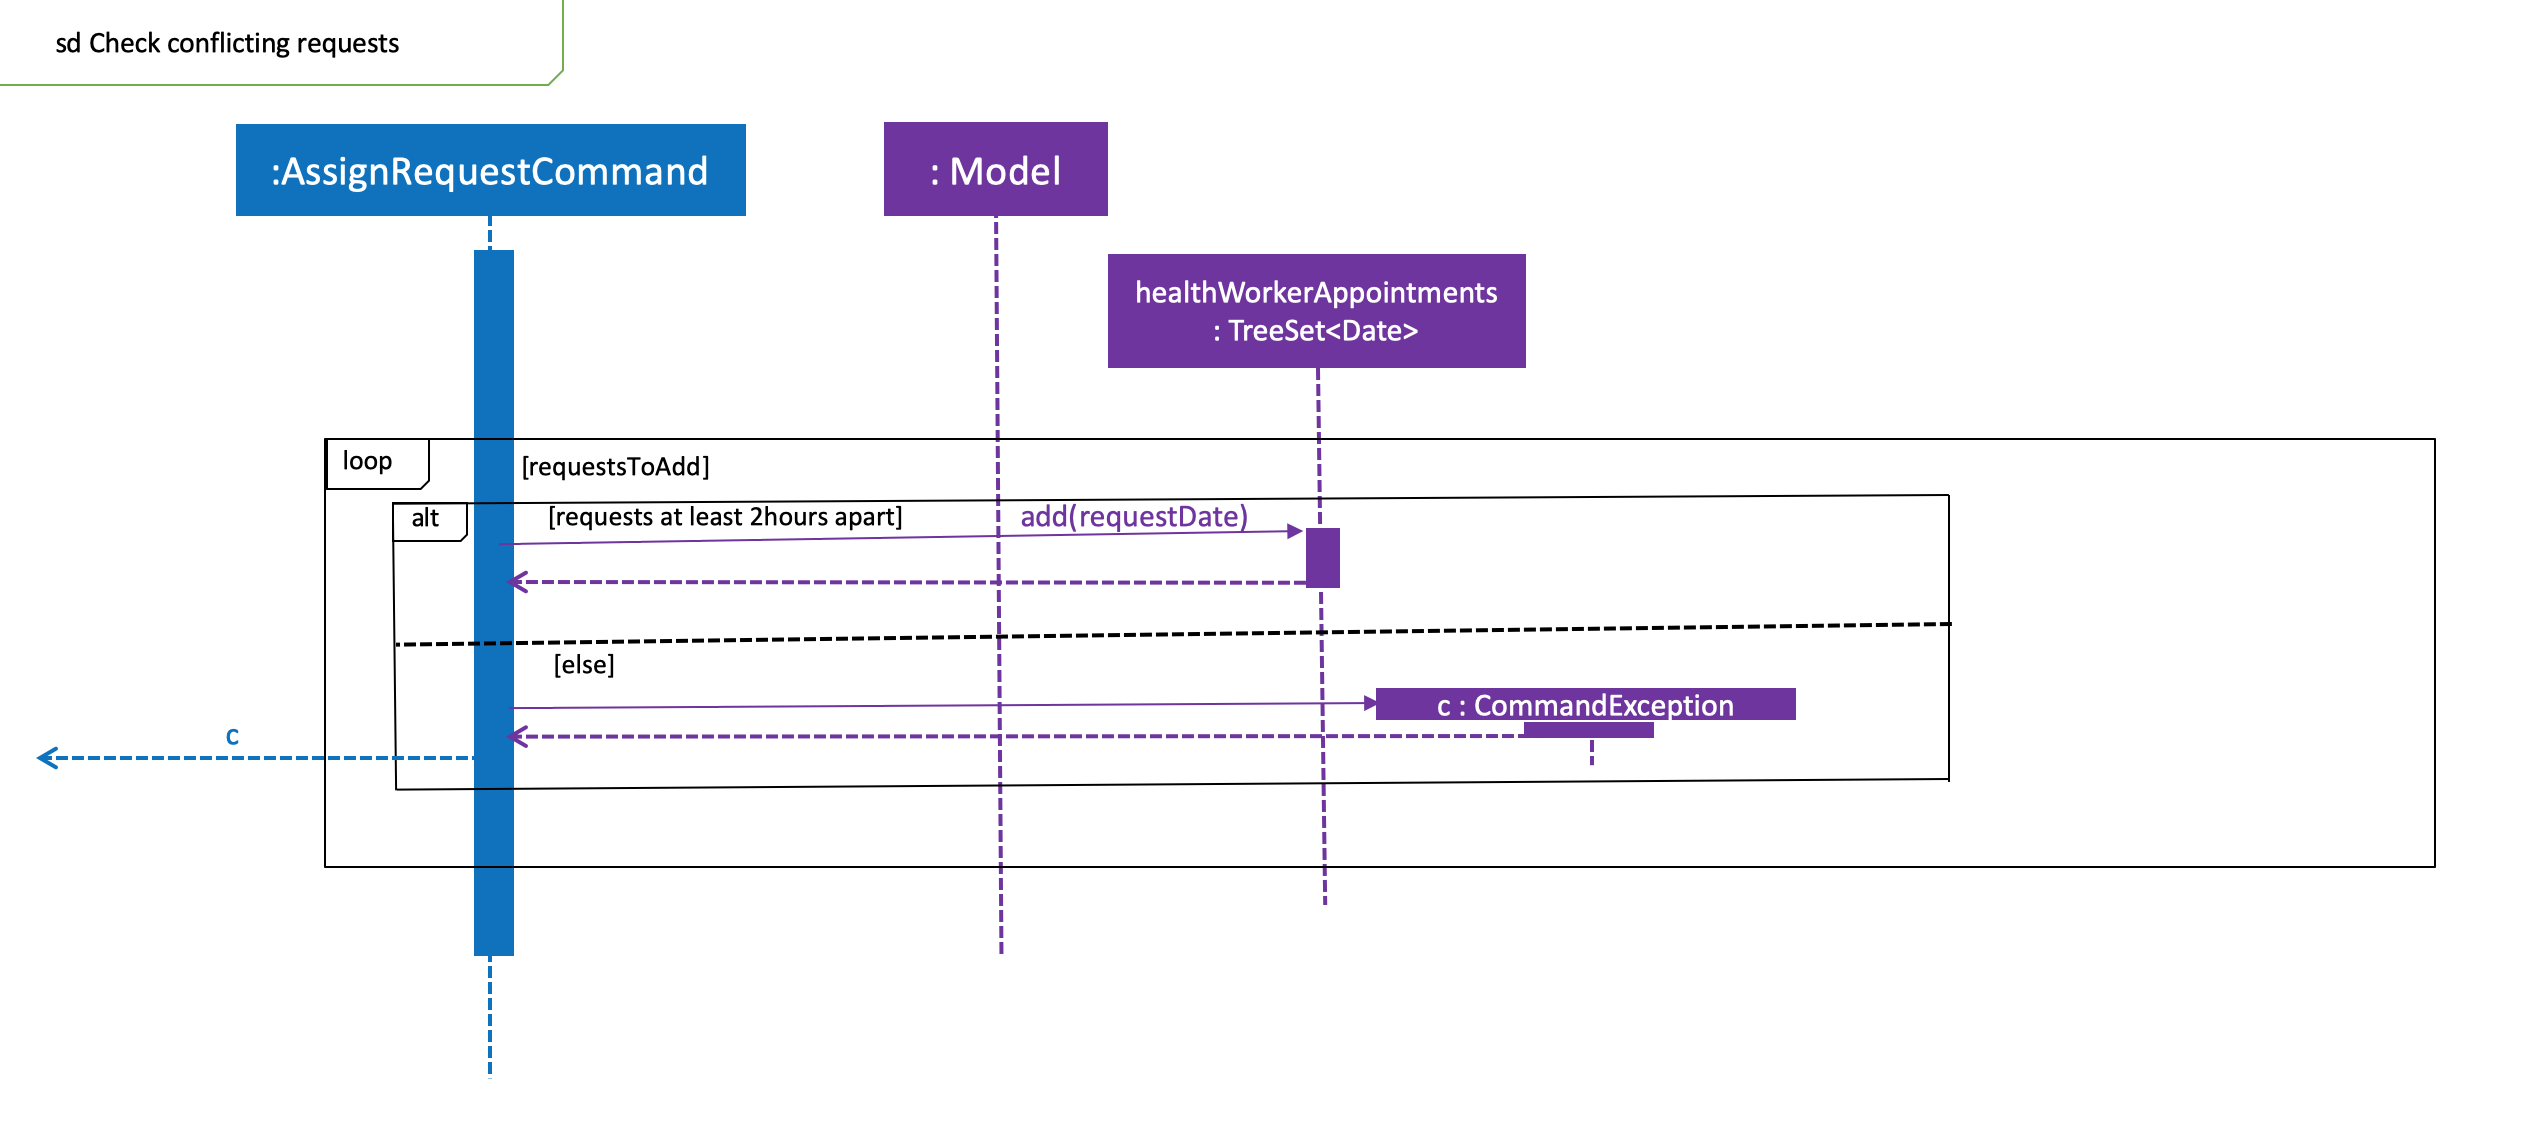
Figure 3.3.1.4 Sequence diagram illustrates interaction between AssignRequestCommand and healthWorkerAppointments
-
When
LogicManagerreceives theexecutecommand, it calls theparseCommandmethod inRequestBookParser. -
RequestBookParserwill receiveassignas the command and instantiateAssignRequestCommandParserto further parse the command. -
If the arguments specified in the
assigncommand are invalid, aAssignCommandwill be created and returned back to theLogicManager. -
LogicManagerwill proceed to call theexecutecommand ofAssignCommand -
AssignRequestCommandwill proceed to call thegetFilteredRequestListmethod ofModel. -
Iterate through the
requestIds, if valid, add therequestcorresponding to thatindexto the set ofRequest. -
Iterates through all the requests already assigned to that
healthWorker. If there is a conflict of schedule (i.e Requests assigned to that healthWorker are less than 2 hours apart), aCommandExceptionis thrown. -
Writes the updated request to the
RequestBookinModelManager, if all the request timings are valid.
3.5.2. Design Consideration
Aspect: Algorithm in ensuring no clashing requests assigned to healthworkers - Data Structure and implementation
-
Alternative 1 (current choice): Using a Balanced Binary Search Tree (java
TreeSet) to keep track of theRequestDateof each request attended to by a particularhealthWorker.-
Reasoning: Since the allowed time interval between 2 consecutive requests should be at least 2 hours, we can take advantage of of this by only keeping track of the start time of requests. Hence we can utilise the
ceiling(),contains()andfloor()methods of theTreeSet, which runs effeciently in O(log N) time (where N is the number of requests). Here is the code snippet that implements this:
-
    // Note: healthWorkerAppointments is the TreeSet that stores the appointment dates
    Date date = request.getRequestDate().getDate();
    calendar.setTime(date);
    calendar.add(Calendar.HOUR_OF_DAY, -MIN_REQUEST_DURATION); // MIN_REQUEST_DURATION = 2 hours
    Date lowerLimit = calendar.getTime();
    calendar.add(Calendar.HOUR_OF_DAY, 2 * MIN_REQUEST_DURATION);
    Date upperLimit = calendar.getTime();

    if (healthWorkerAppointments.contains(date) || (healthWorkerAppointments.lower(date) != null
          && healthWorkerAppointments.lower(date).after(lowerLimit))
          || (healthWorkerAppointments.higher(date) != null
          && healthWorkerAppointments.ceiling(date).before(upperLimit))) {
              throw new CommandException(Messages.MESSAGE_HEALTHWORKER_OCCUPIED_CANNOT_ASSIGN);
    }

    healthWorkerAppointments.add(date);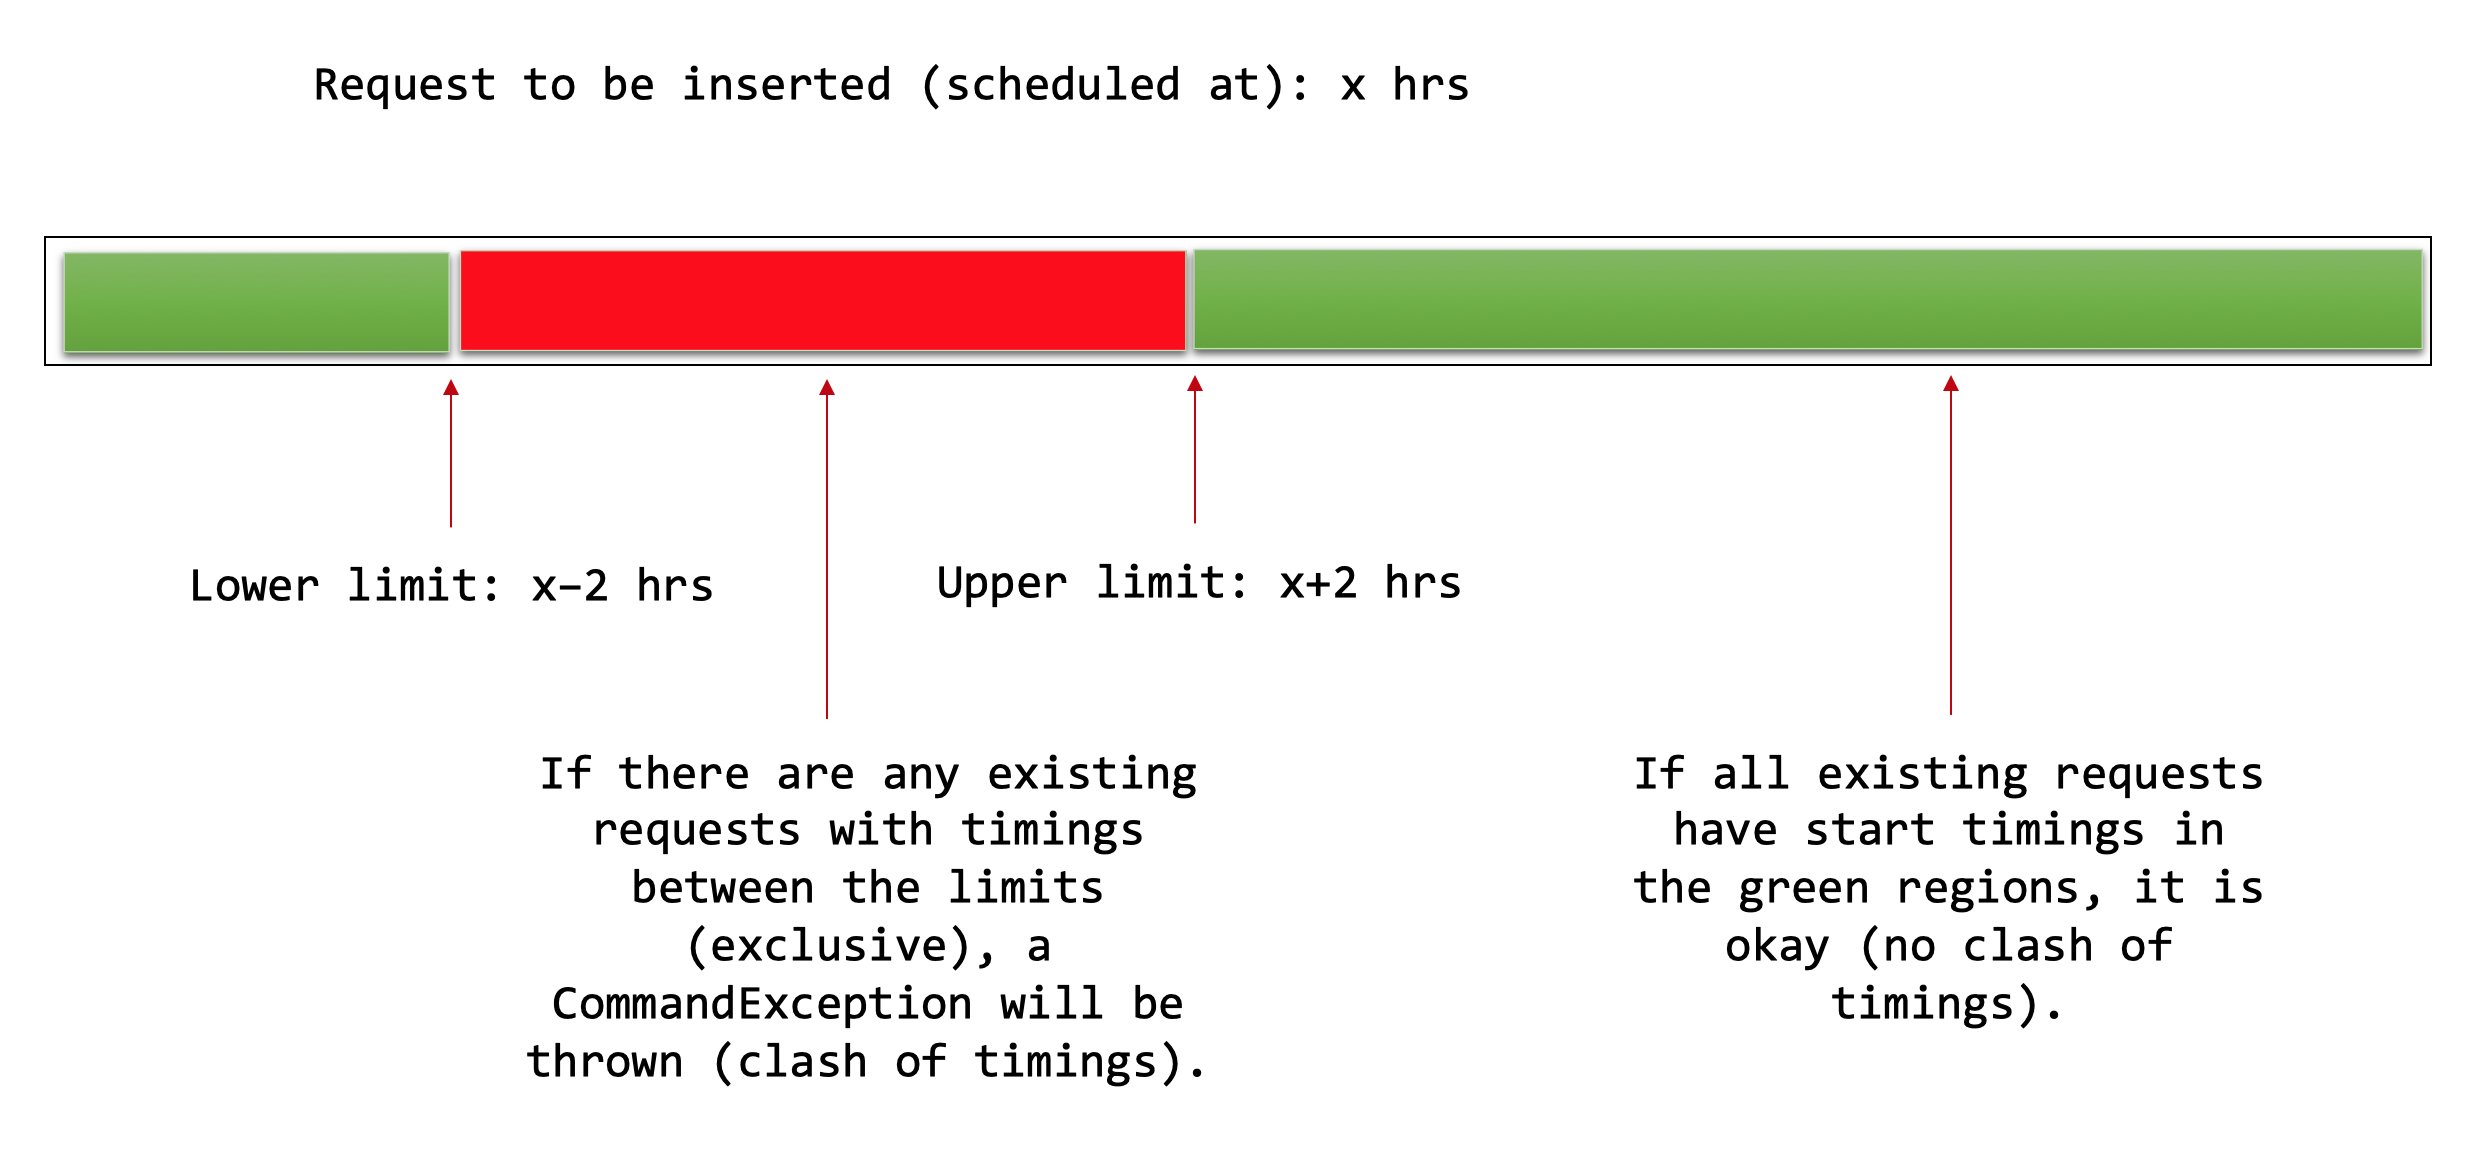
Figure 3.3.1.5 Shows visualisation of time ranges that are valid.
The above mentioned code snippet checks that there are not clashing requests that fall within the red region, as depicted in Figure 3.3.1.5.
-
Alternative 2: For each request to be assigned, manually iterate through the Request list to ensure that there are not clashing dates. Pros: Easy to implement Cons: Slow - in the worst case, if all the requests get assigned at once, this operation will run in O(n^2) time.
Aspect: Relationship between Request and Healthworker
-
Alternative 1 (current choice): The
Requestholds a unique identifier of theHealthWorker(i.e theNRIC) assigned to it.-
Pros: Simplification of implementation.
-
Pros: Cleaner implementation, low level of dependencies on other modules. This also makes it easier to test, and easier to maintain.
-
Cons: Makes it difficult to obtain all details of the
healthWorkerassigned from aRequestobject. The healthworker with the unique NRIC will have the be queried from thehealthWorkerList
-
-
Alternative 2: The
Requestholds aHealthWorkerobject and theHealthWorkerkeeps track of a list of `Request`s.-
Pros: Can quickly access details of a
HealthWorkerfrom aRequest, and can quickly access theRequestsassigned to aHealthWorkerfrom theRequest. -
Cons: Increases complexity of code base, adding additional dependencies to the code. This makes the code base more verbose and more difficult to maintain.
-
3.6. List Feature
The list command allows the user to be able to display all HealthWorker
or Request objects stored in the current application.
3.6.1. Listing HealthWorker objects
-
Format:
list healthworker/h/1 -
Displays all
HealthWorkerobjects already stored in the current application, and the following details:-
name- Name of theHealthWorker -
nric- NRIC of theHealthWorker -
organization- Organization of theHealthWorker -
skills- Skills and Specialisations that theHealthWorkerobject possesses
-
3.6.2. Listing Request objects
-
Format:
list request/r/2 -
Displays all
Requestobjects already stored in the current application, and the following details:-
name- Name of the patient that made the request inRequestobject. -
address- Address of the patient -
condition- Condition of the patient that made the request.
-
3.7. Filter Feature
With the filter command, users can provide specific parameters that act as
conditions for HealthHub to filter the UniqueHealthWorkerList and
UniqueRequestList by. Using these parameters, HealthHub displays only the
HealthWorker or Request whose fields contains the specified parameters.
Command Format: filter <keyword> <prefix>/<parameter> [<prefix>/<parameter>]
…
|
The |
3.7.1. Filtering HealthWorker
The command format for filtering HealthWorker is:
filter healthworker/h/1 <prefix>/<parameter> [<prefix>/<parameter>]…
The fields in HealthWorker that the user can filter by are:
-
nameprepended byn/prefix -
organisationprepended by theo/prefix -
specialisationprepend by thes/prefix
|
If multiple |
HealthHub filters the respective list of HealthWorker and Request by
checking if the corresponding field contains the specified parameter as a
substring.
For example entering the command filter h n/John displays a list of
HealthWorker whose name equals to John, or contains John as a substring(E.g
Johnny, Johnson).
3.7.2. Filtering HealthWorker
The filter command allows users to display only HealthWorker or Request
whose fields matches the <parameter> specified in the filter command.
Format: filter healthworker/h/1 <prefix>/<parameter> [<prefix/<parameter>]
…
-
The
filtercommand checks forHealthWorkerwhose field specific to the<specific>contains or matches the<parameter>provided. -
Example:
filter h n/Johnchanges the UI to display onlyHealthWorkerwhose name is John, or contains John (Johnny, Johnson, …)
Upon entering the filter command, the filter command word is stripped from the
input and the argument fields are passed into the FilterCommandParser class.
The regular expressions for checking the fields for name, organisation
and skills follows the same format as mentioned in add command. If
invalid parameters are specified by the user, or if an invalid keyword was
specified that does not correspond to any CommandMode enum, then
FilterCommandParser throws a ParseException and displays an error message
to the user.
If valid inputs are provided, FilterCommandParser tokenizes the argument
string without the keyword using ArgumentTokenizer object, mapping each
parameter to it’s respective prefix in an ArgumentMultiMap object.
FilterCommandParser then creates a Predicate object using the parameter
values in ArgumentMultiMap for each filter condition, and composes them
into a single Predicate using the and function in Predicate in
conjuction with stream and reduce methods from Java’s Function library.
The Predicate object composed is then passed into
FilterHealthWorkerCommand, which sets the predicate for the HealthWorker
list in the GUI to display only HealthWorker whose fields matches the
Predicate set.
Design Considerations
During the implementation of the filter command, we decide between two
alternative implementations of managing the Predicates created from
multiple criteria input by the user.
The following table states the considerations for performance as well as future implementations and enhancements to HealthHub that were taken into account:
| Design | Using a List of Predicate |
Composed Predicate using and method |
|---|---|---|
How it works |
Each user input condition will be parsed into |
Each user input will be parsed into a |
Implementation |
User inputs are first parsed into |
User inputs are parsed into |
Ultimately, the decision was made to implement the filter command by
composing the Predicate that were formed from the user inputs into a single
Predicate using a combination of Java’s Function library methods
stream and reduce, as well as the and method used in Java’s
Predicate library.
This is because maintain a List of Predicate in HealthHub requires an
unnecessary rework of many existing components in HealthHub in order to fit
the new implementation of using a List, such as replacing Predicate in
methods involved with List<Predicate>.
In addition, by returning a single Predicate object, ease of implementation
of methods in filter command, as well as any future or existing
enhancements to filter reduces the complexity of code as the function
needs only to depend on Predicate and not List, hence observing the Law
of Demeter.
Current Implementation
The following sequence diagram shows the flow of events when the filter h
s/physio command is entered by the user to display only HealthWorker
objects that possess expertise in physiotherapy:
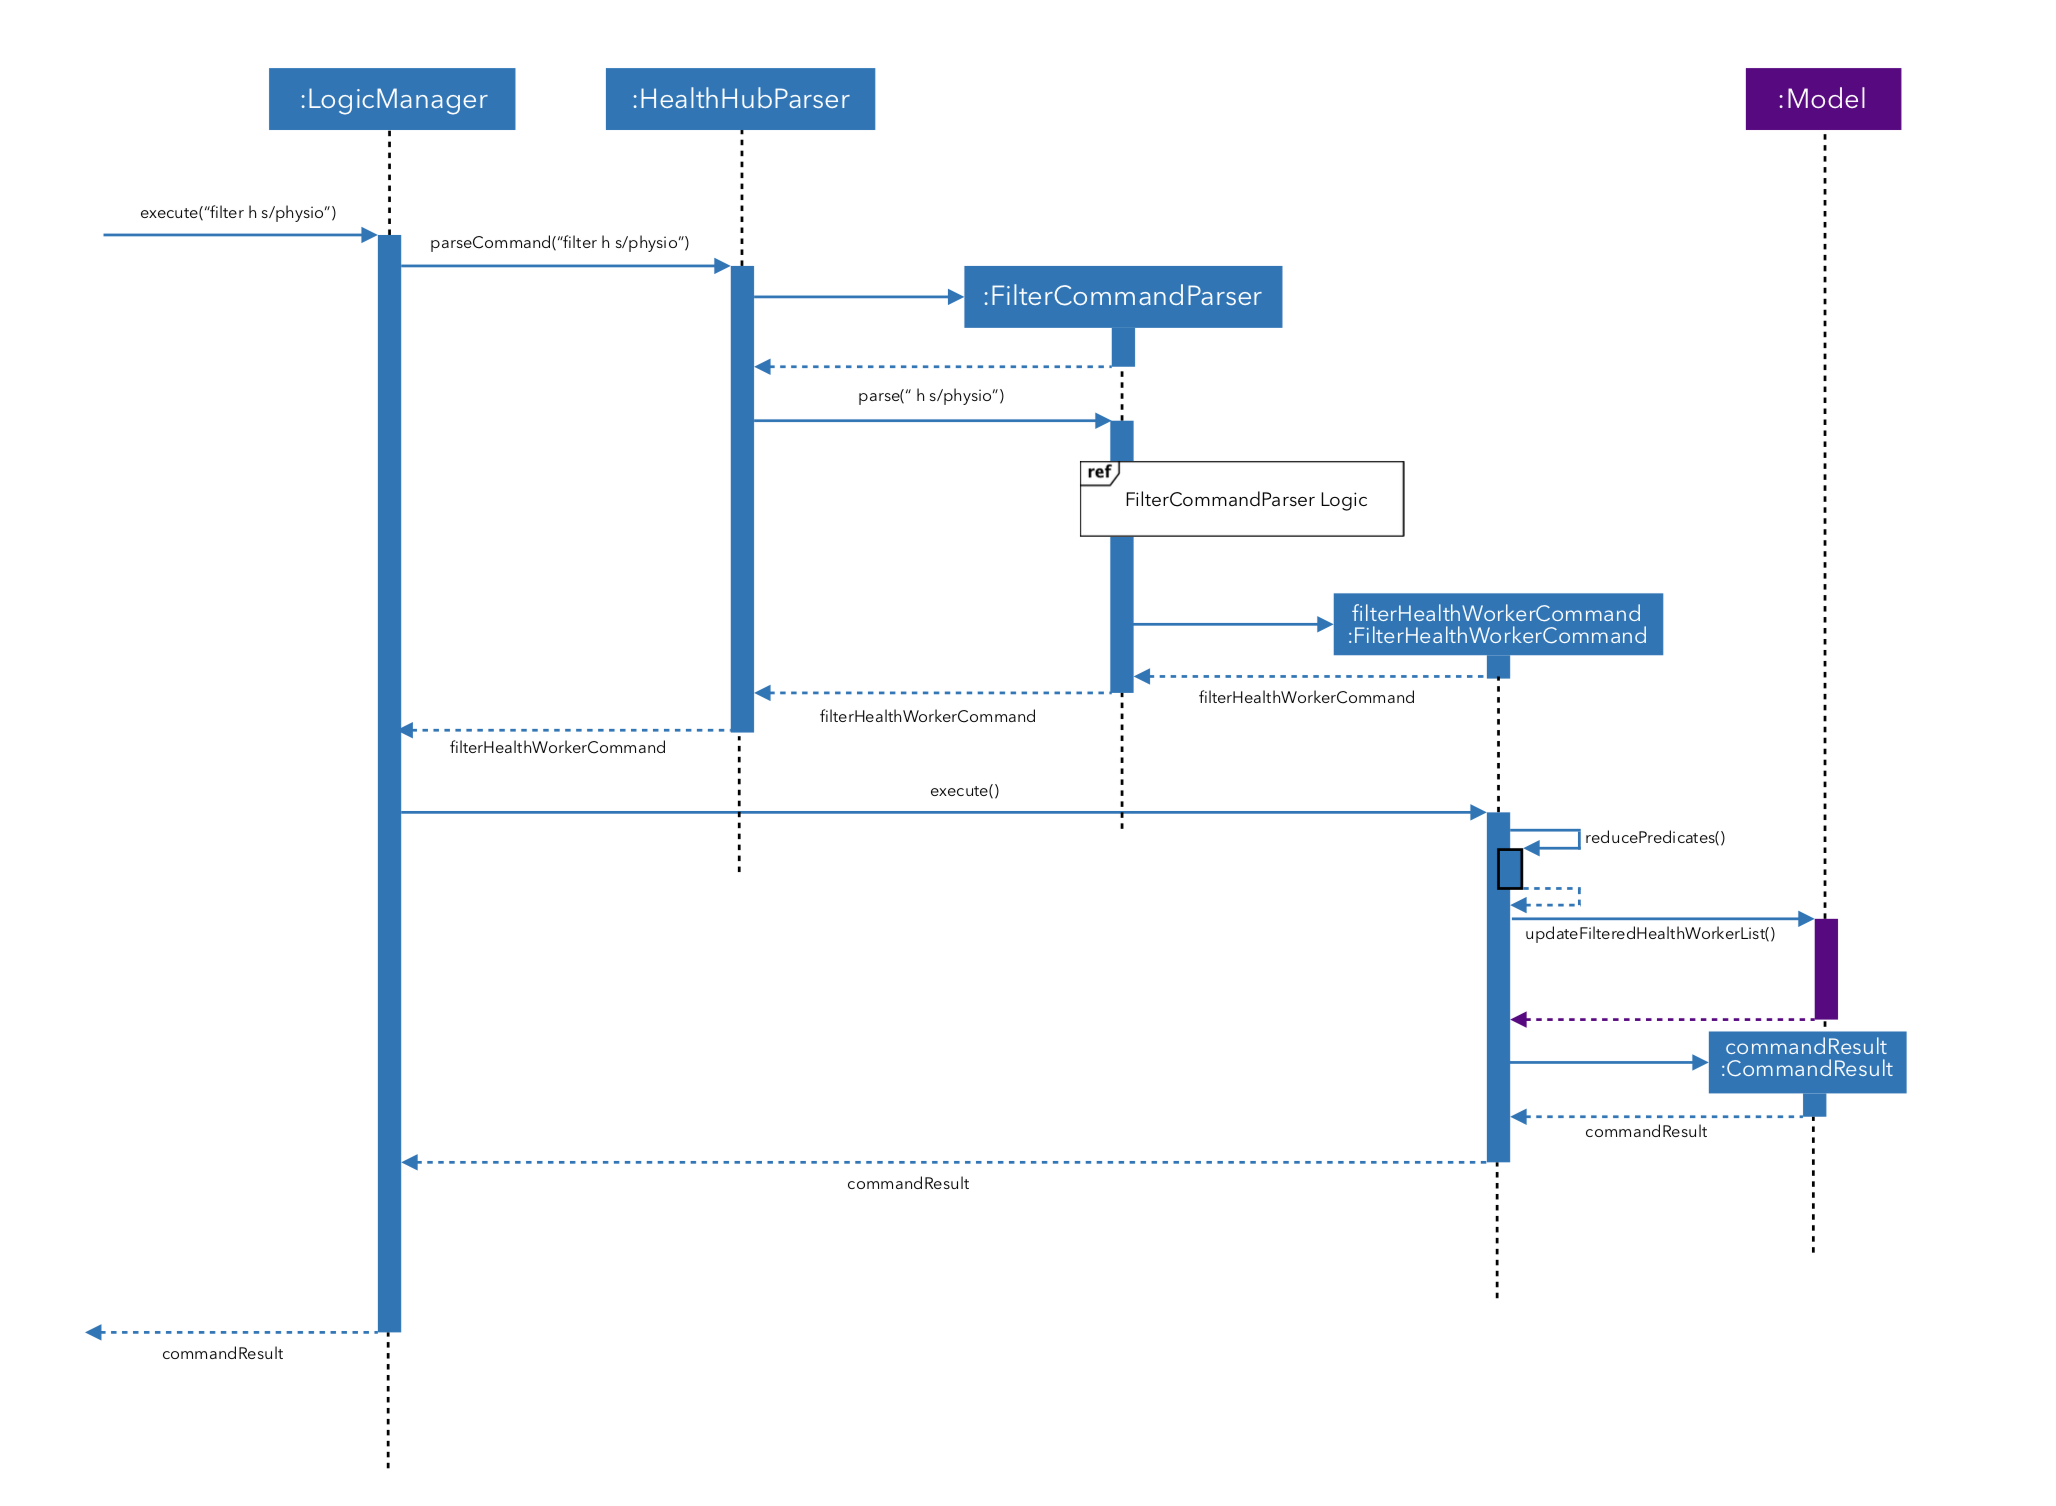
Figure 3.6.1.1: Sequence diagram illustrating the interactions between the
Logic and Model components when filter command is called.
-
When the user inputs the full command
filter h s/physio, theLogicManagerobject takes in the command string, and passes it intoHealthHubParserusing theparseCommandmethod. -
HealthHubParseridentifies the command word in the input string, which isfilter, and identifies the appropriateCommandParserobject to parse the user command. -
HealthHubParserstrips thefiltercommand word off the user input, and passes the remaining argument string in to a newFilterCommandParserobject as corresponding to thefiltercommand word. -
FilterCommandParserthen checks for a validCommandModethat corresponds to the first keyword in the argument string. In this case, the keywordhcorresponds to theCommandMode.HEALTHWORKERvalue.FilterCommandParserthen creates aFilterHealthWorkerCommandwith thePredicateconstructed from the fields remaining in the argument string. For full detail on the implementation of theFilterCommandParserlogic, see the sequence diagram in figure 3.6.1.2 below. -
FilterCommandParserreturns theFilterHealthWorkerCommandobject toHealthHubParser, which calls theexecutemethod ofFilterHealthWorkerCommand. -
FilterHealthWorkerCommanduses Java 8’sPredicateandFunctionlibraries to condense all the suppliedList<Predicate>into a singlePredicateusing theand,reduceandstreammethod calls. After which, it calls theupdateFilteredHealthWorkermethod inModelto set the condensedPredicateon theUniqueHealthWorkerBookinModel, displaying only theHealthWorkerthat evaluates the setPredicateto true on the GUI.
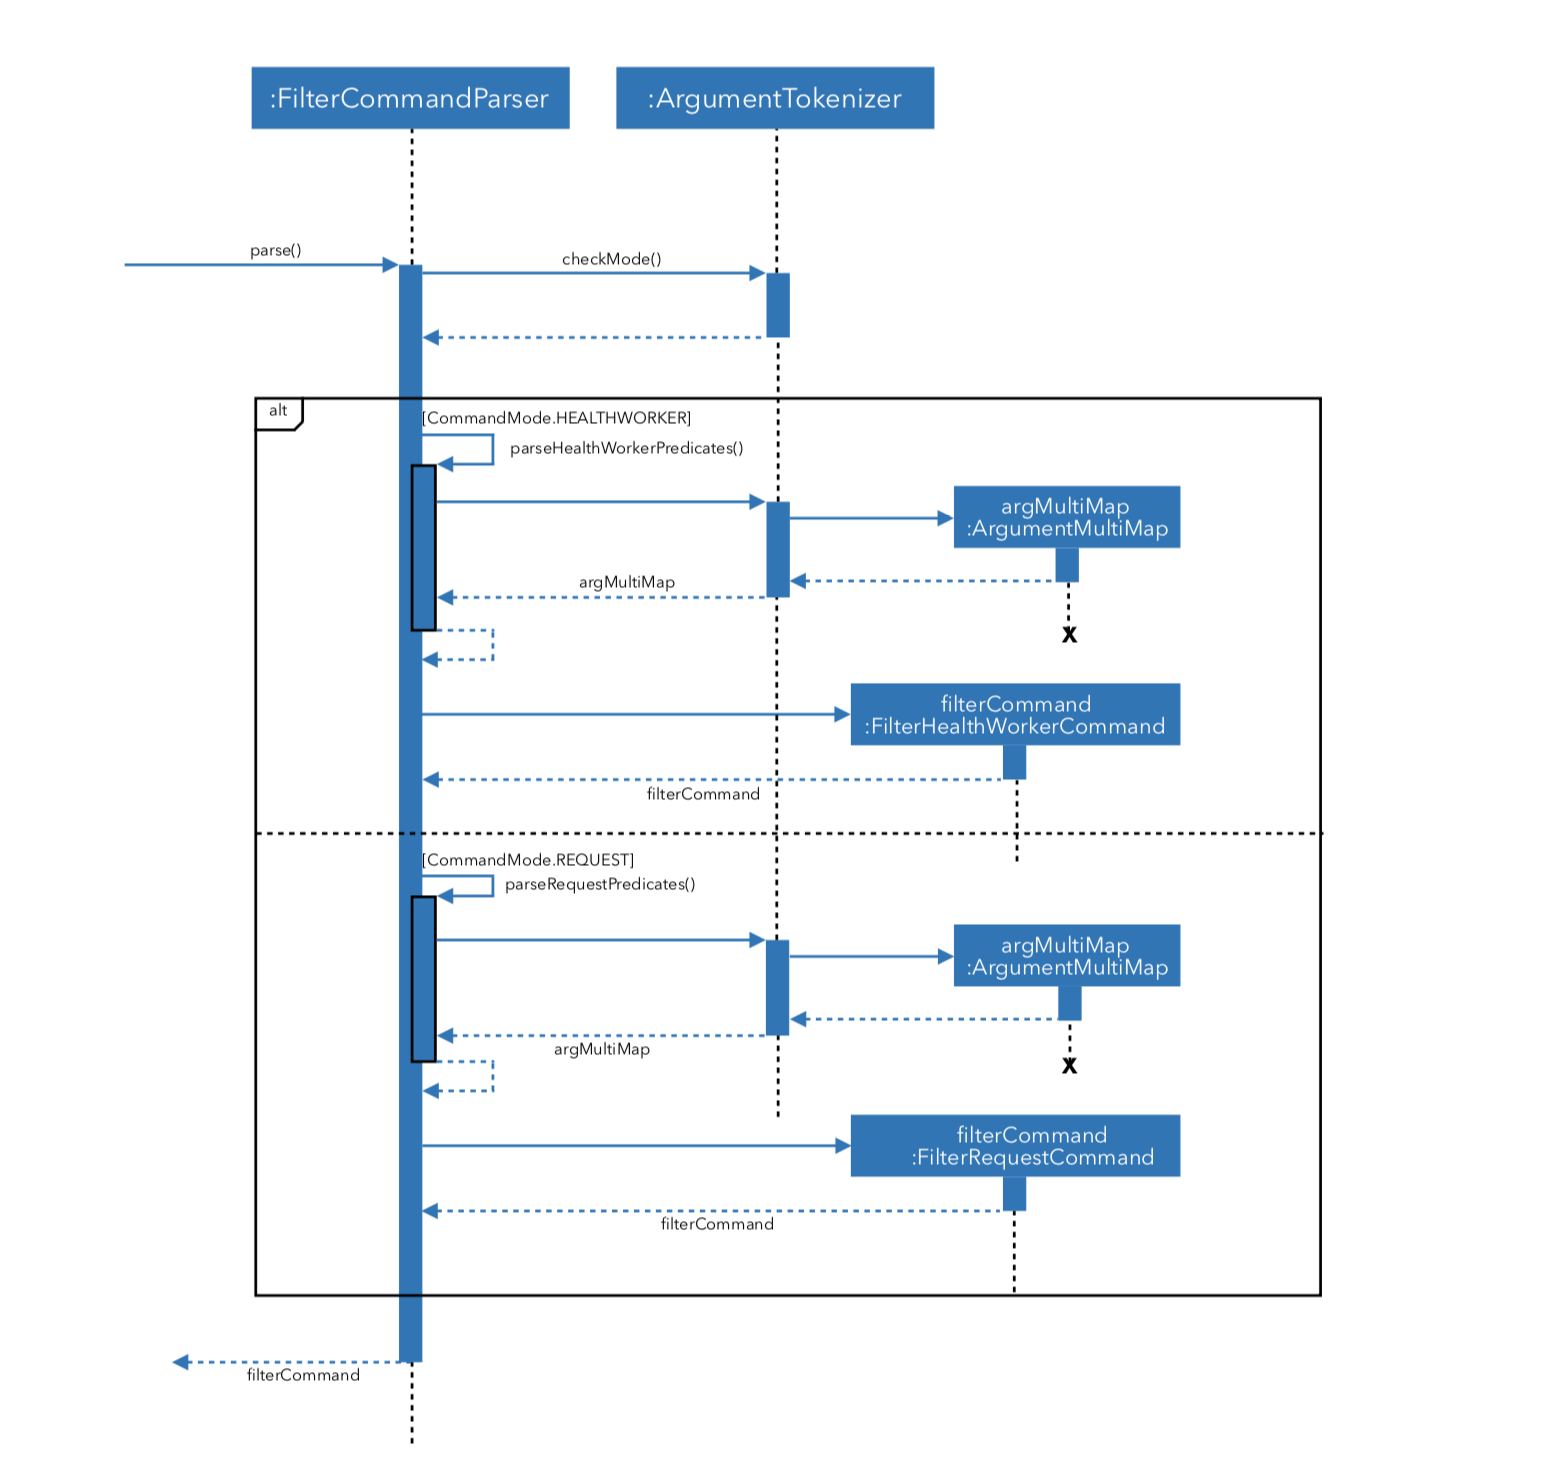
Figure 3.6.1.2 Sequence Diagram that details the interaction that happens
within the FilterCommandParser class when it’s parse() method is called.
3.8. Undo/Redo feature
3.8.1. Current Implementation
The undo/redo mechanism is facilitated by VersionedBook.
There are two extensions of it. VersionedHealthWorkerBook extends HealthWorkerBook and VersionedRequestBook extends RequestBook.
Both contain an undo/redo history, stored internally as an healthWorkerBookStateList or requestBookStateList
and currentStatePointer.
Additionally, it implements the following operations:
-
VersionedBook#commit()— Saves the current request/healthworker book state in its history. -
VersionedBook#undo()— Restores the previous request/healthworker book state from its history. -
VersionedBook#redo()— Restores a previously undone request/healthworker book state from its history.
These operations are exposed in the Model interface as Model#commit(), Model#undo()
and Model#redo() respectively.
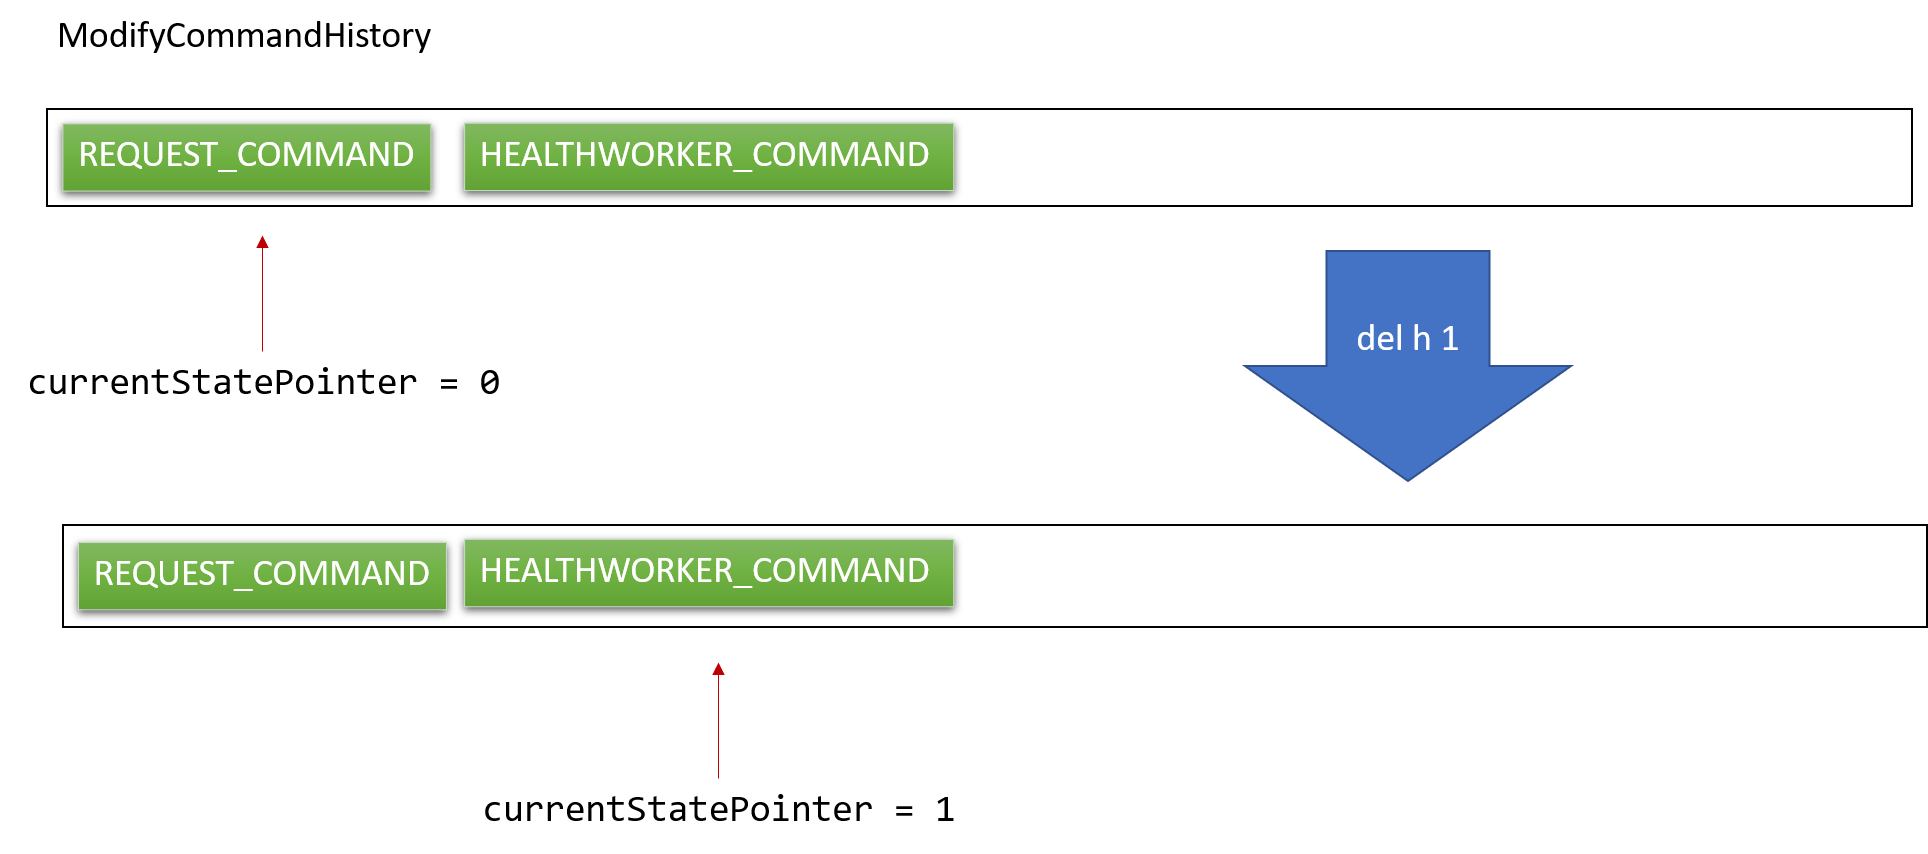
The feature also makes use ModifyCommandHistory to keep track of the commands that modified the books. It contains
currentStatePointer and a list of CommandType enums to differenciate the type of command to undo or redo.
Similar to CommandMode, the various CommandType enums are:
-
CommandType.HEALTHWORKER_COMMAND -
CommandType.REQUEST_COMMAND -
CommandType.HEALTHWORKER_AND_REQUEST_COMMAND
Given below is an example usage scenario and how the undo/redo mechanism behaves at each step.
Step 1. The user launches the application for the first time. The VersionedRequestBook and VersionedHealthWorkerBook will be initialized with the initial state,
and the currentStatePointer for each VersionedBook pointing to that single book state.
Since no modify command has been called, the initial list of commands in ModifyCommandHistory is empty and the initial currentStatePointer of ModifyCommandHistory is initialized to -1.


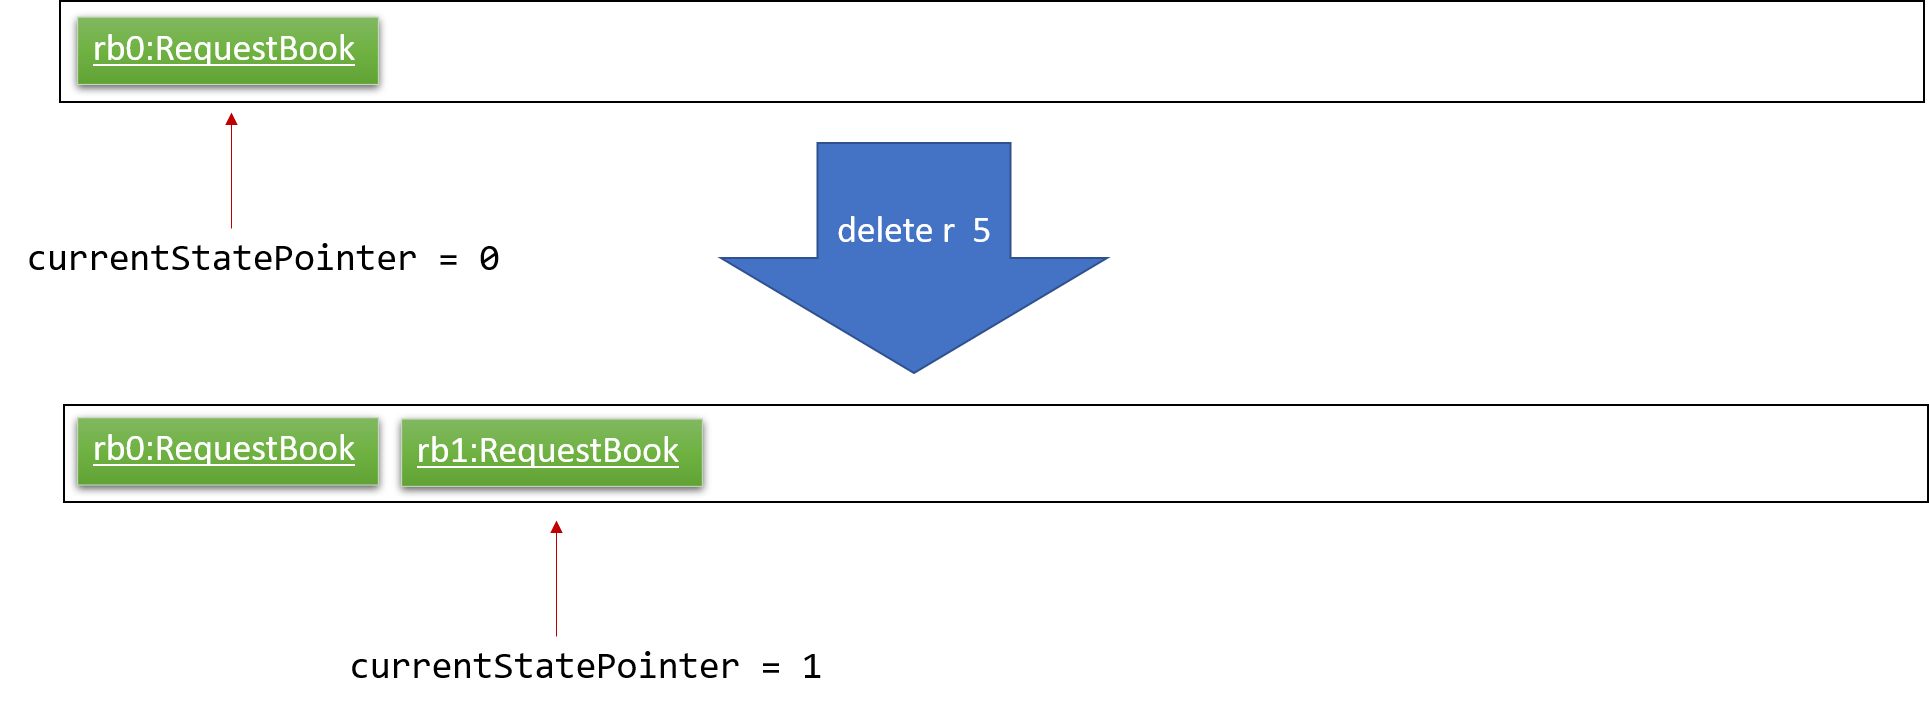
Step 2. The user executes delete r 5 command to delete the 5th request in request book. The delete r command calls Model#commit(REQUEST_COMMAND), causing the modified state of the request book after the delete r 5 command executes to be saved in the requestBookStateList, and the currentStatePointer is shifted to the newly inserted request book state.
Since the request book is modified, the enum REQUEST_COMMAND is added to the modifyCommandHistory list within the ModifyCommandHistory class and the currentStatePointer is now pointing at the most recent command.
The VersionedHealthWorkerBook is unaffected.

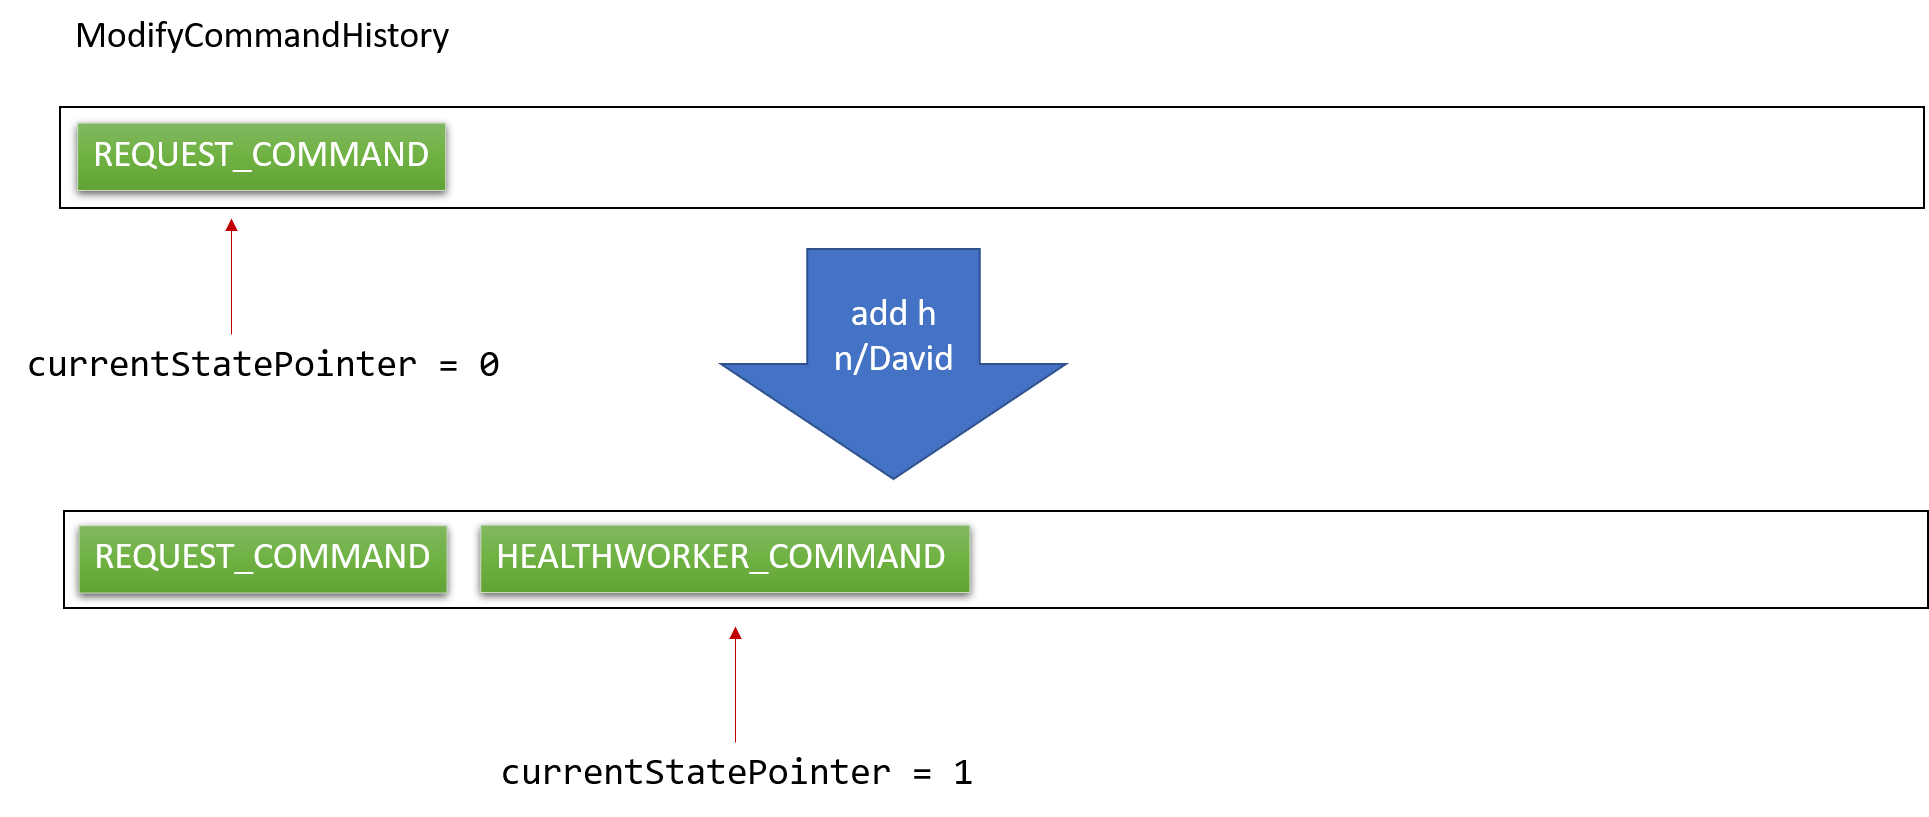
Step 3. The user executes add h n/David … to add a new healthworker. The add h command also calls Model#commit(HEALTHWORKER_COMMAND), causing a modified health worker book state to be saved into the healthWorkerBookStateList and the currentStatePointer is shifted to the new health worker book state.
The enum HEALTHWORKER_COMMAND is added into the modifyCommandHistory list of the ModifyCommandHistory class.
The VersionedRequestBook is unaffected.

If a command fails its execution, it will not call Model#commit(), so the book state will not be saved into the healthWorkerBookStateList or requestBookStateList.
|
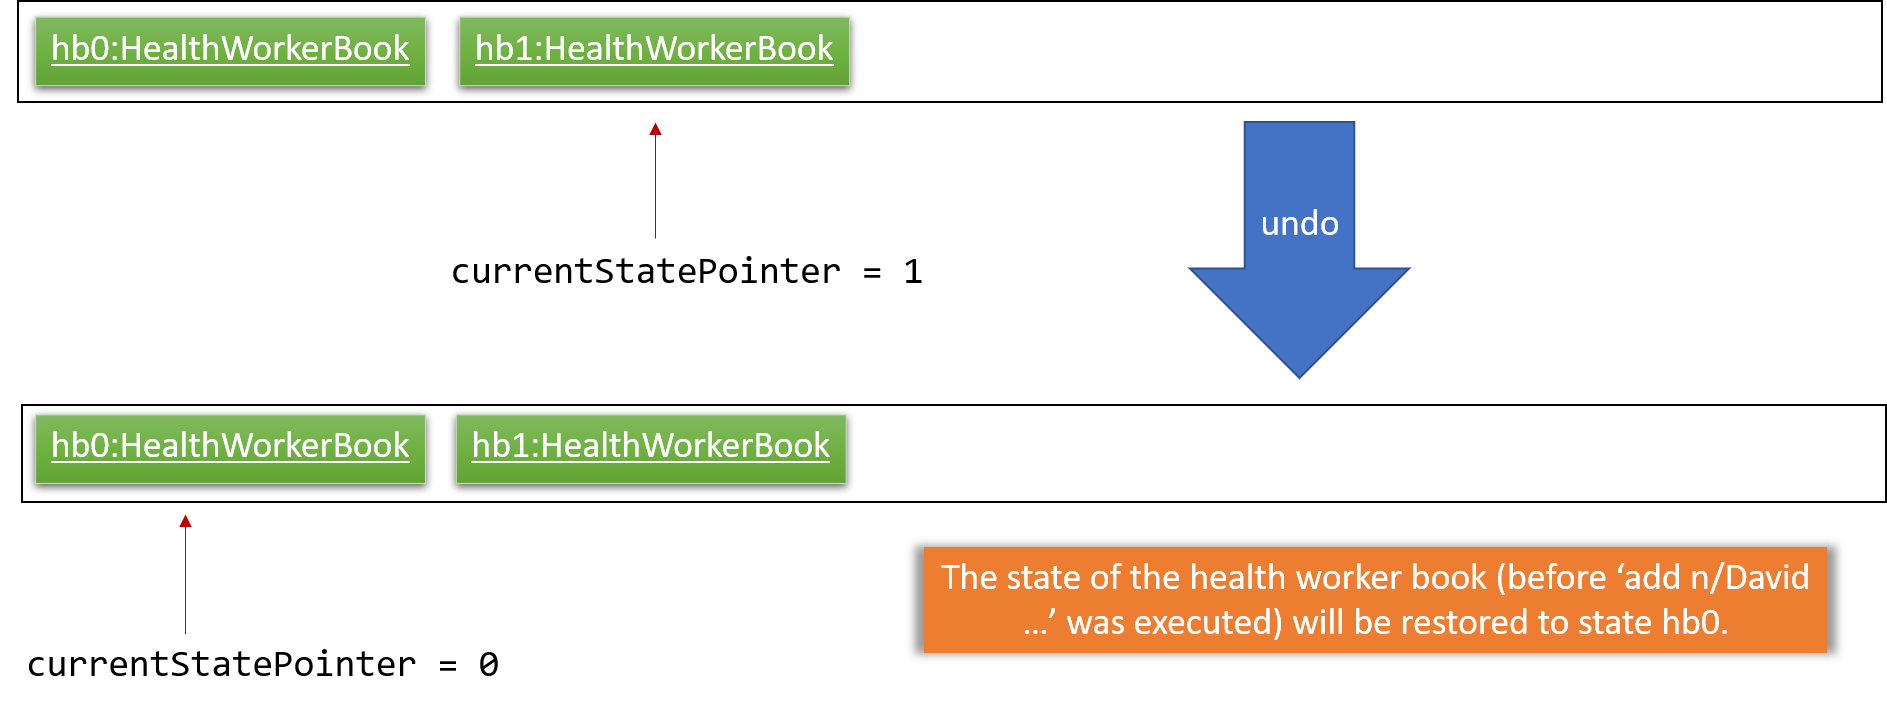
Step 4. The user now decides that adding the health worker was a mistake, and decides to undo that action by executing the undo command.
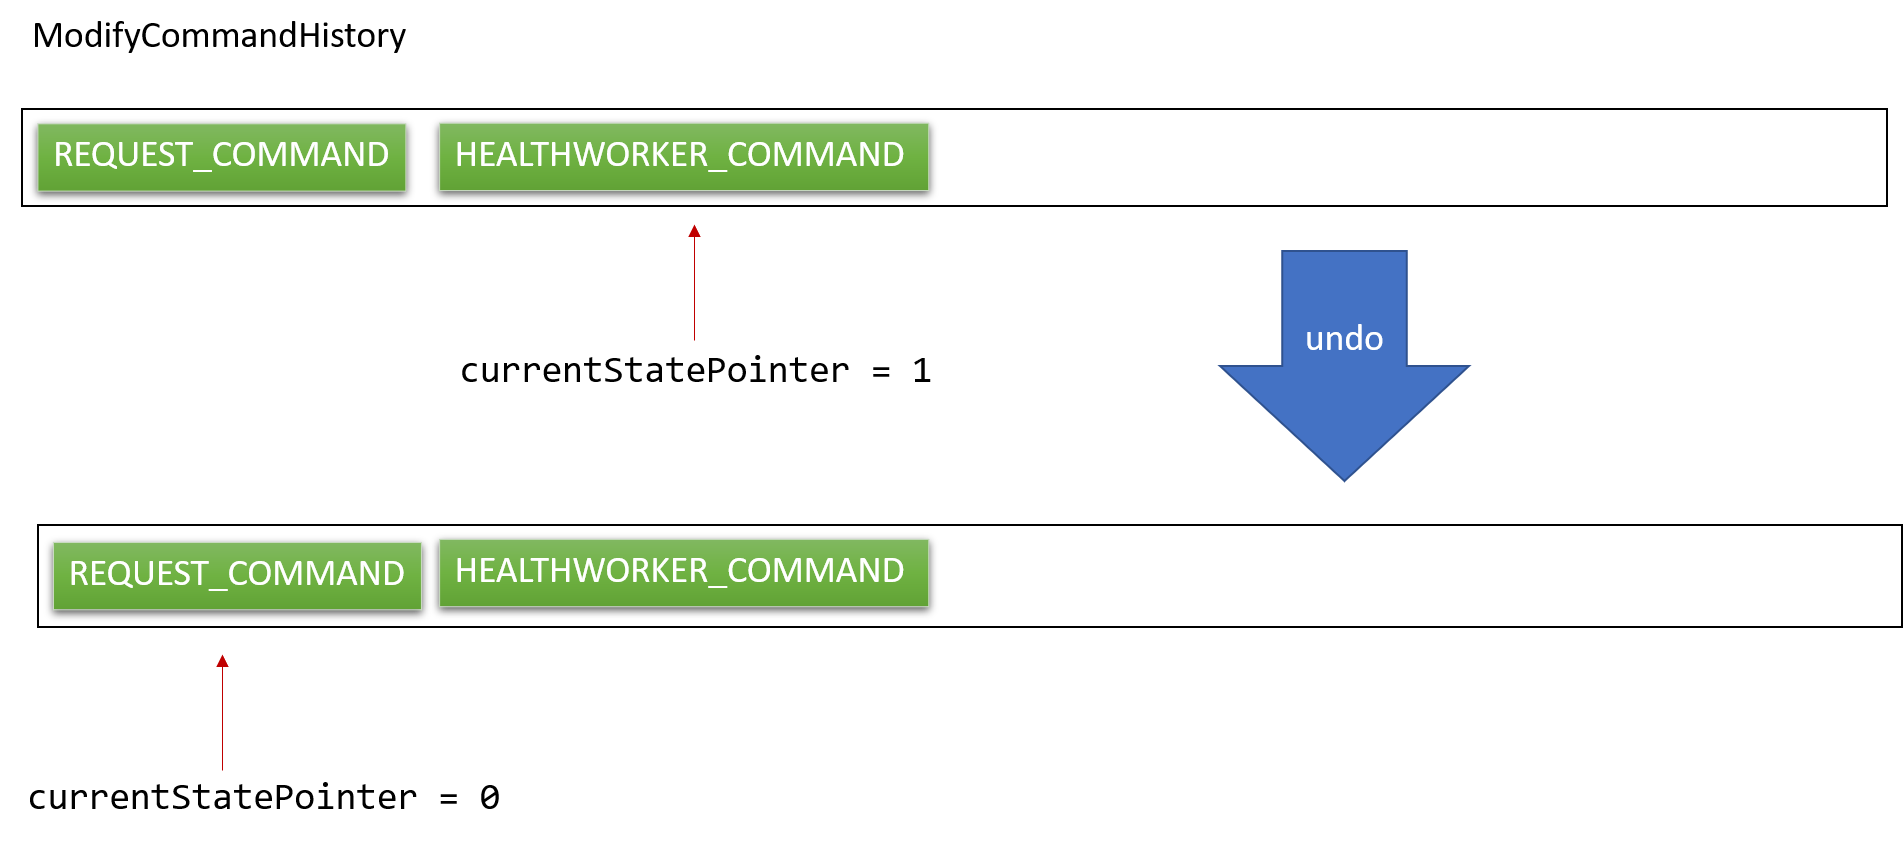
The undo command will call Model#undo(), which will first obtain the type of command that needs to be undone by caling ModifyCommandHistory#getUndoCommand(). In this case HEALTHWORKER_COMMAND is returned, and hence will call undo on VersionedHealthWorkerBook. It will shift the currentStatePointer once to the left, pointing it to the previous health worker book state, and restores the health worker book to that state.
The currentStatePointer of the ModifyCommandHistory also gets shifted once to the left, pointing it to the previous command.
If the currentStatePointer of both VersionedHealthWorkerBook and VersionedRequestBook is at index 0, pointing to the initial book state for both books, then there are no previous states to restore. The undo command uses Model#canUndo() to check if this is the case. If so, it will return an error to the user rather than attempting to perform the undo.
|
As of version 1.4, the only command that has modifies both the health worker book and the request book is EditHealthWorkerCommand.
It is the only command that has CommandType.HEALTHWORKER_AND_REQUEST_COMMAND.
|
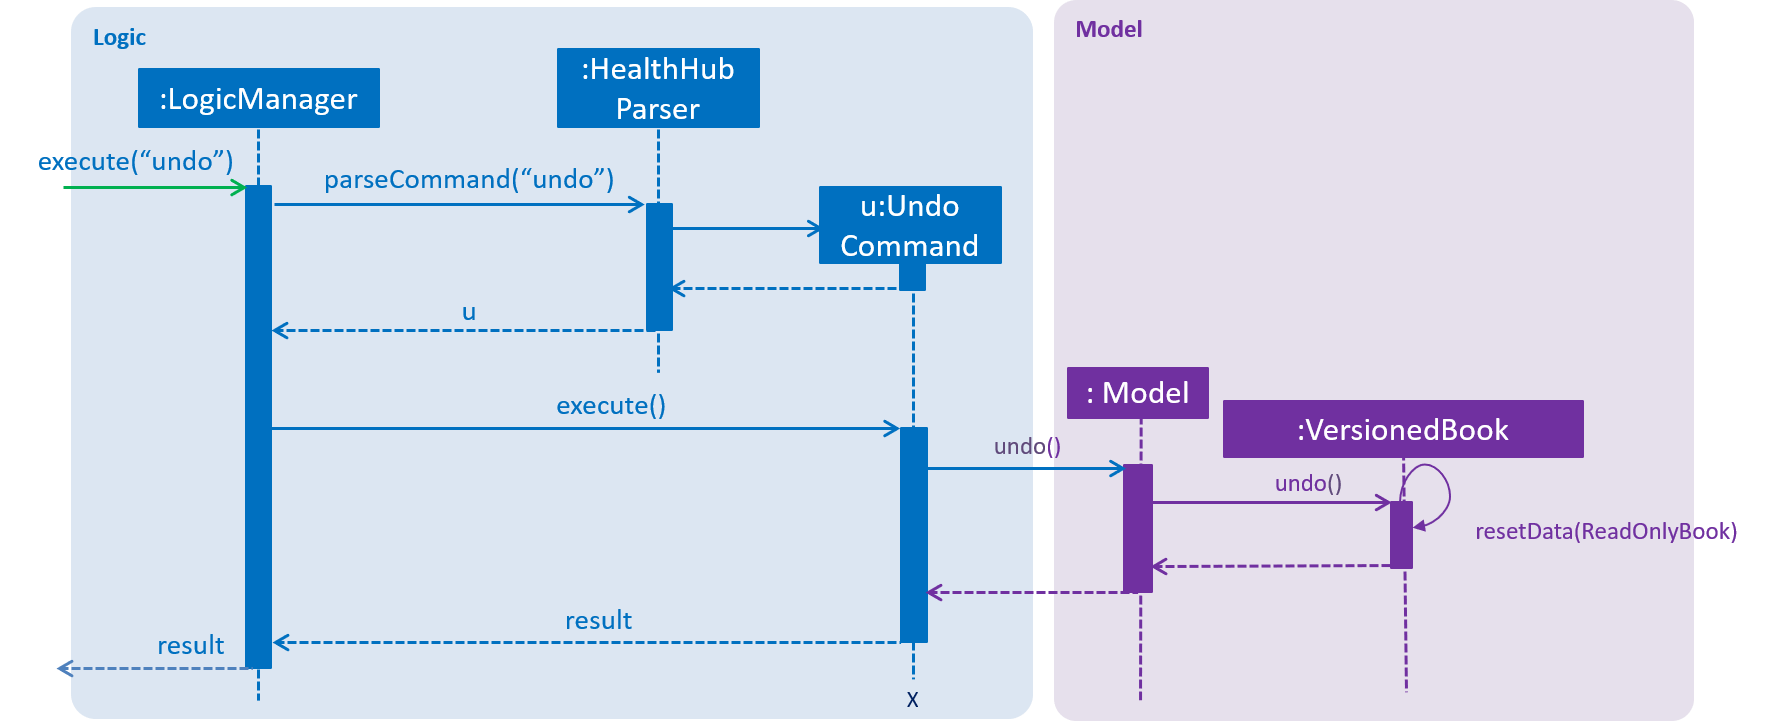
The user first enters the undo command in the command line interface. The logic manager processes the command as a string
and checks using the AddressBookParser is the string is a valid command. In this case, the parser sees that the command string
matches the undo command string and hence returns an undo command to the LogicManager which then calls execute() to execute the command.
The execute() method calls Model#undo() in which the model checks the ModifyCommandHistory for the correct VersionedBook that needs to be undone
and then calls VersionedBook#undo(). Upon a successful undo, the UndoCommand will return a successful result to the LogicManager
which will then the "Undo Success!" message will be displayed on the command line interface.
The following sequence diagram shows how the undo operation works:
The redo command does the opposite — it calls Model#redo(), which first obtains the command type by calling ModifyCommandHistory#getRedoCommand() and based on the returned command type it shifts the currentStatePointer once to the right, pointing to the previously undone state, and restores the respective book to that state.
If the currentStatePointer of both VersionedBook s are pointing to the latest state, then there are no undone book states to restore. The redo command uses Model#canRedo() to check if this is the case. If so, it will return an error to the user rather than attempting to perform the redo.
|
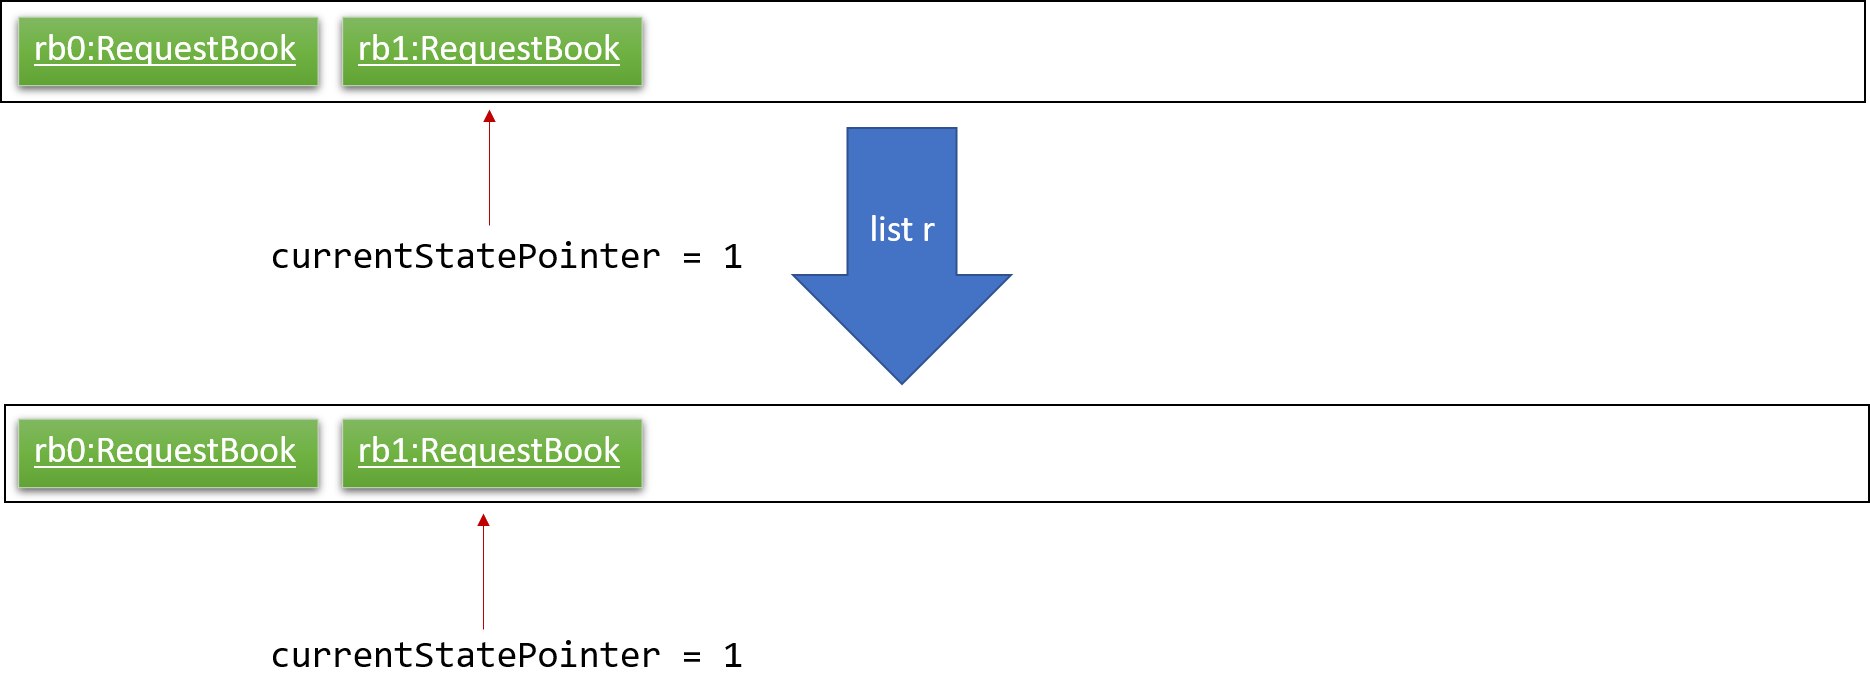
Step 5. The user then decides to execute the command list r. Commands that do not modify the books, such as list r,
will not call Model#commit(), Model#undo() or Model#redo(). Thus, the VersionedBook s and ModyfiCommandHistory do not change.
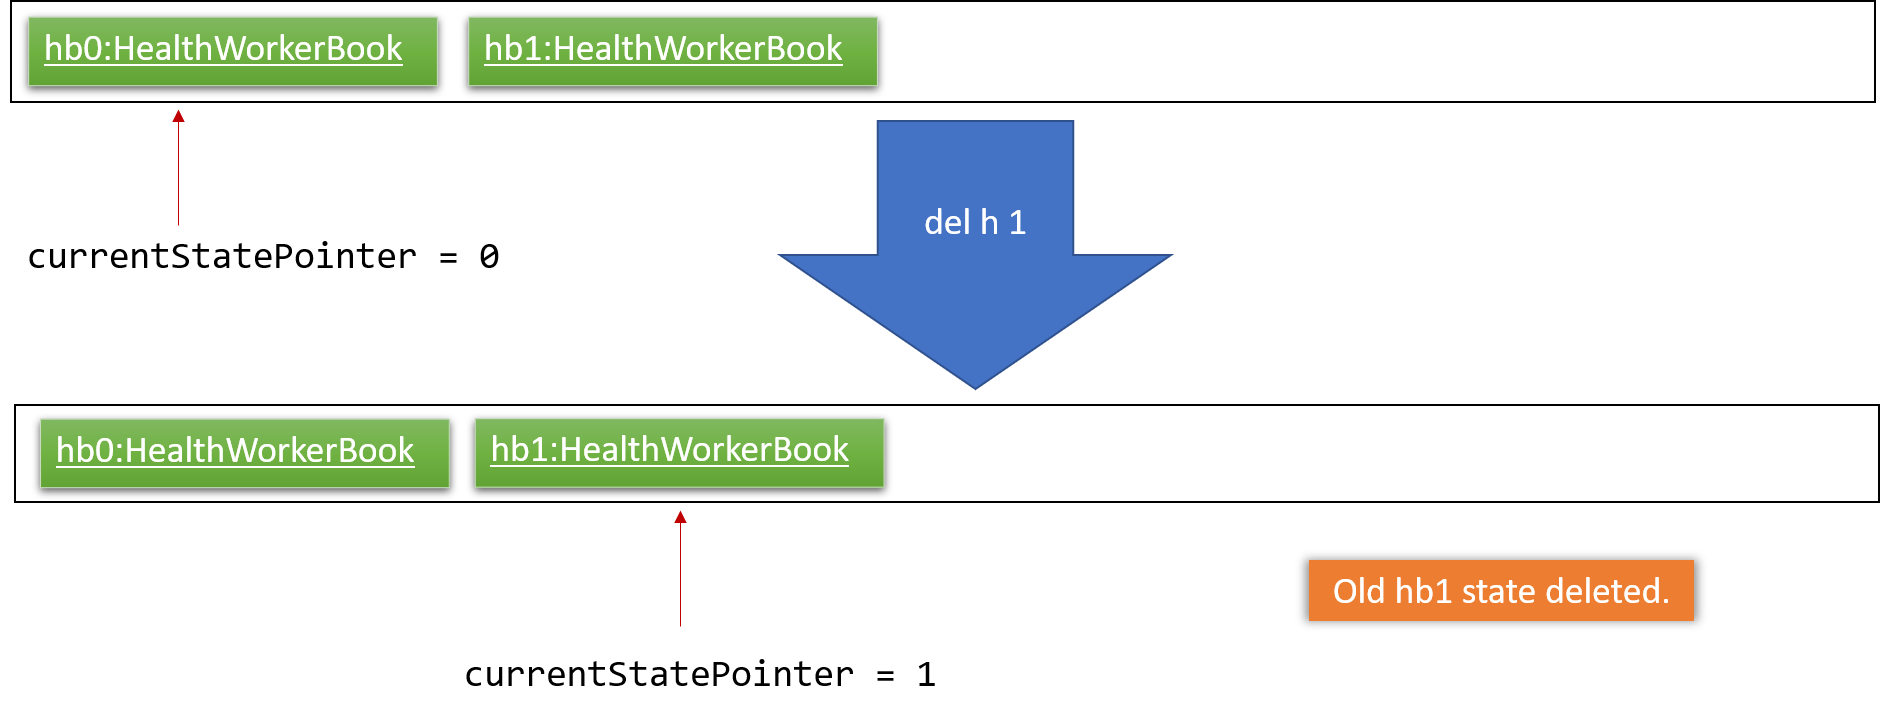
Step 6. The user executes delete h 1, which calls Model#commit(HEALTHWORKER_COMMAND). Since the currentStatePointer is not pointing at the end of the healthWorkerBookStateList, all health worker book states after the currentStatePointer will be purged.
We designed it this way because it no longer makes sense to redo the add n/David … command. This is the behavior that most modern desktop applications follow.
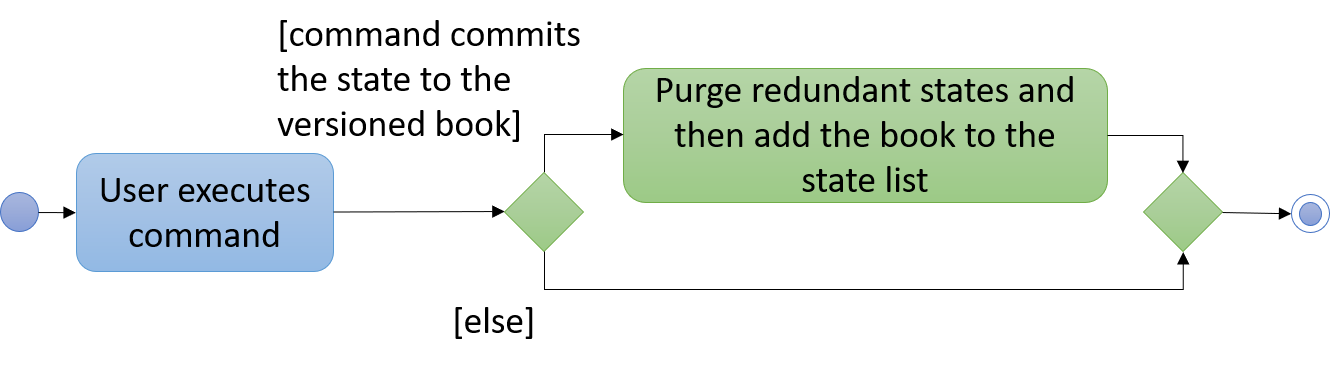
The following activity diagram summarizes what happens when a user executes a new command:
3.8.2. Design Considerations
Aspect: How undo & redo executes
| Implementation | Saves the entire book (Current implementation) | Individual command knows how to undo/redo by itself. |
|---|---|---|
Pros |
Less prone to bugs since the we are switching between different versions of the books. |
Will use less memory (e.g. for |
Cons |
May have performance issues in terms of memory usage especially for large numbers of health workers and requests. |
Every command will have their own implementation of undo and some of them are slow hence it causes performance issues.
(e.g. for |
Aspect: Data structure to support the undo/redo commands
| Implementation | Use a list to store the history of book states.(Current implementation) | Use HistoryManager for undo/redo |
|---|---|---|
Pros |
Undo and redo commands runs faster since it only involves the switching of the state pointer. |
Supports multiple books with the |
Cons |
Need multiple |
|
Aspect: Data structure to handle multiple VersionedBooks
| Implementation | Use a command history to keep track
of the type of book that was modified It is represented as a list of CommandType.(Current implementation) |
Use a list of pairs. Each state is represented as a pair which stores the currentStatePointer of each book. |
|---|---|---|
Pros |
Easily scalable to include more than two books. As the developer can simply add an extra |
Supports commands that change multiple books at once since it keeps track of all states. |
Cons |
Unable to scale as well if there are many commands that modifies multiple books at once. |
Keeping multiple integers takes up more memory as compared to keeping a single enum. |
3.9. Set Reminder Feature
The setreminder command gives the user an option to set a reminder with a customised message.
The reminder is in the form of an AlertDialog and is scheduled to display on the UI by a TimerTask at time
t + current time, where t is time in the format hh:mm:ss.
3.9.1. Current Implementation
The following sequence diagram shows the sequence flow from when the SetReminderCommandParser receives the command and
parses it into a SetReminderCommand object.
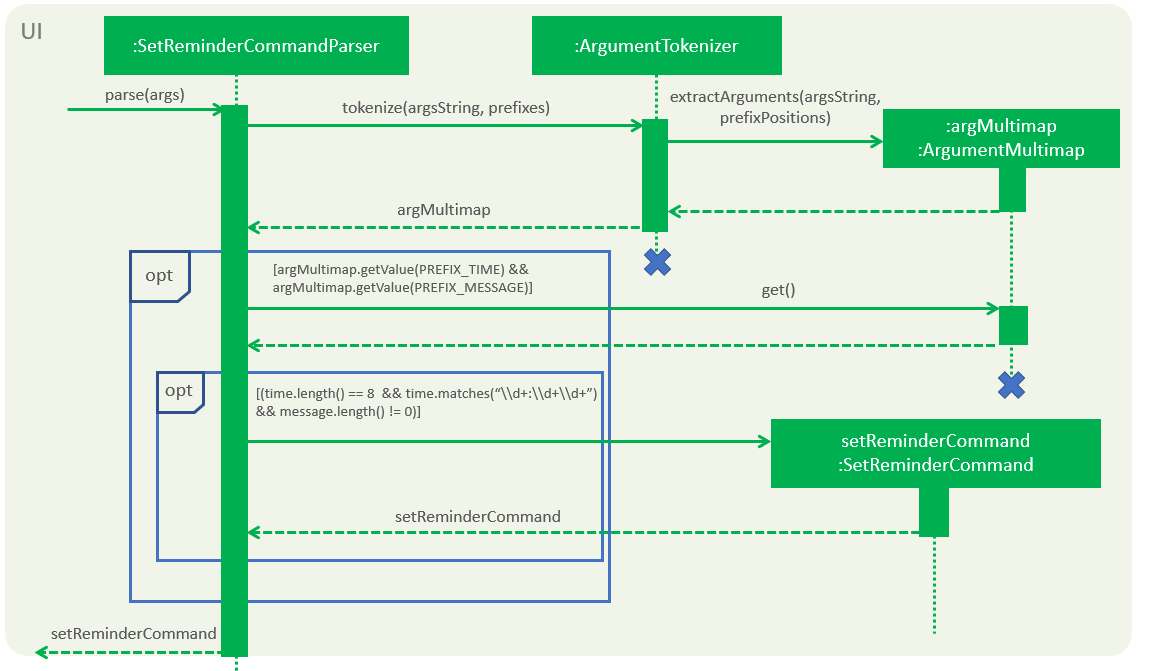
Figure 3.9.1 shows the sequence diagram for the different method invocation calls between the classes
-
When
SetReminderCommandParserreceives theparsecommand, it calls the static methodArgumentTokenizer.tokenizeto extract the arguments from the user input string. -
The
extractArgumentsconstructs and returns anArgumentMultimapbased on the arguments passed in. -
SetReminderCommandParserchecks if there are arguments specified under prefixesPREFIX_TIMEandPREFIX_MESSAGE. -
If it cannot find those arguments, it throws a
ParseExceptionto the calling program. -
If arguments are available, it calls the
getValuemethod ofArgumentMultimapto return the values -
After getting the values, the
SetReminderCommandParserchecks for the validity of the values and if true, calls the constructor ofSetReminderCommand
3.10. Statistics Feature
The statistics mechanism is facilitated by Statistics class, which is a public Java class containing a private static TreeMap data structure and a private static LinkedHashMap data structure. The TreeMap contains key-value pairs, with the names of health conditions as keys and the number of occurrences of each health condition as corresponding values. The key-value pairs in the TreeMap are ordered in lexicographical order, whereas the LinkedHashMap is ordered in descending order by value.
The statistics feature is called every time the user decides to use any request-related commands (such as add request,
edit r, delete r, undo, redo, clr) since statistics need to keep track of every change in the frequency of all health
conditions. Therefore, the Statistics class also carries out the following operations:
-
updateStatistics(): updates statistics with new health condition-related data after add or edit commands are called by the user.
-
deleteStatistics(): updates statistics by specifically removing the health condition-related data that need to be removed after the user calls the delete function.
-
sortStatistics(): sorts statistics by value in descending order of the number of occurrences of each health conditions, and puts the ordered key-value pairs into sortedMap
-
undoRedoStatistics(): clears statistics and sortedMap completely and uses an ObservableList of all requests in the request book to extract all the health conditions and their related number of occurrences. These health conditions and their statistics are then added back to statistics and sortedMap
-
clearStatistics(): renders both statistics and sortedMap empty after the user calls for the clr operation
-
getConditionStatistics(): when the user specifically wants to know the number of occurrences for a particular health condition
Given below is an example of a usage scenario and how the statistics command is executed at each step:
-
Starting up HealthHub: The user launches HealthHub for the first time. The
statisticsandsortedMapwill be initialized as an empty TreeMap and an empty LinkedHashMap respectively. -
Issuing Add Request Command: The user executes
add request n/John Doe i/S8974421C p/98765432 a/123 Brick Road,
#01-01 dt/01-01-2019 14:50:00 c/Diabetes c/Physiotherapy
command to add John Doe to the request book. The aforementioned command also calls updateStatistics(), which takes in a Set<Condition> containing Diabetes Condition and Physiotherapy Condition, and adds an occurrence of one each to statistics. sortStatistics() is then subsequently called to order the health conditions by value in sortedMap. -
Issuing Edit Request Command: The user executes
edit r 1 c/Diabetescommand to make changes to the first request on the request panel in HealthHub. The aforementioned command also calls deleteStatistics(), which removes the statistics of health conditions of the first request in statistics. updateStatistics() is then subsequently called to add the new health condition (which in this case is just Diabetes) to statistics. sortStatistics() is lastly called to order the health conditions by value in sortedMap. -
Issuing Undo Request Command: The user executes
undocommand to reverse his earlieredit r 1 c/Diabetescommand. The aforementioned commands calls undoRedoStatistics(). This method first clears statistics and sortedMap, and then takes an ObservableList of all requests from the request book. All health conditions are retrieved from the requests, and are used to update statistics and sortedMap.
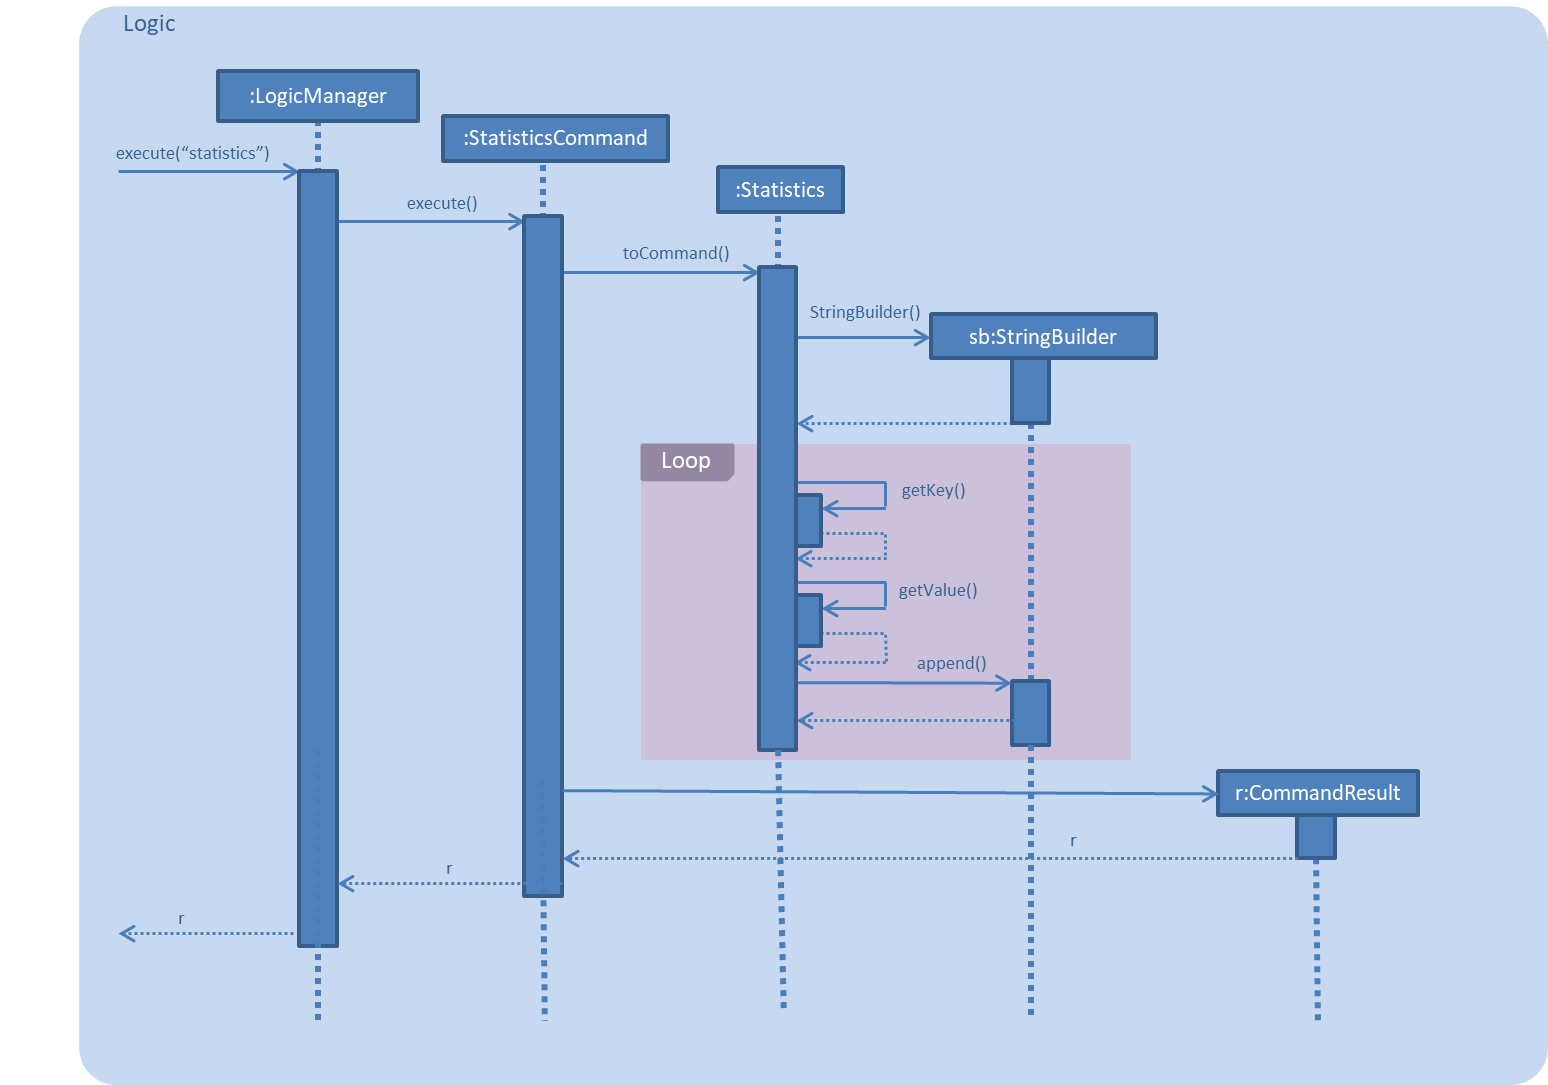
The following sequence shows how the statistics operation works when called by LogicManager:
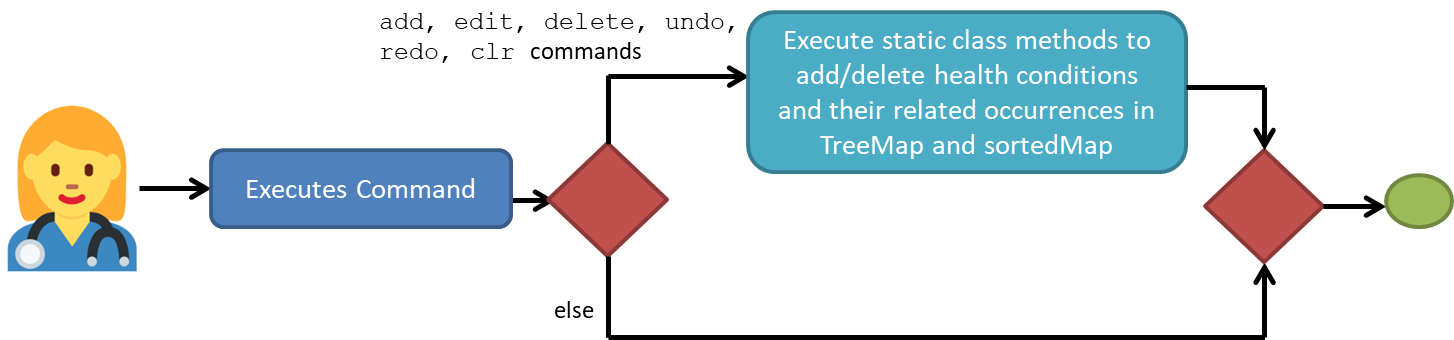
The following activity diagram summarizes what happens when a HealthHub user executes a new command:
3.10.1. Design Considerations
| Aspect | Alternative 1 | Alternative 2 |
|---|---|---|
Choice of data structure for statistics and sortedMap |
statistics: use TreeMap sortedMap: use LinkedHashMap Advantages: 1. Very fast retrieval of information with the TreeMap; guaranteed O(lgn) time complexity for containsKey, get, put, remove operations. 2. TreeMap entries are sorted in the natural ordering of its keys. 3. Having 2 separate data structures (1 to contain alphabetically arranged health conditions and 1 to contain sorted conditions by value) aids in the quicker retrieval of data Disadvantages: 1. Space costly to have 2 separate data structures containing the same information but in different orders |
Use any other reasonable data structure like an ArrayList or a LinkedList Advantages: 1. Very easy to implement and understand 2. Space-efficient to have only 1 list of health conditions and their corresponding number of occurrences Disadvantages: 1. Will need to create another wrapper class around Conditions and their number of occurrences since lists do not allow for key-value pairing 2. Retrieval of information for common operations like getting statistics for a particular condition may not be very fast |
Decision to go with Alternative 1: The team prioritized speed over space since in hospitals, should they want to implement HealthHub, will not have an issue with having memory constraints. But they would definitely want to retrieve data as fast as possible. Moreover, Alternative 1 seems far more scalable for future developments
| Aspect | Alternative 1 | Alternative 2 |
|---|---|---|
How |
The system saves an internal copy of statistics in its storage like a StatisticsBook, modelled after RequestBook or HealthWorkerBook Advantages: 1. When HealthHub is closed and reopened, the old statistics will still exist. Disadvantages: 1. Takes up memory space since statistics will now need to be stored as .json files 2. Speed of retrieval will be lower since HealthHub will need to dig into its storage for data |
Make the statistics class a static class. Advantages: 1. Easier to implement; entirely removes the need for making storage files 2. Speed of retrieval of data will be faster since it does not constantly need to keep digging into storage files Disadvantages: 1. When HealthHub is closed and reopened, the old statistics will disappear since they have not been stored. |
Decision to go with Alternative 2: Since RequestBook was already being stored in the storage component of HealthHub, I found it redundant and space-inefficient to have to create another StatisticsBook to store statistical data, since all of my statistical information can be found from the requests stored in RequestBook. I made sure that whenever request-related commands were being executed (add, edit, delete, undo, redo, clr) statistics was also being updated in tandem so that the statistical data was always accurate in real-time.
To address the issue of losing statistical data upon closing down and reopening HealthHub, I have ensured that statistics and sortedMap are initialized with latest data from the RequestBook during the init() method in the MainApp.
3.11. Autocomplete Feature for CommandBox
The UI component, CommandBox, comes with a TextField component in AB4. For Health Hub, the TextField is replaced
with an AutoCompleteTextField class that extends from the parent class, TextField.
In the AutoCompleteTextField class, it adds an additional listener to the textProperty() of TextField class, to register for when
a text input is being sensed and generates the suggestion box in the form of a ContextMenu to the user.
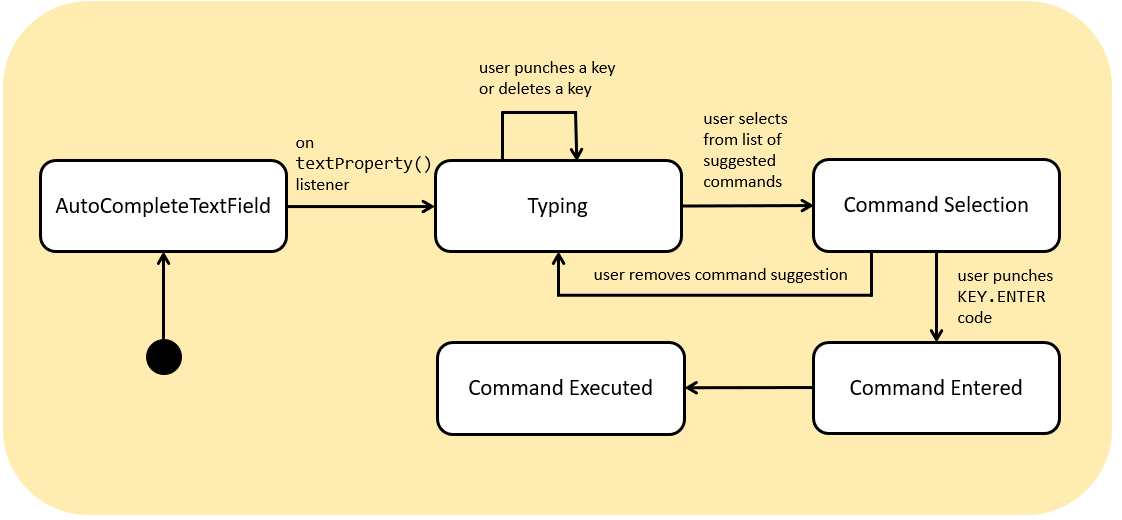
Figure 3.11.1 shows the state machine diagram for the AutoCompleteTextField behaviour when it listens for a user input.
The searching of which commands to display to the user as suggestions is done by iterating the suggestions data structure, which is a TreeSet, then checking
against the user’s input if any of the suggestions starts with the user’s text.
3.11.1. Aspect: Data structure to store the list of commands
| Implementation | Use a TreeSet data structure |
Use a SuffixTree data structure |
|---|---|---|
Pros |
Implements the |
Made for features like autocompletion, allows particularly fast implementation of |
Cons |
Elements contained within the |
Suffix Trees are difficult to comprehend → difficult to implement. |
4. Logging
We are using java.util.logging package for logging. The LogsCenter class is used to manage the logging levels and logging destinations.
-
The logging level can be controlled using the
logLevelsetting in the configuration file (See Section 4.1, “Configuration”) -
The
Loggerfor a class can be obtained usingLogsCenter.getLogger(Class)which will log messages according to the specified logging level -
Currently log messages are output through:
Consoleand to a.logfile.
Logging Levels
-
SEVERE: Critical problem detected which may possibly cause the termination of the application -
WARNING: Can continue, but with caution -
INFO: Information showing the noteworthy actions by the App -
FINE: Details that is not usually noteworthy but may be useful in debugging e.g. print the actual list instead of just its size
4.1. Configuration
Certain properties of the application can be controlled (e.g user prefs file location, logging level) through the configuration file (default: config.json).
5. Documentation
We use asciidoc for writing documentation.
| We chose asciidoc over Markdown because asciidoc, although a bit more complex than Markdown, provides more flexibility in formatting. |
5.1. Editing Documentation
See UsingGradle.adoc to learn how to render .adoc files locally to preview the end result of your edits.
Alternatively, you can download the AsciiDoc plugin for IntelliJ, which allows you to preview the changes you have made to your .adoc files in real-time.
5.2. Publishing Documentation
See UsingTravis.adoc to learn how to deploy GitHub Pages using Travis.
5.3. Converting Documentation to PDF format
We use Google Chrome for converting documentation to PDF format, as Chrome’s PDF engine preserves hyperlinks used in webpages.
Here are the steps to convert the project documentation files to PDF format.
-
Follow the instructions in UsingGradle.adoc to convert the AsciiDoc files in the
docs/directory to HTML format. -
Go to your generated HTML files in the
build/docsfolder, right click on them and selectOpen with→Google Chrome. -
Within Chrome, click on the
Printoption in Chrome’s menu. -
Set the destination to
Save as PDF, then clickSaveto save a copy of the file in PDF format. For best results, use the settings indicated in the screenshot below.

5.4. Site-wide Documentation Settings
The build.gradle file specifies some project-specific asciidoc attributes which affects how all documentation files within this project are rendered.
Attributes left unset in the build.gradle file will use their default value, if any.
|
| Attribute name | Description | Default value |
|---|---|---|
|
The name of the website. If set, the name will be displayed near the top of the page. |
not set |
|
URL to the site’s repository on GitHub. Setting this will add a "View on GitHub" link in the navigation bar. |
not set |
|
Define this attribute if the project is an official SE-EDU project. This will render the SE-EDU navigation bar at the top of the page, and add some SE-EDU-specific navigation items. |
not set |
5.5. Per-file Documentation Settings
Each .adoc file may also specify some file-specific asciidoc attributes which affects how the file is rendered.
Asciidoctor’s built-in attributes may be specified and used as well.
Attributes left unset in .adoc files will use their default value, if any.
|
| Attribute name | Description | Default value |
|---|---|---|
|
Site section that the document belongs to.
This will cause the associated item in the navigation bar to be highlighted.
One of: * Official SE-EDU projects only |
not set |
|
Set this attribute to remove the site navigation bar. |
not set |
5.6. Site Template
The files in docs/stylesheets are the CSS stylesheets of the site.
You can modify them to change some properties of the site’s design.
The files in docs/templates controls the rendering of .adoc files into HTML5.
These template files are written in a mixture of Ruby and Slim.
|
Modifying the template files in |
6. Testing
Testing is an important component of the development pipeline for HealthHub. With each new feature that is implemented, new tests for the fresh feature must also be included to ensure robustness and validation of the feature. In addition, regression testing using existing tests already implemented is also extensively done to ensure that the application functions without unintended side effects. In following sections, we will be elaborating on how you can adopt the testing suite implementation that is in place in HealthHub.
6.1. Running Tests
For the testing phase in HealthHub, we will be using a testing framework called JUnit that is specialised to run tests for software built in Java.
|
Not sure how JUnit works? Head over to the JUnit website and take a look at their User Guide at this link: https://junit.org/junit5/docs/current/user-guide/ |
There are three ways to run tests in HealthHub.
| The most reliable way to run tests is the 3rd one. The first two methods might fail some GUI tests due to platform/resolution-specific idiosyncrasies. |
Method 1: Using IntelliJ JUnit test runner
-
To run all tests, right-click on the
src/test/javafolder and chooseRun 'All Tests' -
To run a subset of tests, you can right-click on a test package, test class, or a test and choose
Run 'ABC'
Method 2: Using Gradle
-
Open a console and run the command
gradlew clean allTests(Mac/Linux:./gradlew clean allTests)
| See UsingGradle.adoc for more info on how to run tests using Gradle. |
Method 3: Using Gradle (headless)
Thanks to the TestFX library we use, our GUI tests can be run in the headless mode. In the headless mode, GUI tests do not show up on the screen. That means the developer can do other things on the Computer while the tests are running.
To run tests in headless mode, open a console and run the command gradlew clean headless allTests (Mac/Linux: ./gradlew clean headless allTests)
6.2. Types of tests
We have two types of tests:
-
GUI Tests - These are tests involving the GUI. They include,
-
System Tests that test the entire App by simulating user actions on the GUI. These are in the
systemtestspackage. -
Unit tests that test the individual components. These are in
seedu.address.uipackage.
-
-
Non-GUI Tests - These are tests not involving the GUI. They include,
-
Unit tests targeting the lowest level methods/classes.
e.g.seedu.address.commons.StringUtilTest -
Integration tests that are checking the integration of multiple code units (those code units are assumed to be working).
e.g.seedu.address.storage.StorageManagerTest -
Hybrids of unit and integration tests. These test are checking multiple code units as well as how the are connected together.
e.g.seedu.address.logic.LogicManagerTest
-
6.3. Generation of test files
We use classes located in the seedu.address.jsonfilegenerator folder to generate JSON
test files.
Developers are free to modify the code within the classes to generate healthworker/request
book containing the respective data they need for tests by using the HealthWorkerBuilder
and RequestBuilder classes
All test file generator classes contains a main function and hence can be ran independently by compiling the file.
6.4. Troubleshooting Testing
Problem: HelpWindowTest fails with a NullPointerException.
-
Reason: One of its dependencies,
HelpWindow.htmlinsrc/main/resources/docsis missing. -
Solution: Execute Gradle task
processResources.
7. Dev Ops
As HealthHub grows larger as a software development project due to addition of new features or overhauling of existing ones, we have also deployed the use of various build automation tools in order to efficiently integrate the components of HealthHub together during the build process. This allows of greater efficiency and scalability when introducing new implementations into the project.
7.1. Build Automation
See UsingGradle.adoc to learn how to use Gradle for build automation on your local machine for efficient project builds.
7.2. Continuous Integration
We use Travis CI and https://www.appveyor .com/[AppVeyor] to perform Continuous Integration on our projects to allow for more seamless and parallel coding performance between team members. See UsingTravis.adoc and UsingAppVeyor.adoc for more details.
7.3. Coverage Reporting
Coverage represents the portion of the software codebase that has been tested for using various testing frameworks, such as JUnit. This allows the development to track how extensive the testing of new features are to ensure that their features are correctly implemented with minimal bugs.
We use Coveralls to track the code coverage of our projects. See UsingCoveralls.adoc for more details.
7.4. Documentation Previews
When a pull request has changes to asciidoc files, you can use Netlify to see a preview of how the HTML version of those asciidoc files will look like when the pull request is merged. See UsingNetlify.adoc for more details.
7.5. Making a Release
Here are the steps to create a new release.
-
Update the version number in
MainApp.java. -
Generate a JAR file using Gradle.
-
Tag the repo with the version number. e.g.
v0.1 -
Create a new release using GitHub and upload the JAR file you created.
7.6. Managing Dependencies
With a huge number of different components in HealthHub, the project also includes use of various third party libraries to efficiently support new and existing features in HealthHub, some of which includes for example the Jackson library for JSON parsing. Managing these dependencies can be automated using Gradle. For example, Gradle can download the dependencies automatically, which is better than these alternatives:
-
Include those libraries in the repo (this bloats the repo size)
-
Require developers to download those libraries manually (this creates extra work for developers)
Appendix A: Product Scope
Target user profile:
-
Administrative staff in hospitals and healthcare organizations that also manage requests from and services for home-care patients
-
Administrative staff that are comfortable with typing on a CLI, as well as a GUI.
-
Aims to streamline the performance of keeping records of home-care patients, and also assigning health staff to requests using technological means.
Value proposition: manage requests from home-care patients, and handle assignment of healthstaff for these requests much faster and efficient than traditional methods of pen and paper documentation.
Appendix B: User Stories
Priorities: High (must have) - * * *, Medium (nice to have) - * *, Low (unlikely to have) - *
| Priority | As a … | I want to … | So that I can… |
|---|---|---|---|
|
new user |
see usage instructions |
refer to instructions when I forget how to use the App |
|
user |
Check the details of new or unassigned requests |
See what requests have yet to be assigned a health worker and what type of request it is |
|
user |
Assign a health worker to an existing request |
Accept a pending request by assigning a new health worker who has the skillset to fufill the request at the time of the request |
|
user |
Complete a request that is currently ongoing |
Label the request as completed once the health worker completes his/her task |
|
user |
Register a new health worker |
|
|
user |
delete a healthworker |
remove healthworkers that are no longer in our hospital database |
|
user |
find a healthworker by name |
locate details of persons without having to go through the entire list |
|
user |
Check the professional details of existing health workers |
Identify which health worker has the appropriate skillsets and certificates to fufill the corresponding requests |
|
user |
Register a new request |
Key in a new request from a patient with the specific request and patient details |
|
user handling many requests at once |
Identify the number of requests and their proportion |
Immediately see which type of requests have the most demand |
|
user |
filter requests by type |
Perform assignment of staff of tasks of a specific type |
|
user |
Delete a request |
Remove a request that is no longer valid or cancelled |
Appendix C: Use Cases
(For all use cases below, the System is the HealthHub and the Actor is the user, unless specified otherwise)
Use case: Add health worker
-
User wants to register a new health worker.
-
1.a. User enters the relevant health worker details into the system.
-
2. Application registers the new health worker
-
Use case ends.
-
-
3a. The same health worker already exists inside the Application.
-
3a1. Application shows an error message.
Use case ends.
-
Use case: Delete health worker
MSS
-
User requests to list health workers
-
Application shows a list of health workers
-
User requests to delete a specific health worker in the list
-
Application deletes the person
Use case ends.
Extensions
-
2a. The list is empty.
Use case ends.
-
3a. The given index is invalid.
-
3a1. Application shows an error message.
Use case resumes at step 2.
-
Use case: Add request
-
User wants to register a new request.
-
1.a. User enters the relevant request details into the system.
-
2. Application registers the new request
Use case ends.
-
3a. The same request already exists inside the Application.
-
3a1. Application shows an error message.
Use case ends.
-
Use case: Assign requests to worker
-
User wants to view the list of open requests.
-
1.a. User does not know command for listing requests:
-
1.a1. User enters the help command to look up the command for listing all requests.
-
-
Application displays list of open requests.
-
User wants to assign a health worker to a request.
-
3.a. No free health worker during the specified time slot for assignment:
-
3.a1 Request is left open.
-
-
Use case ends.
-
3.b.No health worker with the necessary skillsets/certifications:
-
3.b1. Request is left open. Use case ends.
-
-
Free health worker that has the necessary certifications and with the closest proximity to the patient address will be assigned to the request.
Use case ends.
Use case: Delete requests
-
User wants to delete a request that is expired or invalid.
-
1.a. Specified request is not in Application
-
Use case ends.
-
-
Application deletes the specified request.
-
Use case ends.
-
Appendix D: Non Functional Requirements
-
Should work on any mainstream OS as long as it has Java
9or higher installed. -
Should be able to hold up to 1000 persons without a noticeable sluggishness in performance for typical usage.
-
A user with above average typing speed for regular English text (i.e. not code, not system admin commands) should be able to accomplish most of the tasks faster using commands than using the mouse.
Appendix F: Instructions for Manual Testing
In case of circumstances where manual testing needs to be done for HealthHub, this section provides instructions on how to get started on manual testing for the application.
| These instructions only provide a starting point for testers to work on; testers are expected to do more exploratory testing. |
F.1. Launch and Shutdown
-
Initial launch
-
Download the jar file and copy into an empty folder
-
Double-click the jar file
Expected: Shows the GUI with a set of sample contacts. The window size may not be optimum.
-
-
Saving window preferences
-
Resize the window to an optimum size. Move the window to a different location. Close the window.
-
Re-launch the app by double-clicking the jar file.
Expected: The most recent window size and location is retained.
-
F.2. Adding a `HealthWorker
-
Enter a valid
add healthworkercommand with all compulsory fields containing valid values. For example, you may tryadd healthworker n/Dog Terr p/92837710 i/S98817471Z o/NUH s/GENERAL_PRACTICE s/ORTHOPAEDIC
Message showing the successful addition of theHealthWorkerwill be displayed in the command terminal, as well as the details of the newly addedHealthWorker. The newly addedHealthWorkeris now reflected immediately in the GUI shown at the end of the list on the right. -
Enter an invalid
add healthworkercommand. Some examples include:-
Missing fields: add healthworker p/92837710 i/S98817471Z o/NUH s/GENERAL_PRACTICE s/ORTHOPAEDIC` (Missing name)
An error message representing invalid command format will be displayed on the command terminal, as well as the valid command format for theadd healthworkercommand. -
Invalid fields: add healthworker n/Dog Terr p/92837710 i/A111Z o/NUH s/GENERAL_PRACTICE s/ORTHOPAEDIC` (Invalid NRIC format)
An error message is displayed that tells the user of the incorrect format for a field whose value does not follow the correct format. If there are multiple, the incorrect format of the first field whose value is invalid is shown.
-
F.3. Editing a HealthWorker
-
Enter a valid
edit healthworkercommand with a valid index, and at least one field to edit with a valid value. For example, you may tryedit healthworker 1 p/91234567 n/John Doe
A status message that denotes the successful modification of the details of an existingHealthWorkeris shown on the command terminal. In addition, the modified details of the `HealthWorker is immediately reflected on the list in the GUI. -
Enter an invalid
edit healthworkercommand. Some examples include:-
Invalid index:
edit healthworker -1 n/John
An error message displays which informs the user that the index provided is invalid. -
No field specified: `edit healthworker 1 `
An error message displays informing the user that at least one field to edit must be provided. -
Invalid field:
edit healthworker 1 p/helloworld
An error message displays informing the user that the specific field specified containing invalid values does not conform the field format. If multiple invalid fields are entered, the first invalid one will be chosen as the invalid format.
-
F.4. Deleting a HealthWorker
-
Deleting a
HealthWorkerwhile allHealthWorkerare listed:-
Prerequisites: List all
HealthWorkerusing thelist healthworkercommand. MultipleHealthWorkerin the list. -
Test case:
delete healthworker 1
Expected: FirstHealthWorkeris deleted from the list. Details of the deletedHealthWorkershown in the status message. Timestamp in the status bar is updated. -
Test case:
delete healthworker 0
Expected: NoHealthWorkeris deleted. Error details shown in the status message. Status bar remains the same. -
Other incorrect delete commands to try:
delete, delete healthworker`,delete healthworker x(where x is larger than the list size),delete healthworker y(where y is negative)
Expected: Similar to previous.
-
-
Deleting a
HealthWorkerafter a validfilter healthworkercommand is issued:-
Prerequisite: Enter the command
filter healthworker s/physiotherapyto display onlyHealthWorkerthat specialise in physiotherapy. Other valid variants of thefilter healthworkercommand may be used in place of this. -
Test case:
delete healthworker 1
Expected: FirstHealthWorkeris deleted from the filtered list. Details of the deletedHealthWorkershown in the status message. Timestamp in the status bar is updated. -
Test case:
delete healthworker 0
Expected: NoHealthWorkeris deleted. Error details shown in the status message. Status bar remains the same. -
Other incorrect delete commands to try:
delete, delete healthworker`,delete healthworker x(where x is larger than the filtered list size),delete healthworker y(where y is negative)
Expected: Similar to previous.
-
F.5. Saving data
-
Dealing with missing/corrupted data files
-
If data file is missing, the app will retrieve a list of sample data internally. It will be saved upon exit.
-
If any of the data is corrupted, the app will start with empty books, adding a health worker or request will overwrite the corrupted file.
-
F.6. Undoing a command
-
Undo a command that has been executed
-
Prerequisites: A command that modifies the data has been executed already, for example
delete r 1. -
Test case:
undo
Expected: The request has been deleted will appear back inside the list in its original position. -
Test case:
undowithout any prerequisites
Expected: The application will show an error message: No more commands to undo!
-
F.7. Redoing a command
-
Redo an undone command
-
Prerequisites: A successful undo command have to be executed already.
-
Test case:
redo
Expected: The application will redo the undone command. -
Test case:
redowithout prerequisites
Expected: The application will show an error message: No more commands to redo!
-